How to Create a New Schedule
This documentguide willwalks walkmanagers youthrough thruthe howprocess toof Buildcreating a new schedule fromin scratch,Ingage publish,Scheduling. send,It covers how to add shifts, review availability and printtime-off it.requests, publish the schedule, and share it with your team.
Step 1: Open the Schedule View

Confirm you are viewingdefault, thecorrectschedule will open to the current week.-
Use the date
selectorcontrols at the top of the screen to move forward or backward between weeks. Make sure you are viewing the correct week before adding or editing shifts.
Step 2: Review Availability & Time-Off Requests
Before adding shifts:shifts, review employee availability and any time-off requests on the schedule.
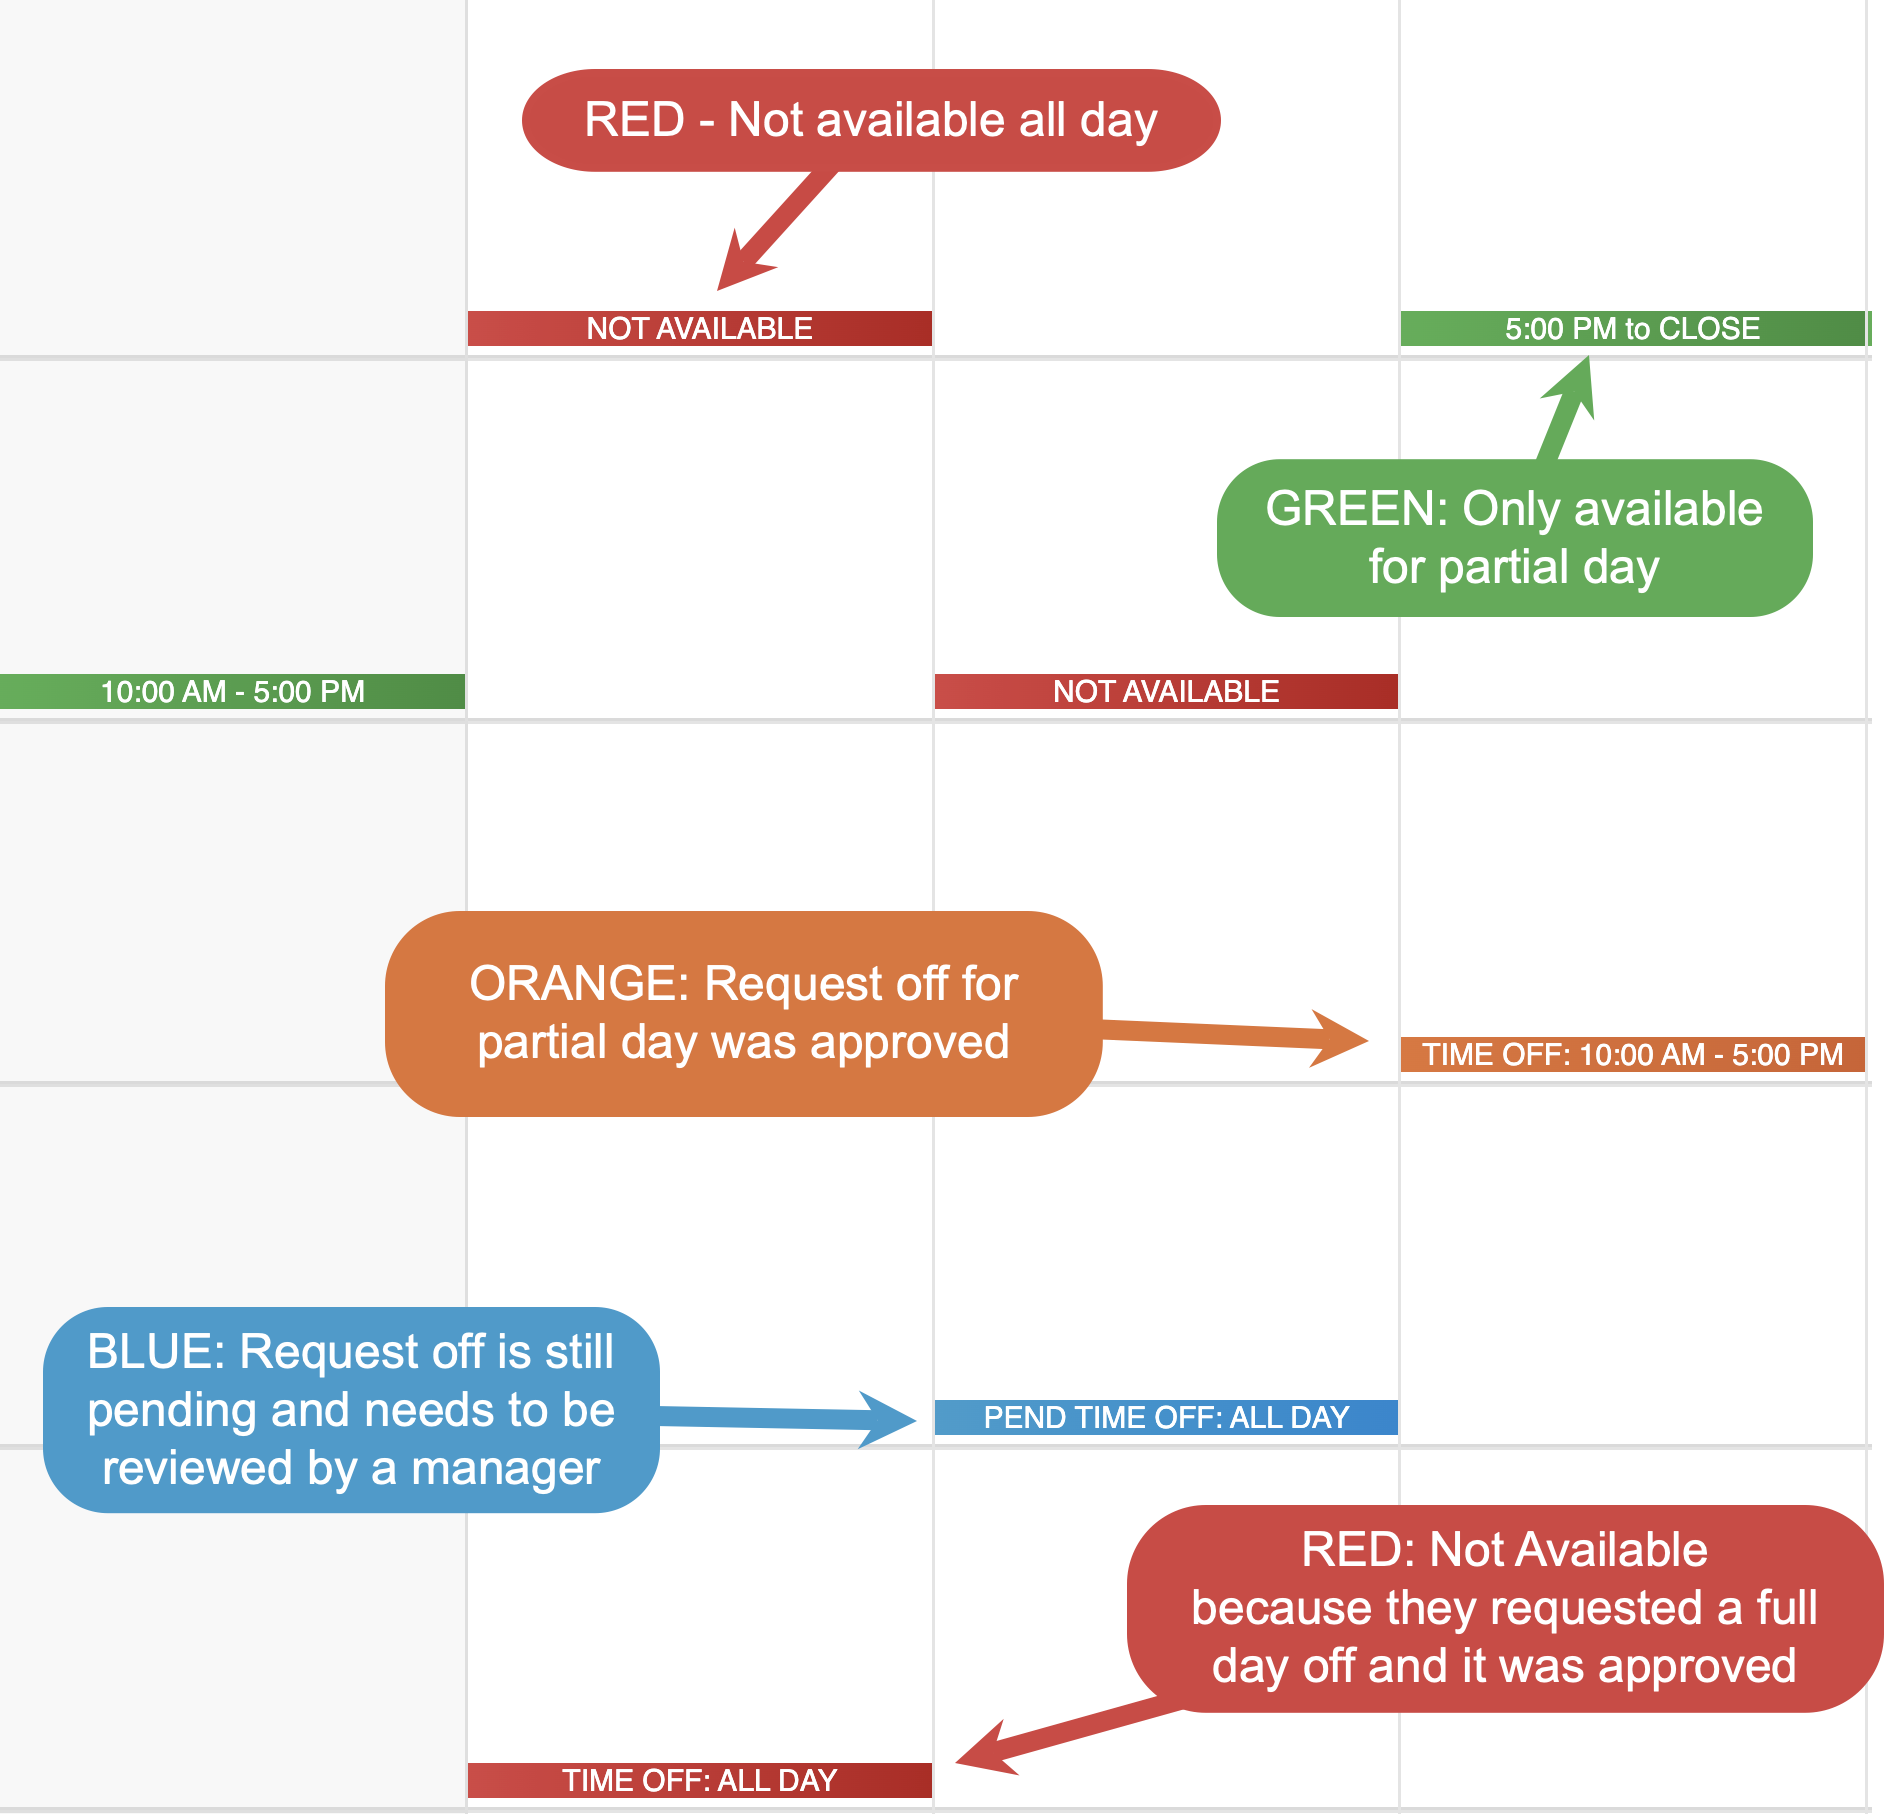
Availability and time-off requests are color-coded to make conflicts easy to spot:
-
LookAvailabilityfor color-coded availability blocksColors- RED - Not available for the whole day
- GREEN - Only available for part of the day
-
Check for approved time-offTime-Off requests colors- RED - Request off for the full day was approved
- ORANGE - Request off for part of the day was approved
- BLUE - Still has a pending request off that needs to be reviewed by a manager
EnsureAny notes added by the employee will also be visible on the schedule.
Reviewing this information first helps ensure employees are only scheduled only when they are available and prevents conflicts before shifts are added.
Step 3: Add Shifts
- add
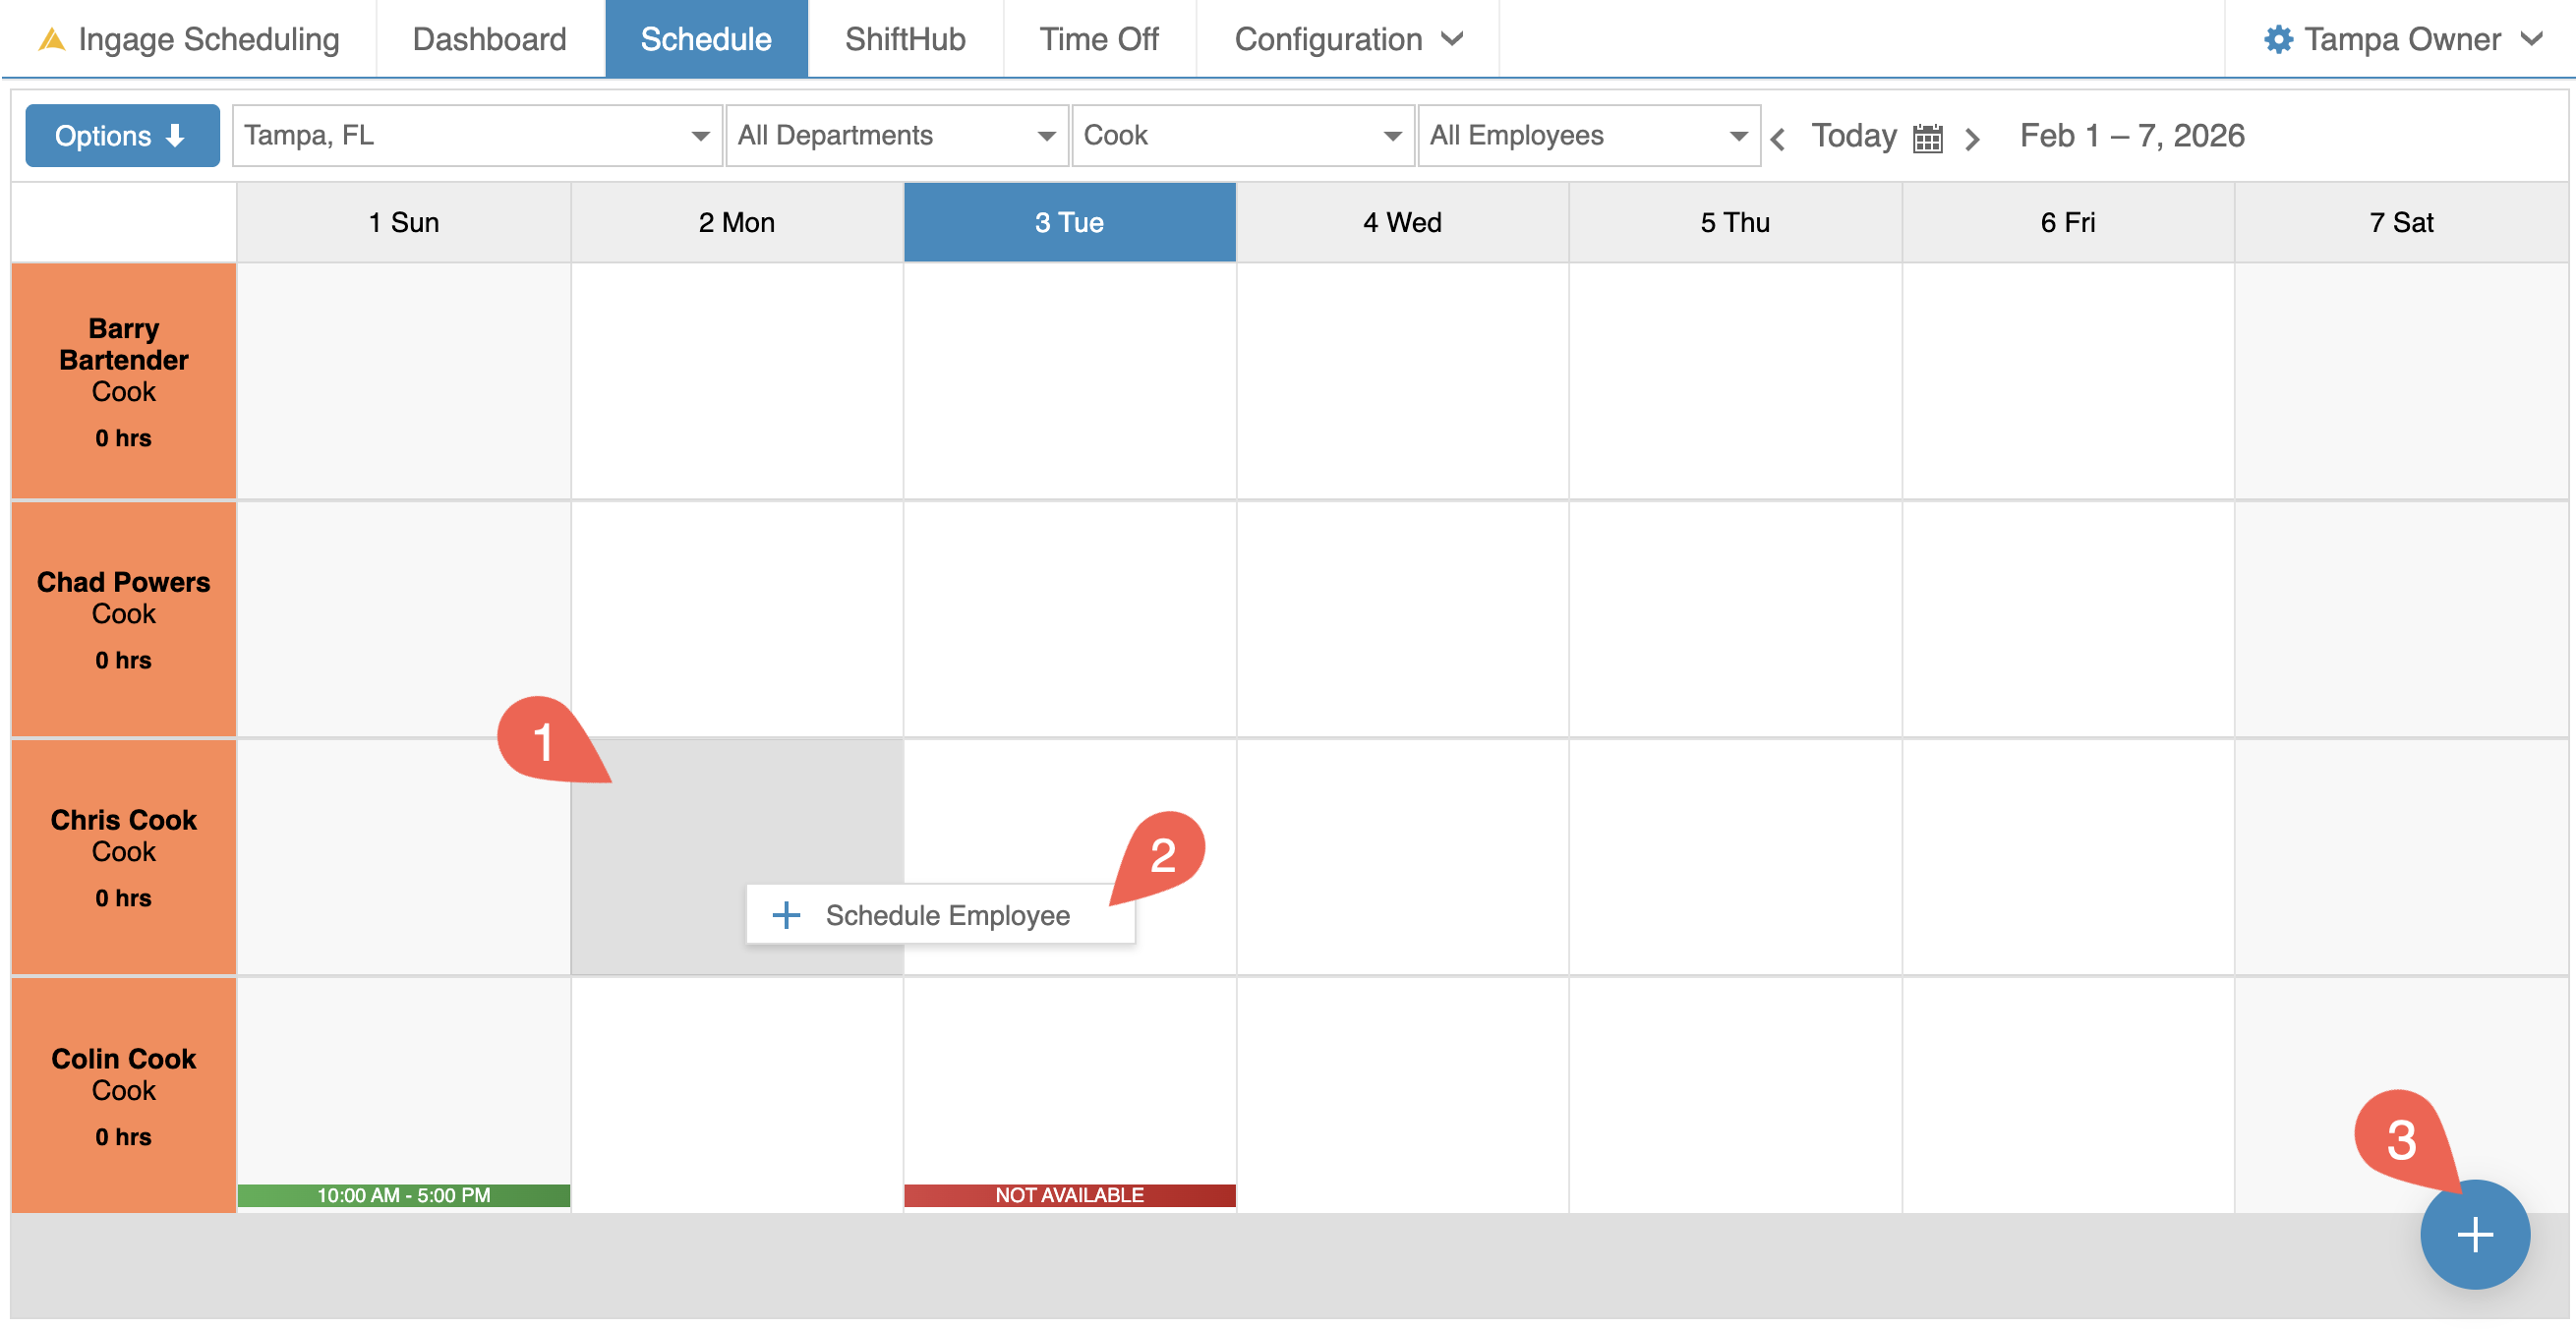
Clickaonshift, start by selecting the day and employee row where you wanttotheaddshift.a shift - There are
3three ways to open the ShiftEditorEditor:(1)DoubleDouble-click in the schedule cell
(2)RightRight-click in the cell and
clickselecton the "ScheduleEmployee"Employee(3)SelectSingle-click the cell
andtoClickhighlight it, then click theBlueblue +circlebutton in thebottombottom-rightrightcorner of the screen
To
Any of these options will open the Shift Editor so you can enter the shift details.
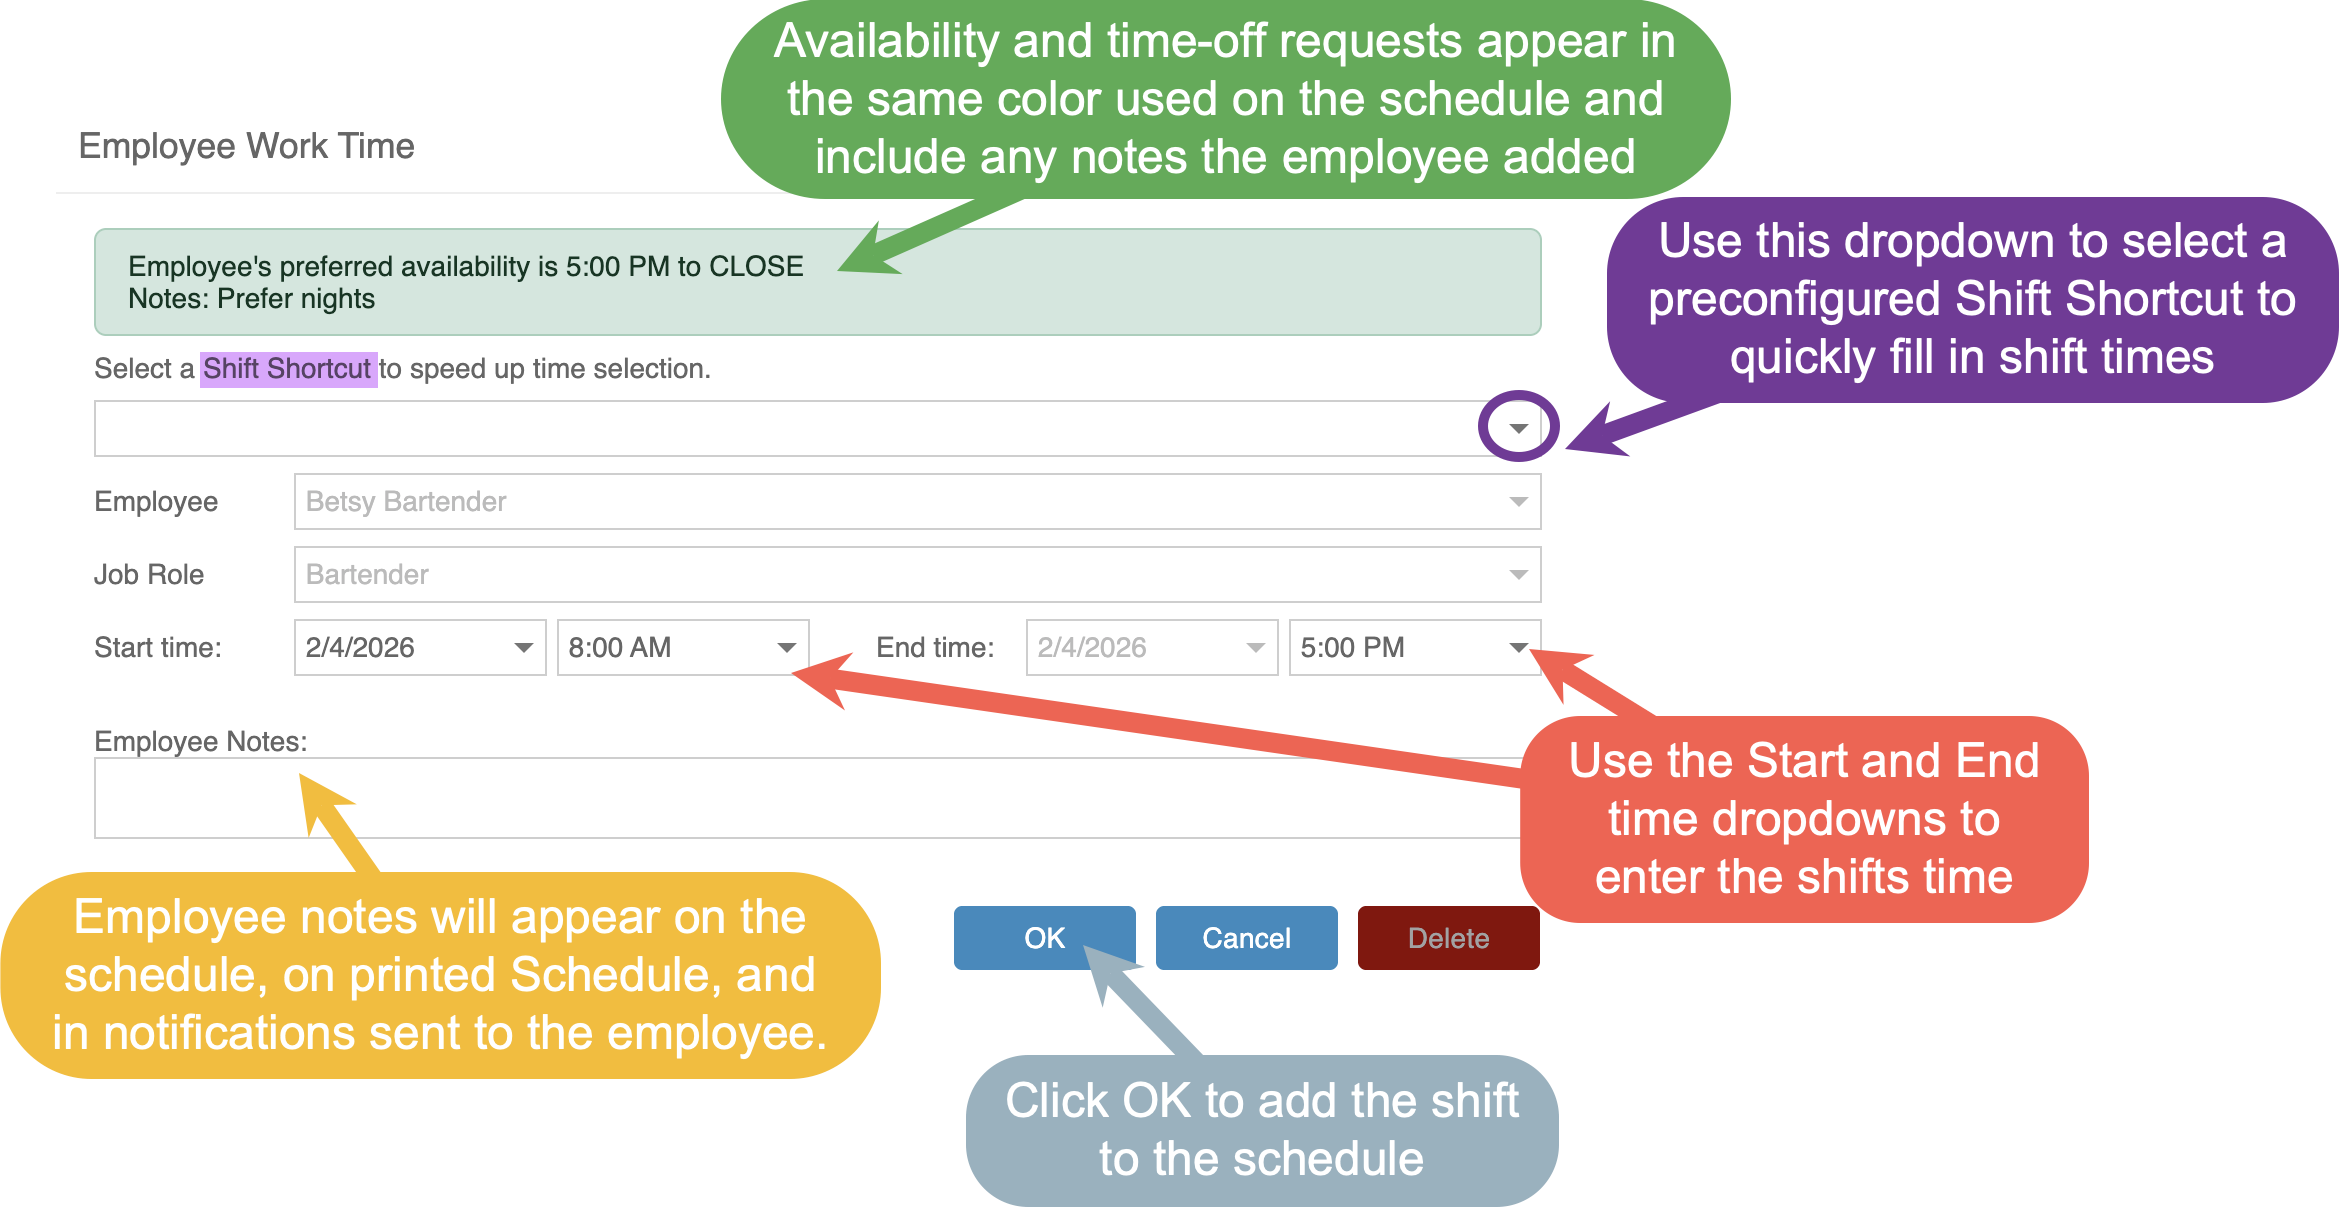
UseIn the Shift
EditorEditor, you can either select a Shift Shortcut toenterautomatically fill in preset start and end times, or manually enter the shift times.To enter times manually:
ToenterClick
in times you can useinto thedropStartdownsorandEndscrolltimethrufield-
Begin typing a time to quickly filter the list
to(forfindexample, typing 9 will show 9:00 AM, 9:30 AM, etc.) -
Select the correct time
Start typing in a number and it will filter all times that use that numberType in 3pm as an example and all times duringfrom the3pmdropdownhour will appear to choose from
You can also add notes to the shift if you need to
explainprovidemoreadditionalaboutdetails,it,suchlikeasthesectionsection,assignments,1stfirst or2ndsecond cut, or closer. These notes will appear on thePrintedprinted schedule, inthenotificationsthat issent to the employee, andonintheirthe employee app when they view their schedule.Click OK to add the shift to the
scheduleschedule.
Once a shift is
added,added:it- The shift will appear in light tan, indicating that the shift is unpublished.
- If an employee works more than one job role, scheduling them for a shift in one role will cause that shift to appear in their other job role rows in light gray. These "Shadow Shifts" help you quickly see when an employee is already scheduled, preventing accidental overlapping shifts.

Step 4: Review, Adjust & Balance Coverage
-
Review each day
forto ensure proper staffing -
Check total scheduled hours per employee
- Total hours for each shift
canarebedisplayedfound onin thebottombottom-right corner of theshiftshift. - Total weekly hours for each
employeesemployeeweek can be foundappear on theleftleft-hand side under theemployeesemployee’s name and job role.EachThis totalis the total forincludes all shiftsunderacross all jobrolesroles.
- Total hours for each shift
-
Make adjustments as needed to avoid over- or under-scheduling
To EditEditing a shift- Shifts can be edited at any time before
theirthey are published.- Double click on the shift to get back into the shift editor
- Right click on the shifts and click "Open" or "Delete"
- Select the
shiftshift, and theBlueblue circleatin thebottombottom-rightrightcorner willturnchangeintotoshiftshow options to edit or deleteit.the shift.
- A
Shiftshift can be dragged to a different day- Click and hold
ontheshiftshift,andthen drag itbackleftandorforthright to move iton the same employee butto a different day for the same employe
- Click and hold
- A
Shiftshift can be dragged to a different job role- Click and hold
ontheshiftshift,andthen drag it upandor down to move it tothe Same employee buta different job role for the same employee
- Click and hold
You can use the Filters along the top to narrow in on specific departments, job roles, or individual employees.
- Filters
arework from topdownto-bottomif- If a
higherhigher-levelonefilter changes after alowerlower-levelonefilterhasisbeen set thenset, the loweronesfilters will reset toALLAll - If a
higherhigher-levelonefilterchangesisbeforeset first, only compatible options will appear in the loweronesfilters
havebeen set then it will filter out only things that are compatible - If a
Step 5: Publish the Schedule

Once the schedule is
ready:ready, the next step is to publish it.To publish the schedule:
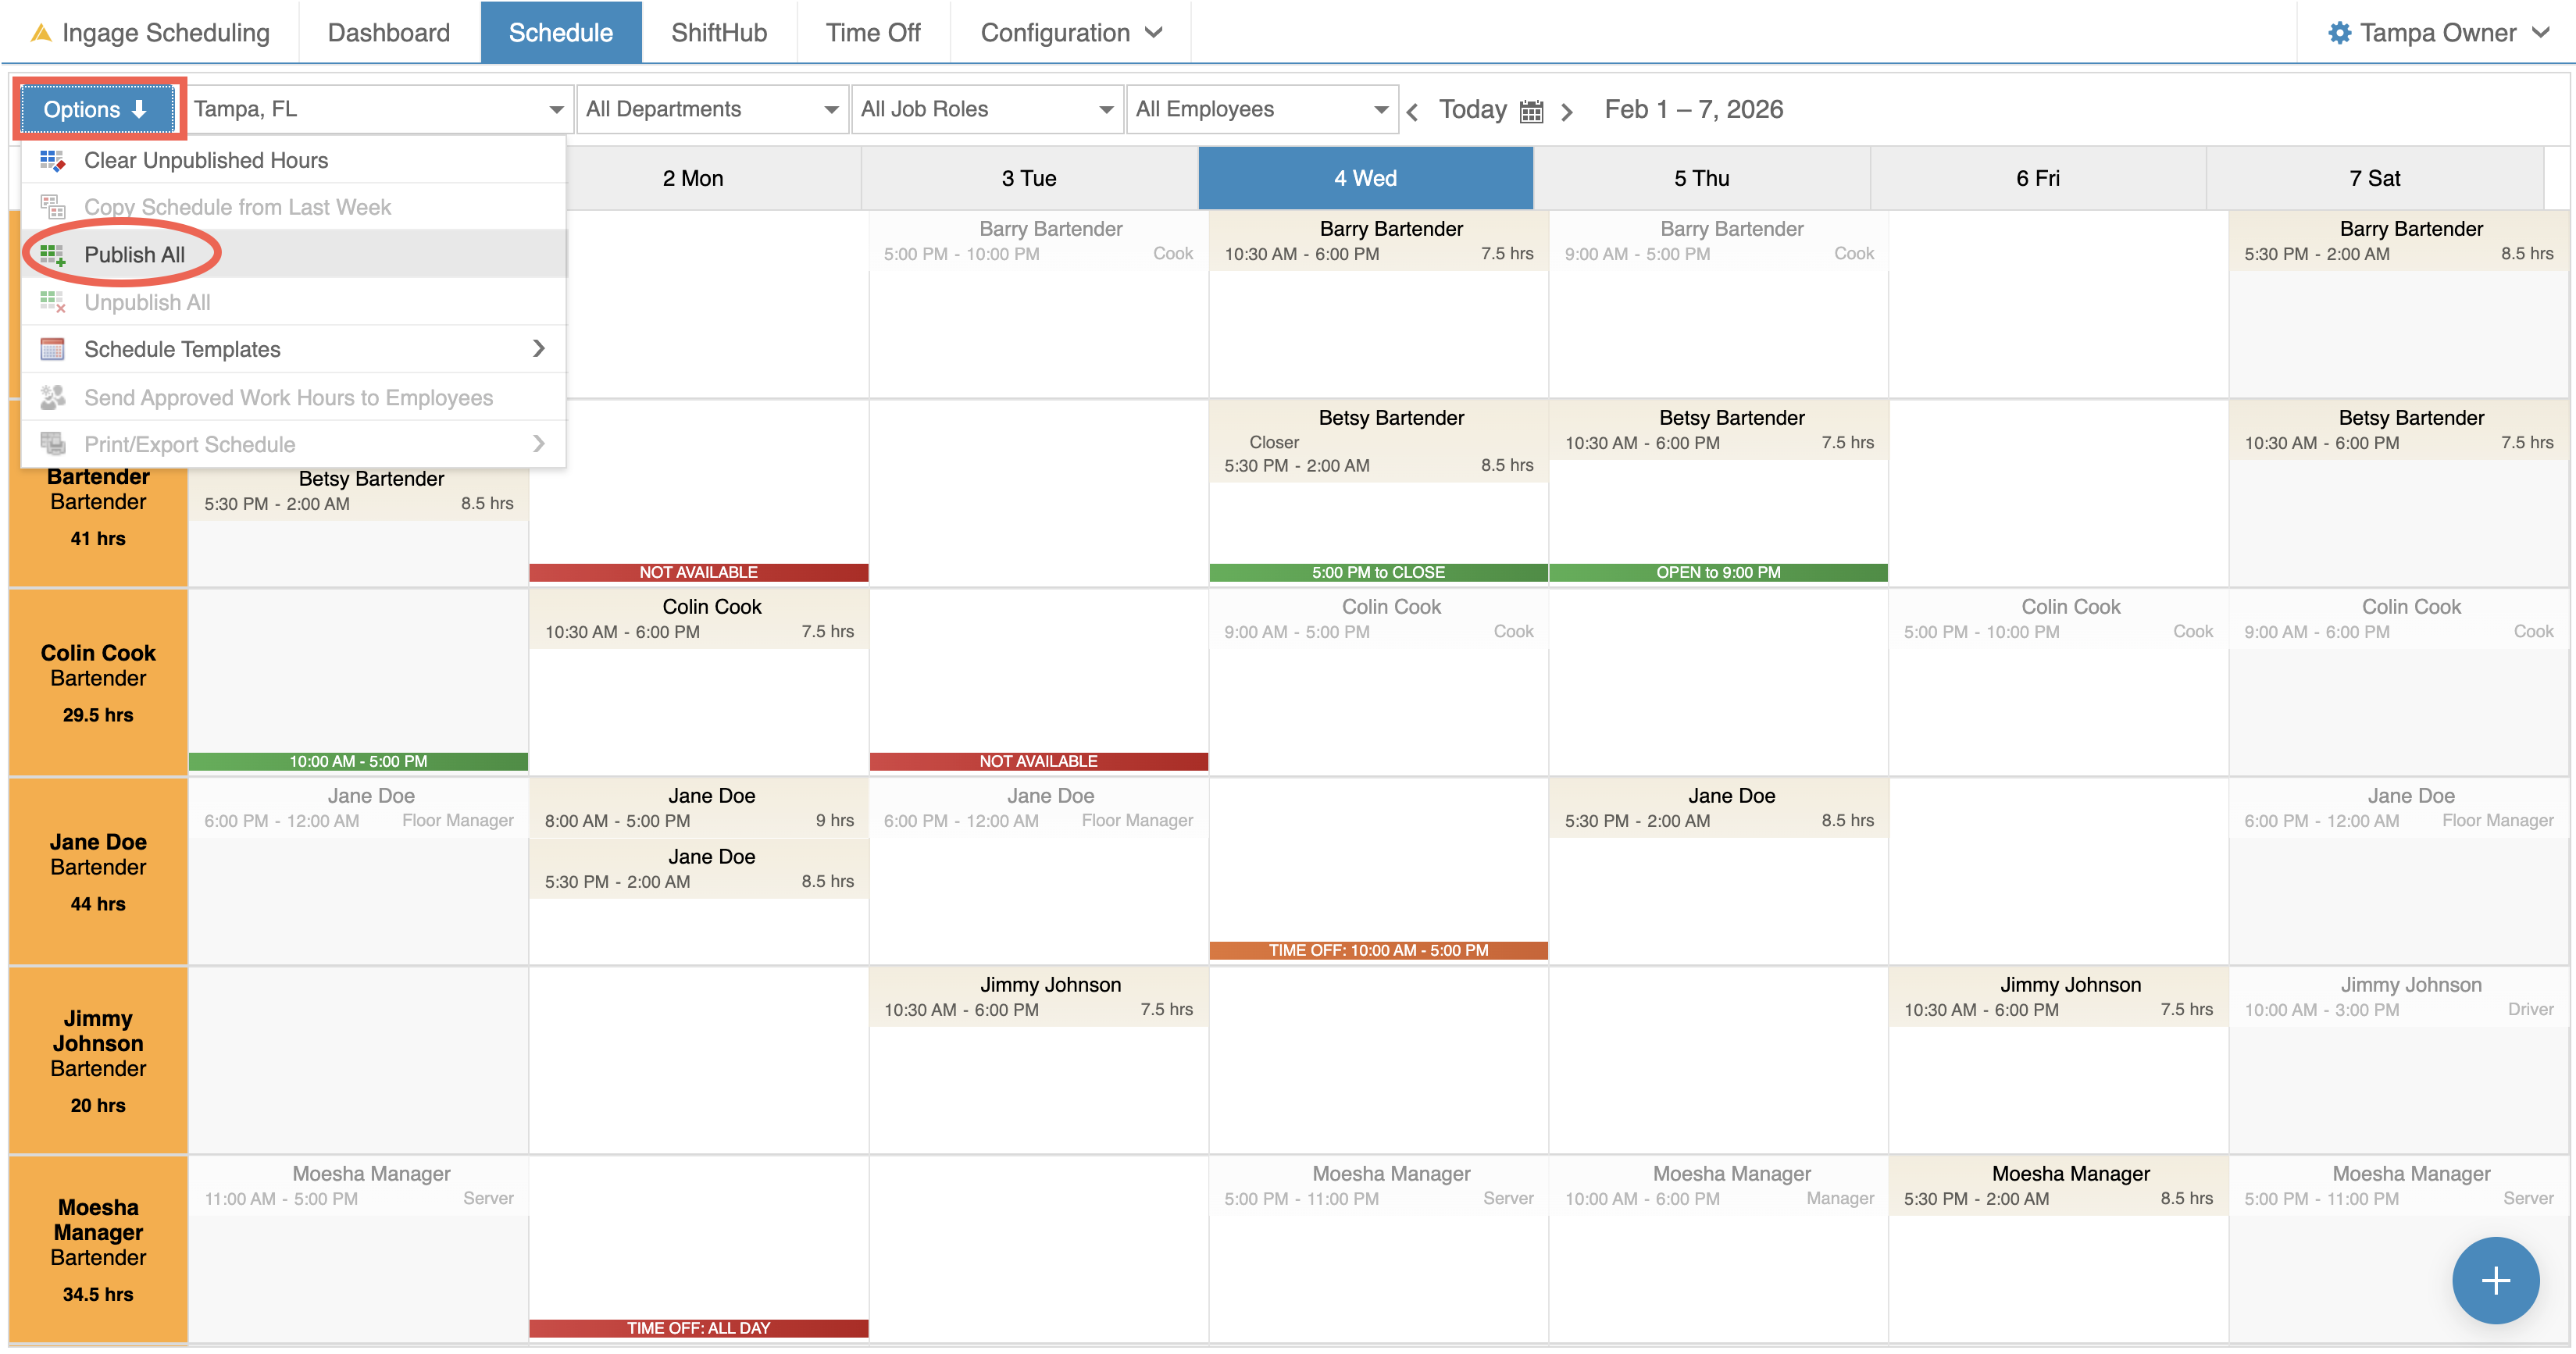
-
Click Options in the top-left corner
-
Select "Publish All"
When the schedule is published:
ThisAll shifts will change
all the shiftsfromalight tan toalight blue
ThisEmployees will
updateimmediately see their scheduled hours in the appright-
withoutNo
themnotificationsbeingare sentoutto employees at this time


Publishing allows you to make the schedule visible to employees while giving you control over when notifications are sent.
Step 6: Send the Schedule to Employees

WhenOnce youthe areschedule has been published and you’re ready to notify employees, you can send a notification to the employees:schedule directly from the Schedule view.
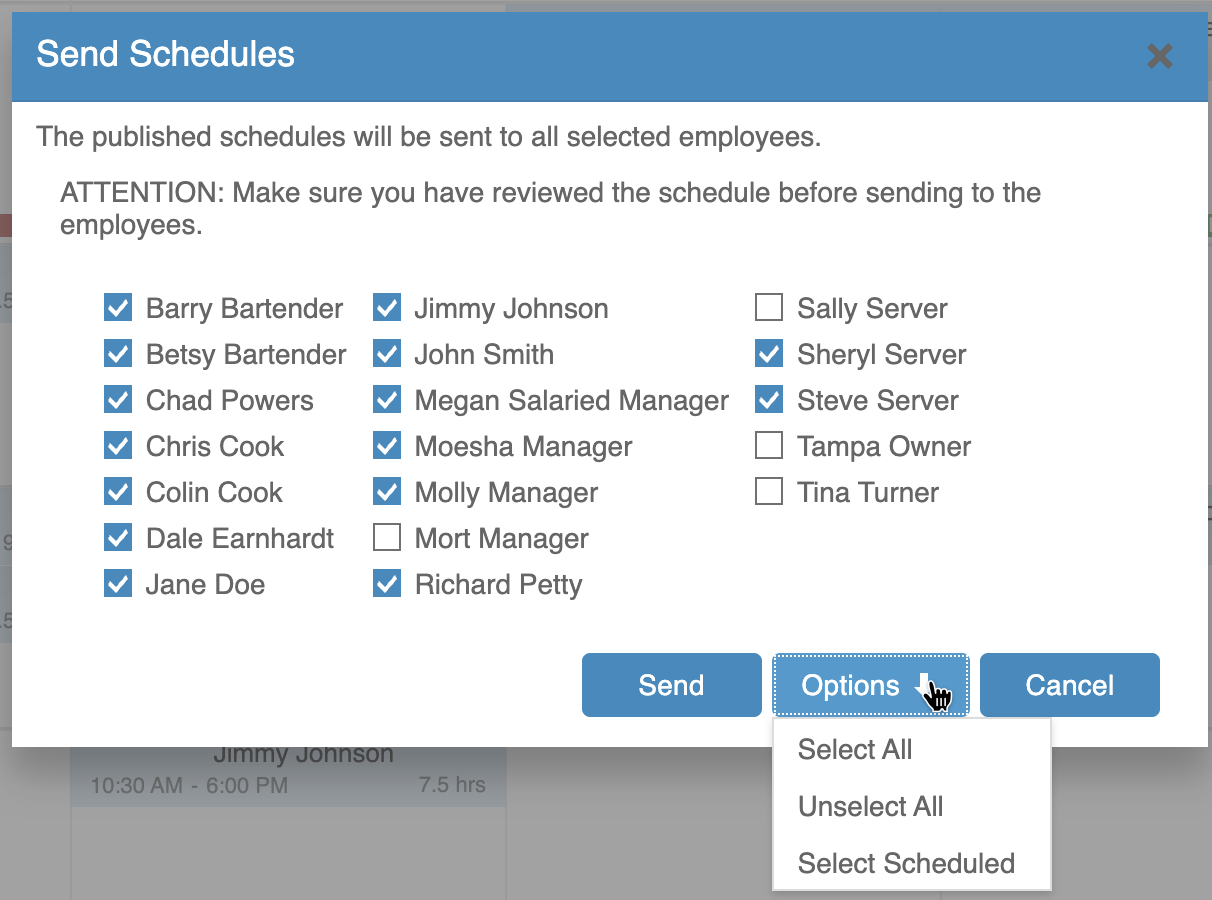
To send the schedule:
-
Click
optionsOptions in the top-left corner -
Select "Send Approved Work Hours to Employees"
-
By
Default it will auto selectdefault, all employeeswho havewith a scheduled shift during that timeperiod.period will be selected -
Use the
Optionsoptions to Select All, Unselect All, or reselectallonly the scheduled employees
Once you'you’ve selected the employees you'dyou likewant to notify, click Send
After the schedule is sent:
-
A
Mailmail icon willbeappearadded toin thetoptop-left corner of each shift
to -
thatThis
thetheiriconscheduledindicates the schedule has been sent tothem

Employees will receive their schedules viaby email or text, based offon their preferrednotification settingspreferences.
Step 7: Print the Schedule
If you need a physical copy of the schedule for posting or reference, you can print it directly from the Schedule view.
To print the schedule:
-
Click
optionsOptions in the top-left corner-
Select "
Print/Print / Export Schedule"
You can choose to print the schedule
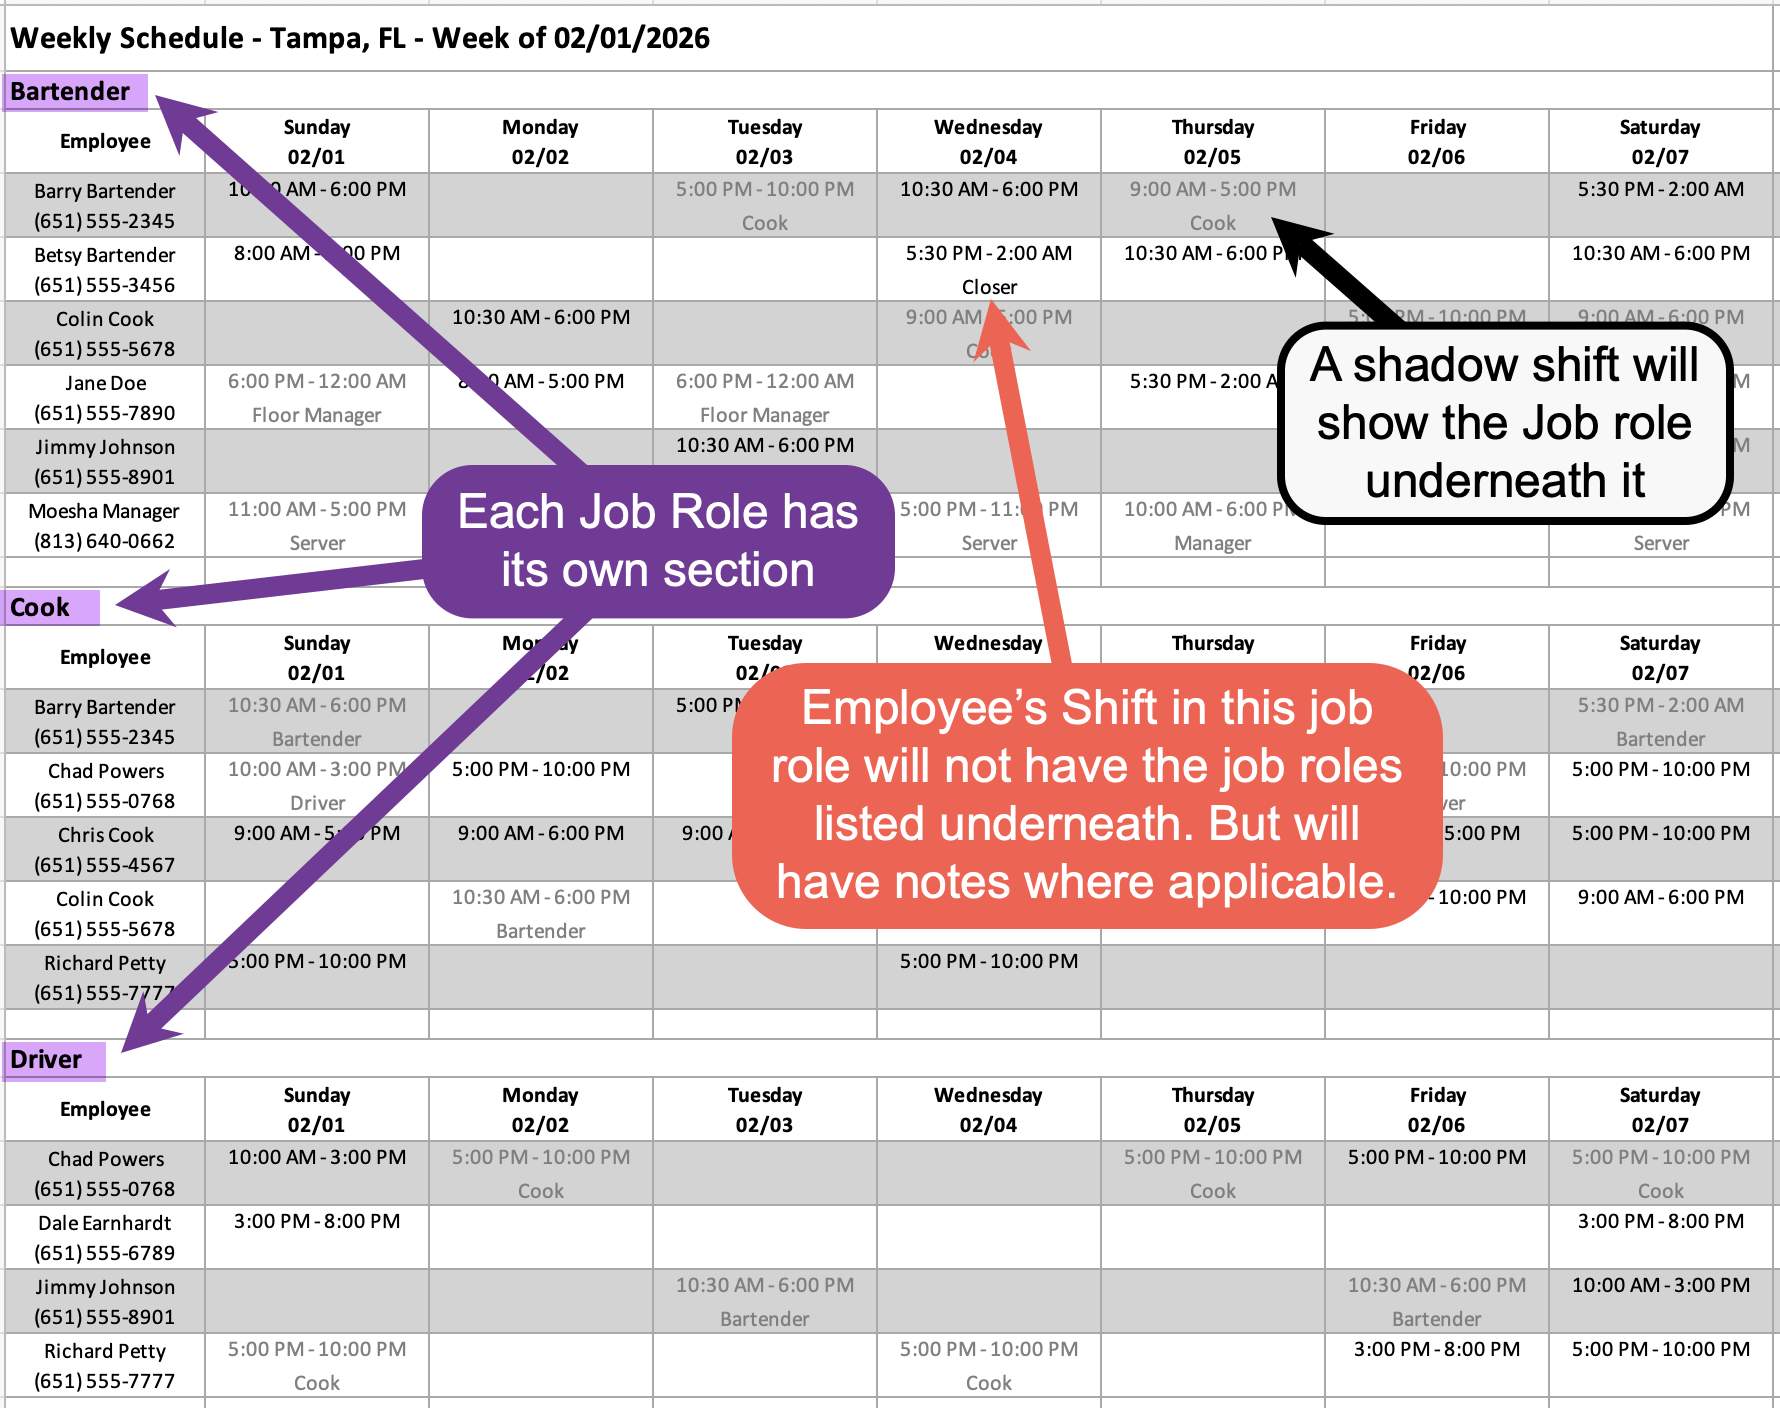
2in two differentwaysformats:"By
Employee"Employee--
willEmployees
listareemployeeslisted alphabeticallyand -
theirEach
Jobshift displays the employee’s job role underthierthe shift,Soso they knowwhatwhichjobpositionroletheythey'reare working thatday.day
Whichput-
"By Job
Role"Role--
willThe
havescheduledifferentissectiongroupedforintoeachsections by jobrole.role -
Employees with
more than onemultiple jobroleroles will appear in eachsection.applicable section -
Shadow shifts will also
appearappear,on the schedule soallowing employeesstill only needtolookviewatall of their scheduled shifts in one sectionof the printed scheduled to see all the shifts they work. Soand avoidthemmissingone onadifferentshiftsection.
listedelsewhere

Will-

Optional Step
Each week ifIf you don'don’t want to createbuild a new schedule from scratch each week, you can use one of ourthe twooptions shortcuts.below to speed up the process.
-
Copy Last
Week'Week’s ScheduleOncan copy the previous week’s schedule into aBLANKblankweekweek.you can choose toTo copy last
weeksweek’sscheduleschedule:to this weeks schedule-
Click
optionsOptions in the top-left corner -
Select "Copy Schedule from Last Week"
ItThis will
bringcopyover everyall publishedshiftshifts from the previous weekItwillAvailability changes and time-off requests for the current week are not
taketaken into accountAvailability-
orBe
requestssureoffto review and adjust the schedule after copying to account forthisanycurrentchangesweek.
You
Important things to know:
changesSoyou will need to double check that you make adjustments for those change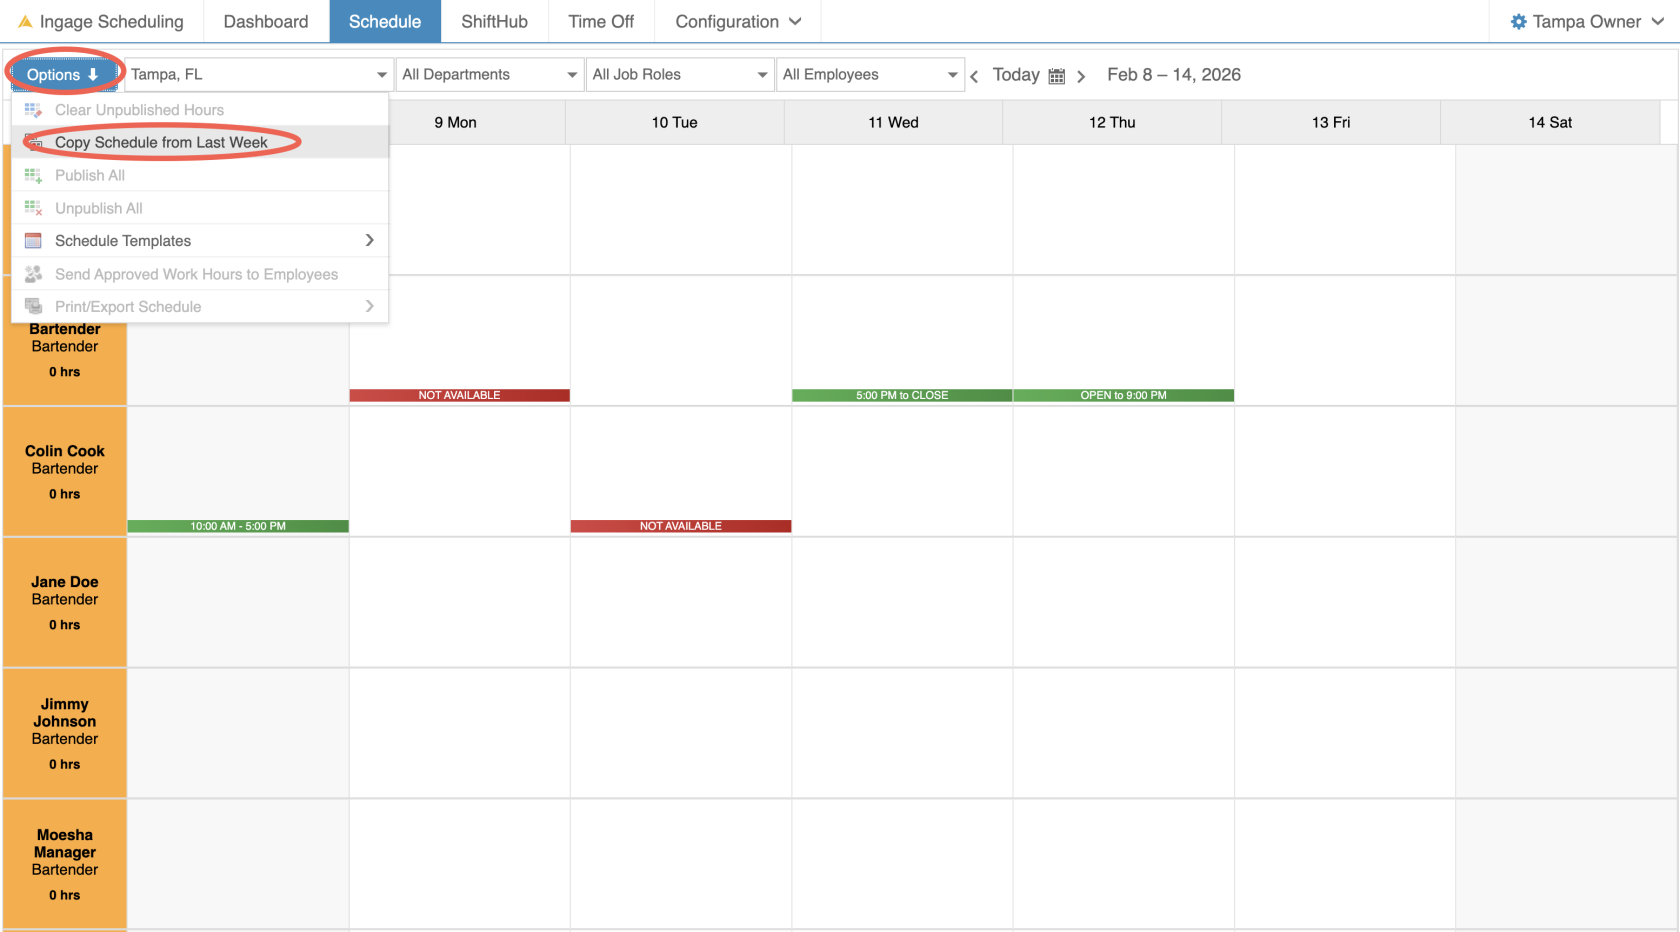

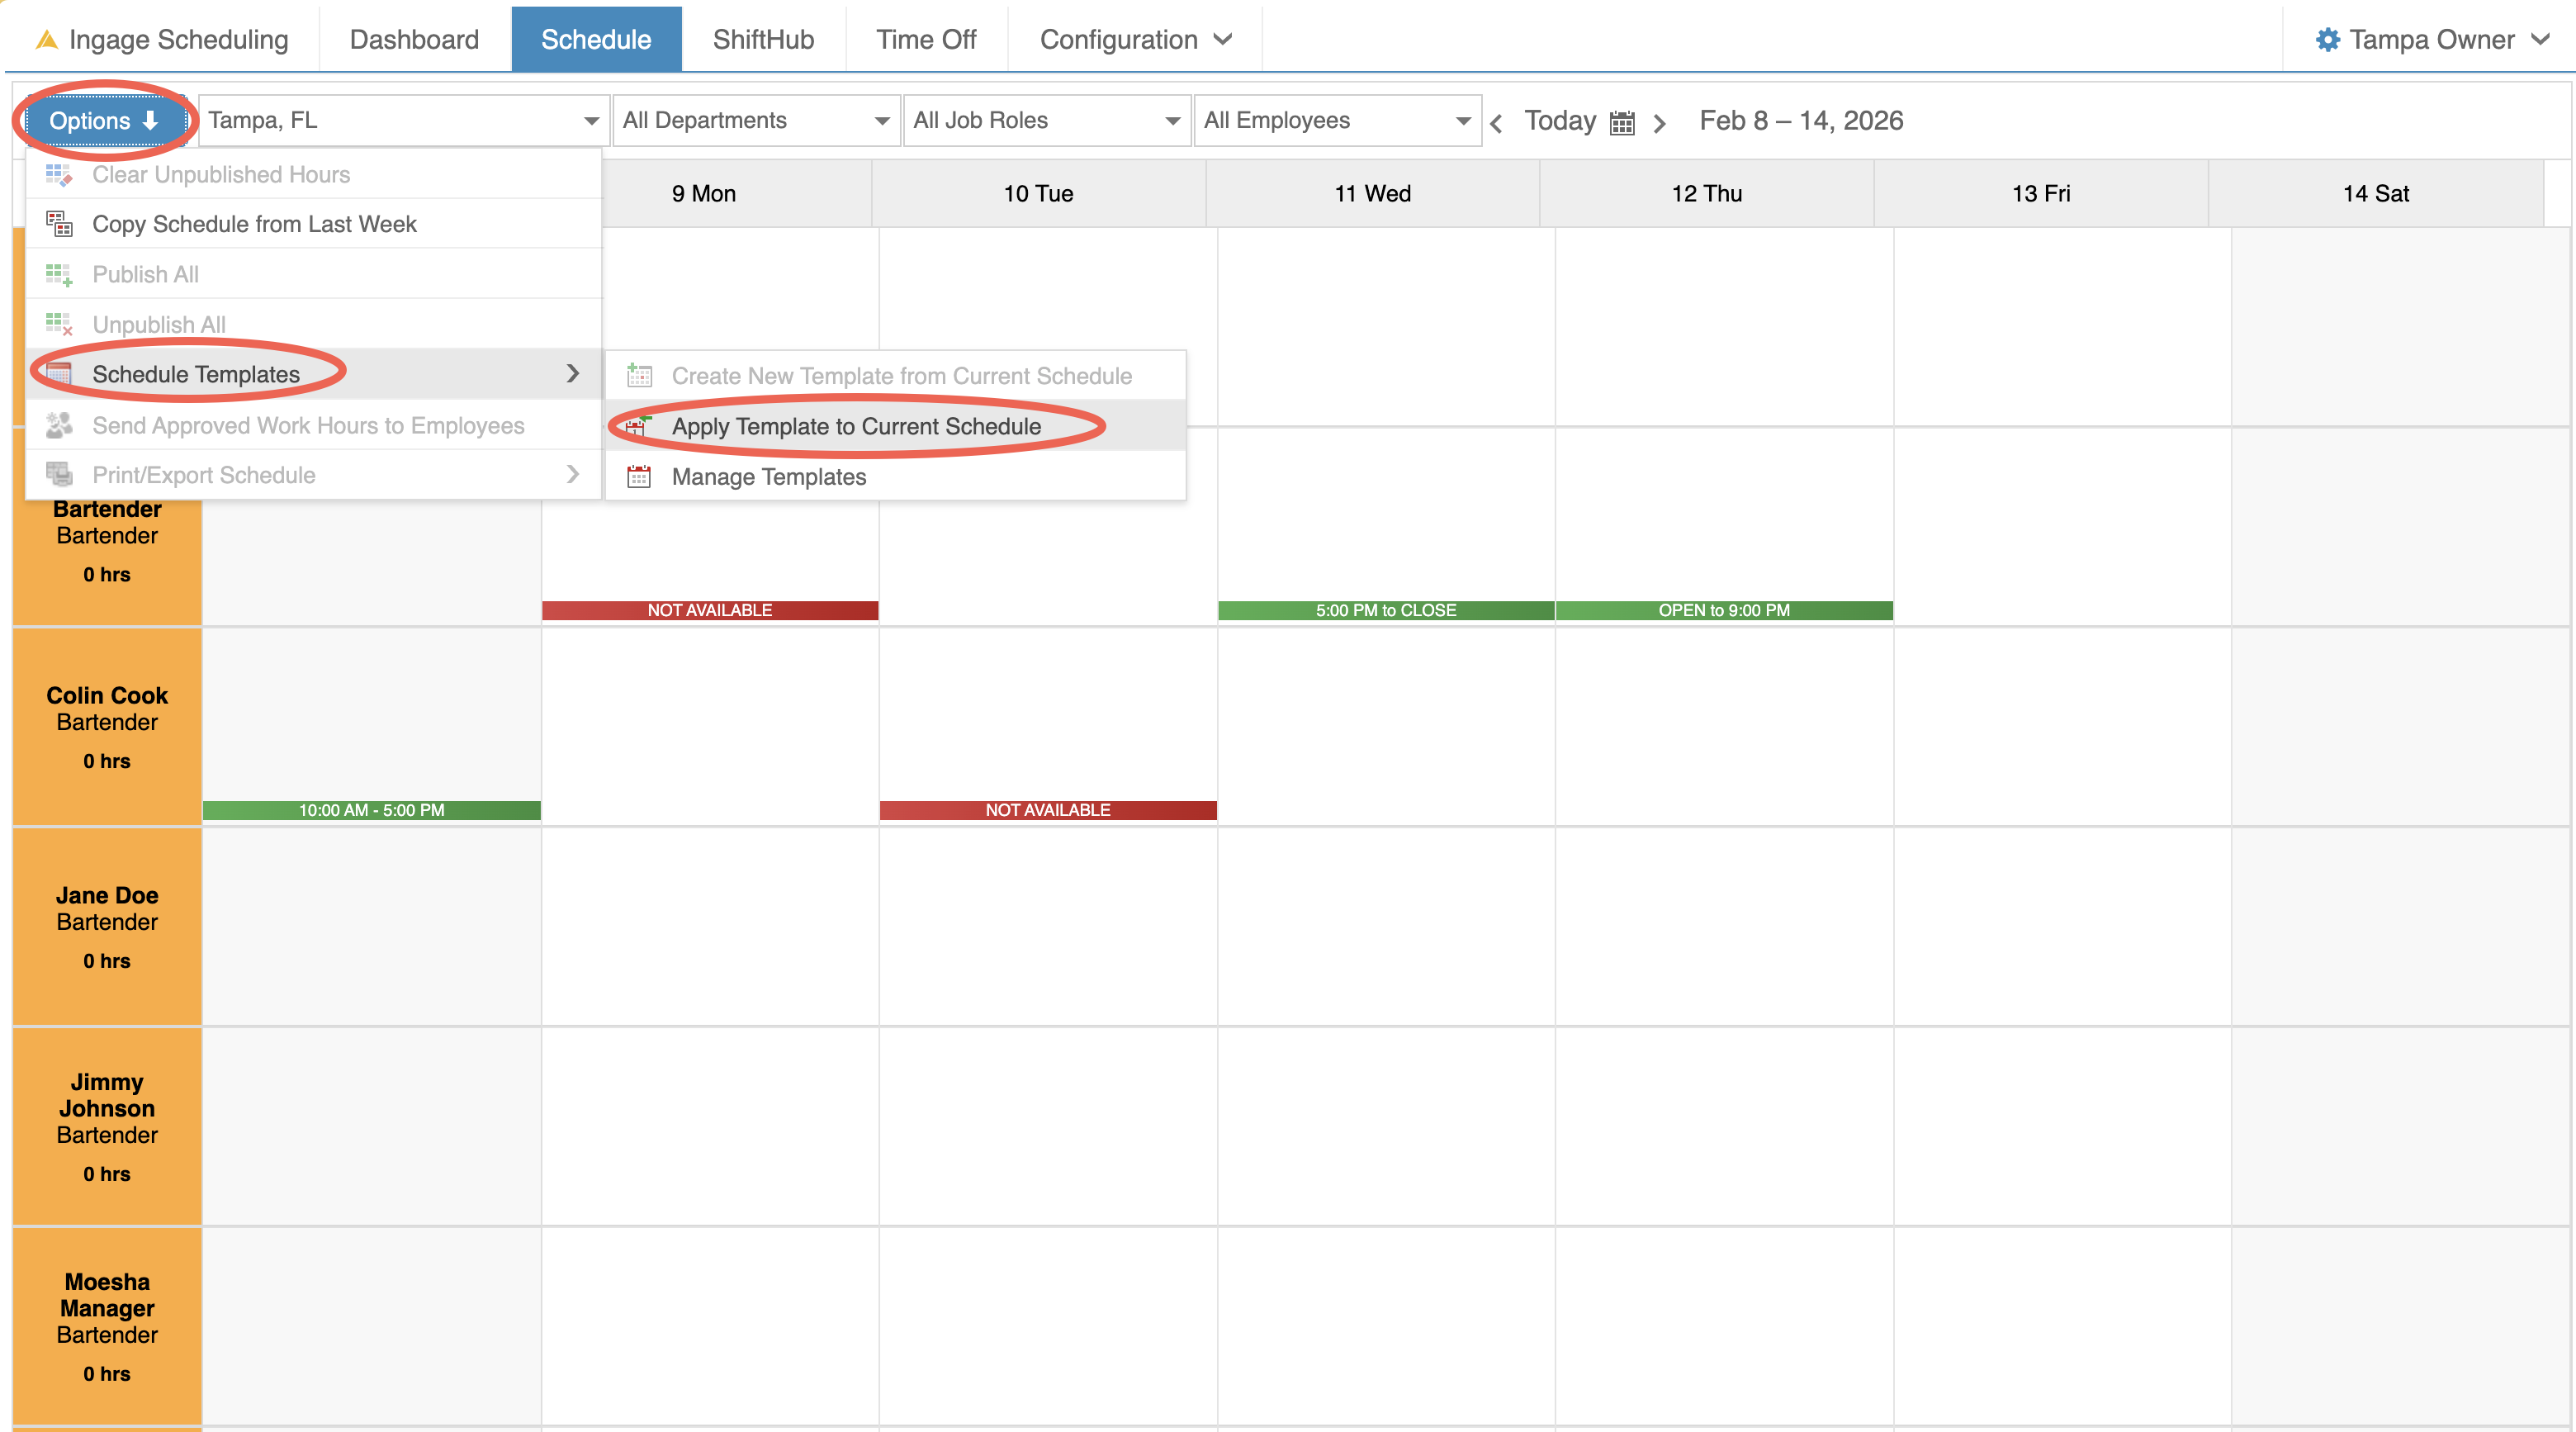
Use a Schedule Template
Schedule Templates allow you to apply a pre-built schedule templateto
- the current week.
-
Click Options in the top-left corner
-
Select "Schedule Templates"
SelectChoose "Apply Templates to Current Schedule"
Thiswill allow you to choose a premade template from the list and apply it to this weekThe schedule does not need to be
blank,blankas-
You can have
many differentmultiple templates for different jobroles.roles or scenarios YouwillYou’ll have the option
toto:overwrite-
Overwrite existing hours
and -
ifSkip
theemployeesemployee haswith approved time off
skip-
To apply a schedule template:
Additional details:
Click this link to learn more about creating Schedule Templates