
Running Payments in MX Merchant
The process for running a credit card payment within MX Merchant.
Getting to Quick Pay
Step 1 - Login to MXM
Go to www.mxmerchant.com and login using your credentials. If you do not have credentials, request your user account be added to the merchant in question.

Step 2 - Select Location
Verify you are connected to the proper account. You may have to edit your "Location". To do this, select the ![]() in the top right-hand corner. Select "Edit" next to "Location". A pop-up will appear. Search for the correct merchant location by name. Select the checkbox next to the correct location and hit "Save".
in the top right-hand corner. Select "Edit" next to "Location". A pop-up will appear. Search for the correct merchant location by name. Select the checkbox next to the correct location and hit "Save".
Step 3 - Access Quick Pay
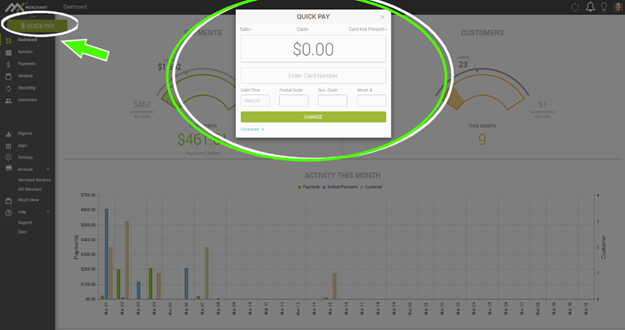
Quick Pay transactions are just as they sound: quick transactions that require little detail in order to process the payment! Transactions that can be made through Quick Pay are card, cash, check, and ACH transactions.
Across the top are drop downs with the default selection showing. To change them for the current transaction, click on the down arrows to the right of each word (defaults can be set in payment settings).
- Type of sale: Sale or refund
- Tender type: Card, cash, check or ACH
- Presentment type:
1. For card: card present, card not present, swiped, terminal.
2. For ACH: CCD, PPD, Tel, Web.
The type and presence of tender will determine the fields available to process the payment.
Select "Advanced" in blue at the bottom of the pop-out to access additional data fields that can be added to the payment. Please note all fields under the advanced section are optional.
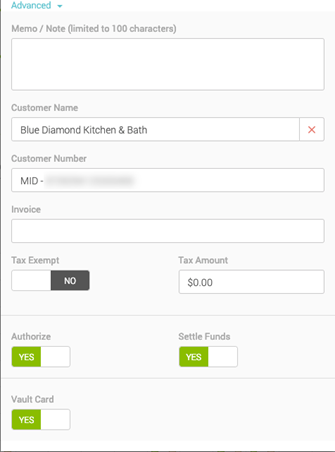
Now you will see the pop-out has expanded with the following fields:
- Memo / Note: a free-form textbox
- Customer Name: you can either search for a customer here or enter a new customer name. If a customer name is entered that does not already exist, a new record will be created for them
- Customer Number: search for an existing customer by customer number or use this field to enter your own unique number
- Invoice: here you can enter your own invoice number for this payment
- Tax Exempt: Yes/No; Defaults to "No"
- Tax Amount: how much of the total above is tax. If nothing is entered the system will default to 7% for reporting purposes only to help you qualify for the best rate
- Authorize: If toggle to no, a field is displayed to enter an offline authorization code. This option is not available to Clerks
- Settle Funds: If toggle to yes, it will add funds to the day’s settlement. If toggled to no, it does not add funds to the day’s settlement. This option is not available to Clerks.
- Vault Card: If toggled to "Yes", card information will be saved. If toggled to "No", card information will not be saved. Card will display with only the last four digits.
Processing a Sale
Cash Sale
In the Quick Pay pop-up, select the payment type and the sale option from the top row of dropdowns. Do this by selecting "Cash" from the middle dropdown of tender types and "Sale" from the far left:
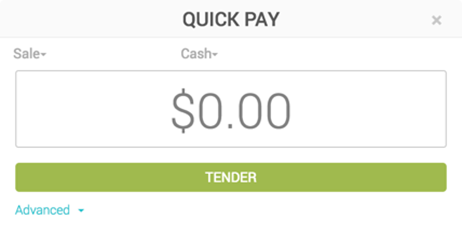
Enter in the textbox the dollar amount to charge the customer. When you are finished, select the green "Tender" button to complete.
Card Sale
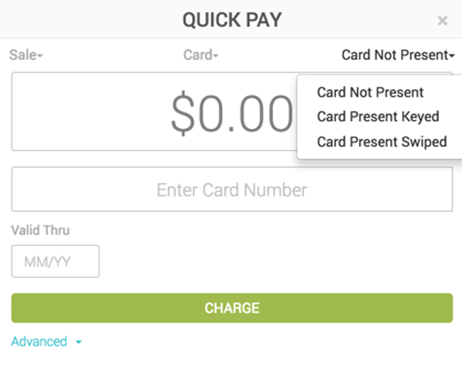
Step 1 - Configure Card Settings
In the Quick Pay pop-up, select the payment type and the sale option from the top row of dropdowns. Do this by selecting "Card" from the middle dropdown of tender types and "Sale" from the far left.
Then from the far-right dropdown, select the appropriate option:
- Card Not Present: The card is not present for the transaction but you have the card information
- Card Present Keyed: The card IS present but you are manually inputting the card information
- Card Present Swiped: The card is present and being swiped
- Terminal: The payment is being requested from a connected terminal
Step 2 - Enter Card Information
Enter in the textbox the dollar amount to charge the customer.
Then swipe or key in the card number. If you chose "Terminal", select the "Request Payment" button.
Select the blue "Advanced" if you wish to enter additional information.
When you are finished, select the green "Charge" button to complete.
Check Sale
In the Quick Pay pop-up, select the payment type and the sale option from the top row of dropdowns. Do this by selecting "Check" from the middle dropdown of tender types and "Sale" from the far left.
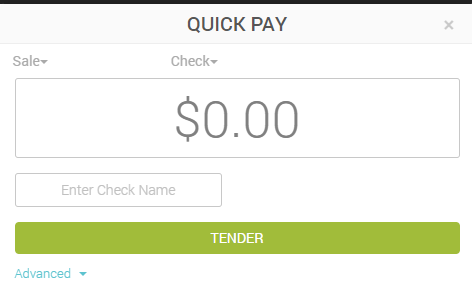
Enter in the textbox the dollar amount to charge the customer.
Then enter the name on the check in the "Enter Check Name" textbox.
Enter the phone number and check number if prompted due to "Loss Prevention" settings.
When you are finished, select the green "Tender" button.
ACH Sale
In the Quick Pay pop-up, select the payment type and the sale option from the top row of dropdowns. Do this by selecting "ACH" from the middle dropdown of tender types and "Sale" from the far left.
Then from the far-right dropdown, select the appropriate security code option:
- WEB
- PPD
- CCD
- TEL
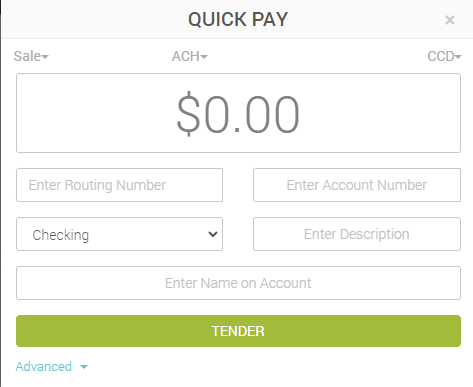
Enter the routing number and account number. Then select whether it is a checking or savings account.
Enter a description (i.e., what is the charge for?).
Select the blue "Advanced" if you wish to enter additional information.
When you are finished, select the green "Tender" button.
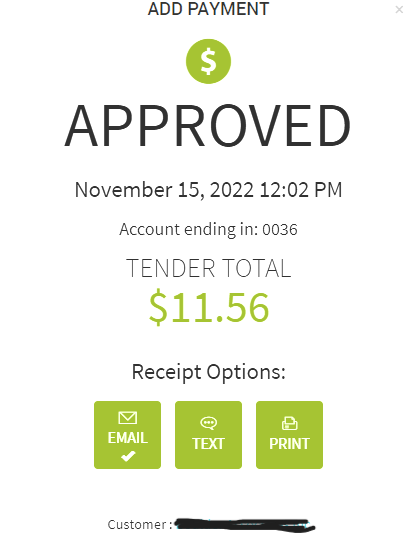
Status of Transaction - Approved or Declined
Once the "Charge" button is selected a pop-up will be displayed showing the status of the transaction: "Approved" or
"Declined". An "Approved" transaction allows for a receipt to be sent via email and text or printed:
A "Declined" transaction will look like below:
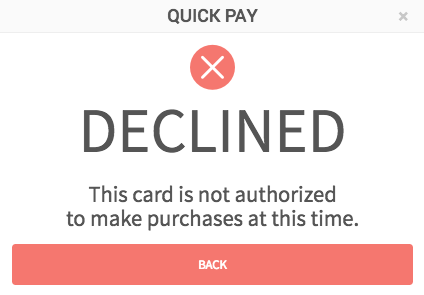
The reason for a declined transaction could be for a number of reasons. Some examples being:
- Information was inputted incorrectly
- Insufficient funds on the card to cover the charge
- A hold on the card
Click on the red "BACK" button at the bottom of the pop-up and try a different payment method or run the card again.