Release 2024.12.3 "Escargot"
Notes: In this release we made some improvements to our Scheduled orders feature so it will explain how to use it.
**This release will NOT require you to update your handheld**
If you would like any additional information or help setting up any of these new features, please contact support at:
Support@ingageit.com or call (612) 861-5277
Scheduled Orders
Sail has the ability to take an order and have it send to the kitchen later that day or on a future day.
Scheduled Order Settings in Backoffice
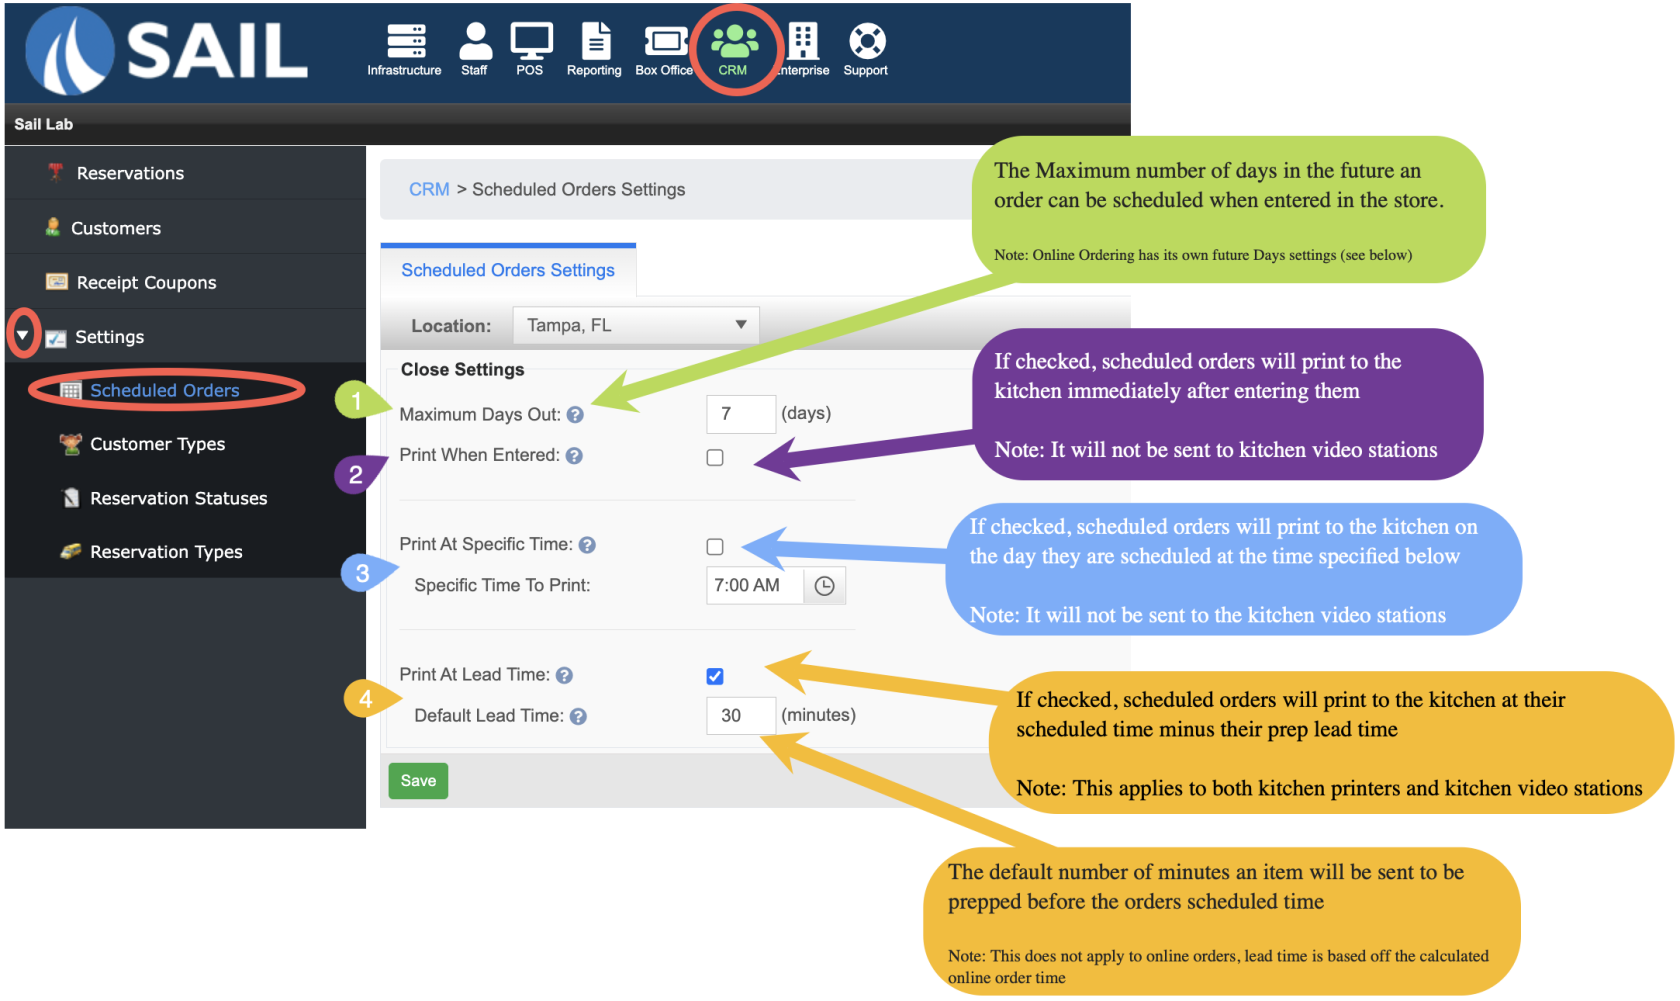
- In Backoffice --> CRM --> Settings --> Scheduled orders
- There are 4 different settings you can configure for your scheduled order.
- #1 - Set how many days in advance you'd like people to be able to schedule orders out
- #2 - Check this box if you'd like it to print to the kitchen printers as soon as you take the order
- #3 - Check this box if you'd like it to print at a specific time on the day its scheduled for
- Many like this setting so that the kitchen teams can see all the orders that are scheduled for that day.
- #4 - Check this box if you'd like it to print to the kitchen when the order is scheduled for, minus the prep time you have set up.
- Example: You have an order scheduled for 2pm, so it will be sent to the kitchen at 1:30pm to give the kitchen time to make it.
- Things to Note:
- You may have multiple settings set at one time
- Example: "Print at specific time" and "Print at lead time" - This will have the ticket printed out in the morning at the time you set, and will also print at the scheduled time minus prep time.
- Settings #2 and #3 are only available if you have kitchen printers and will not send to Kitchen Video stations at this time.
- The "Maximum days out" and "Default prep lead time" are for in store orders only. There are different settings for Online Order that you'll see below
- You may have multiple settings set at one time
Setting up a scheduled orderorders on an Order Type
- You can decide which order types are schedulable and which orders are not.
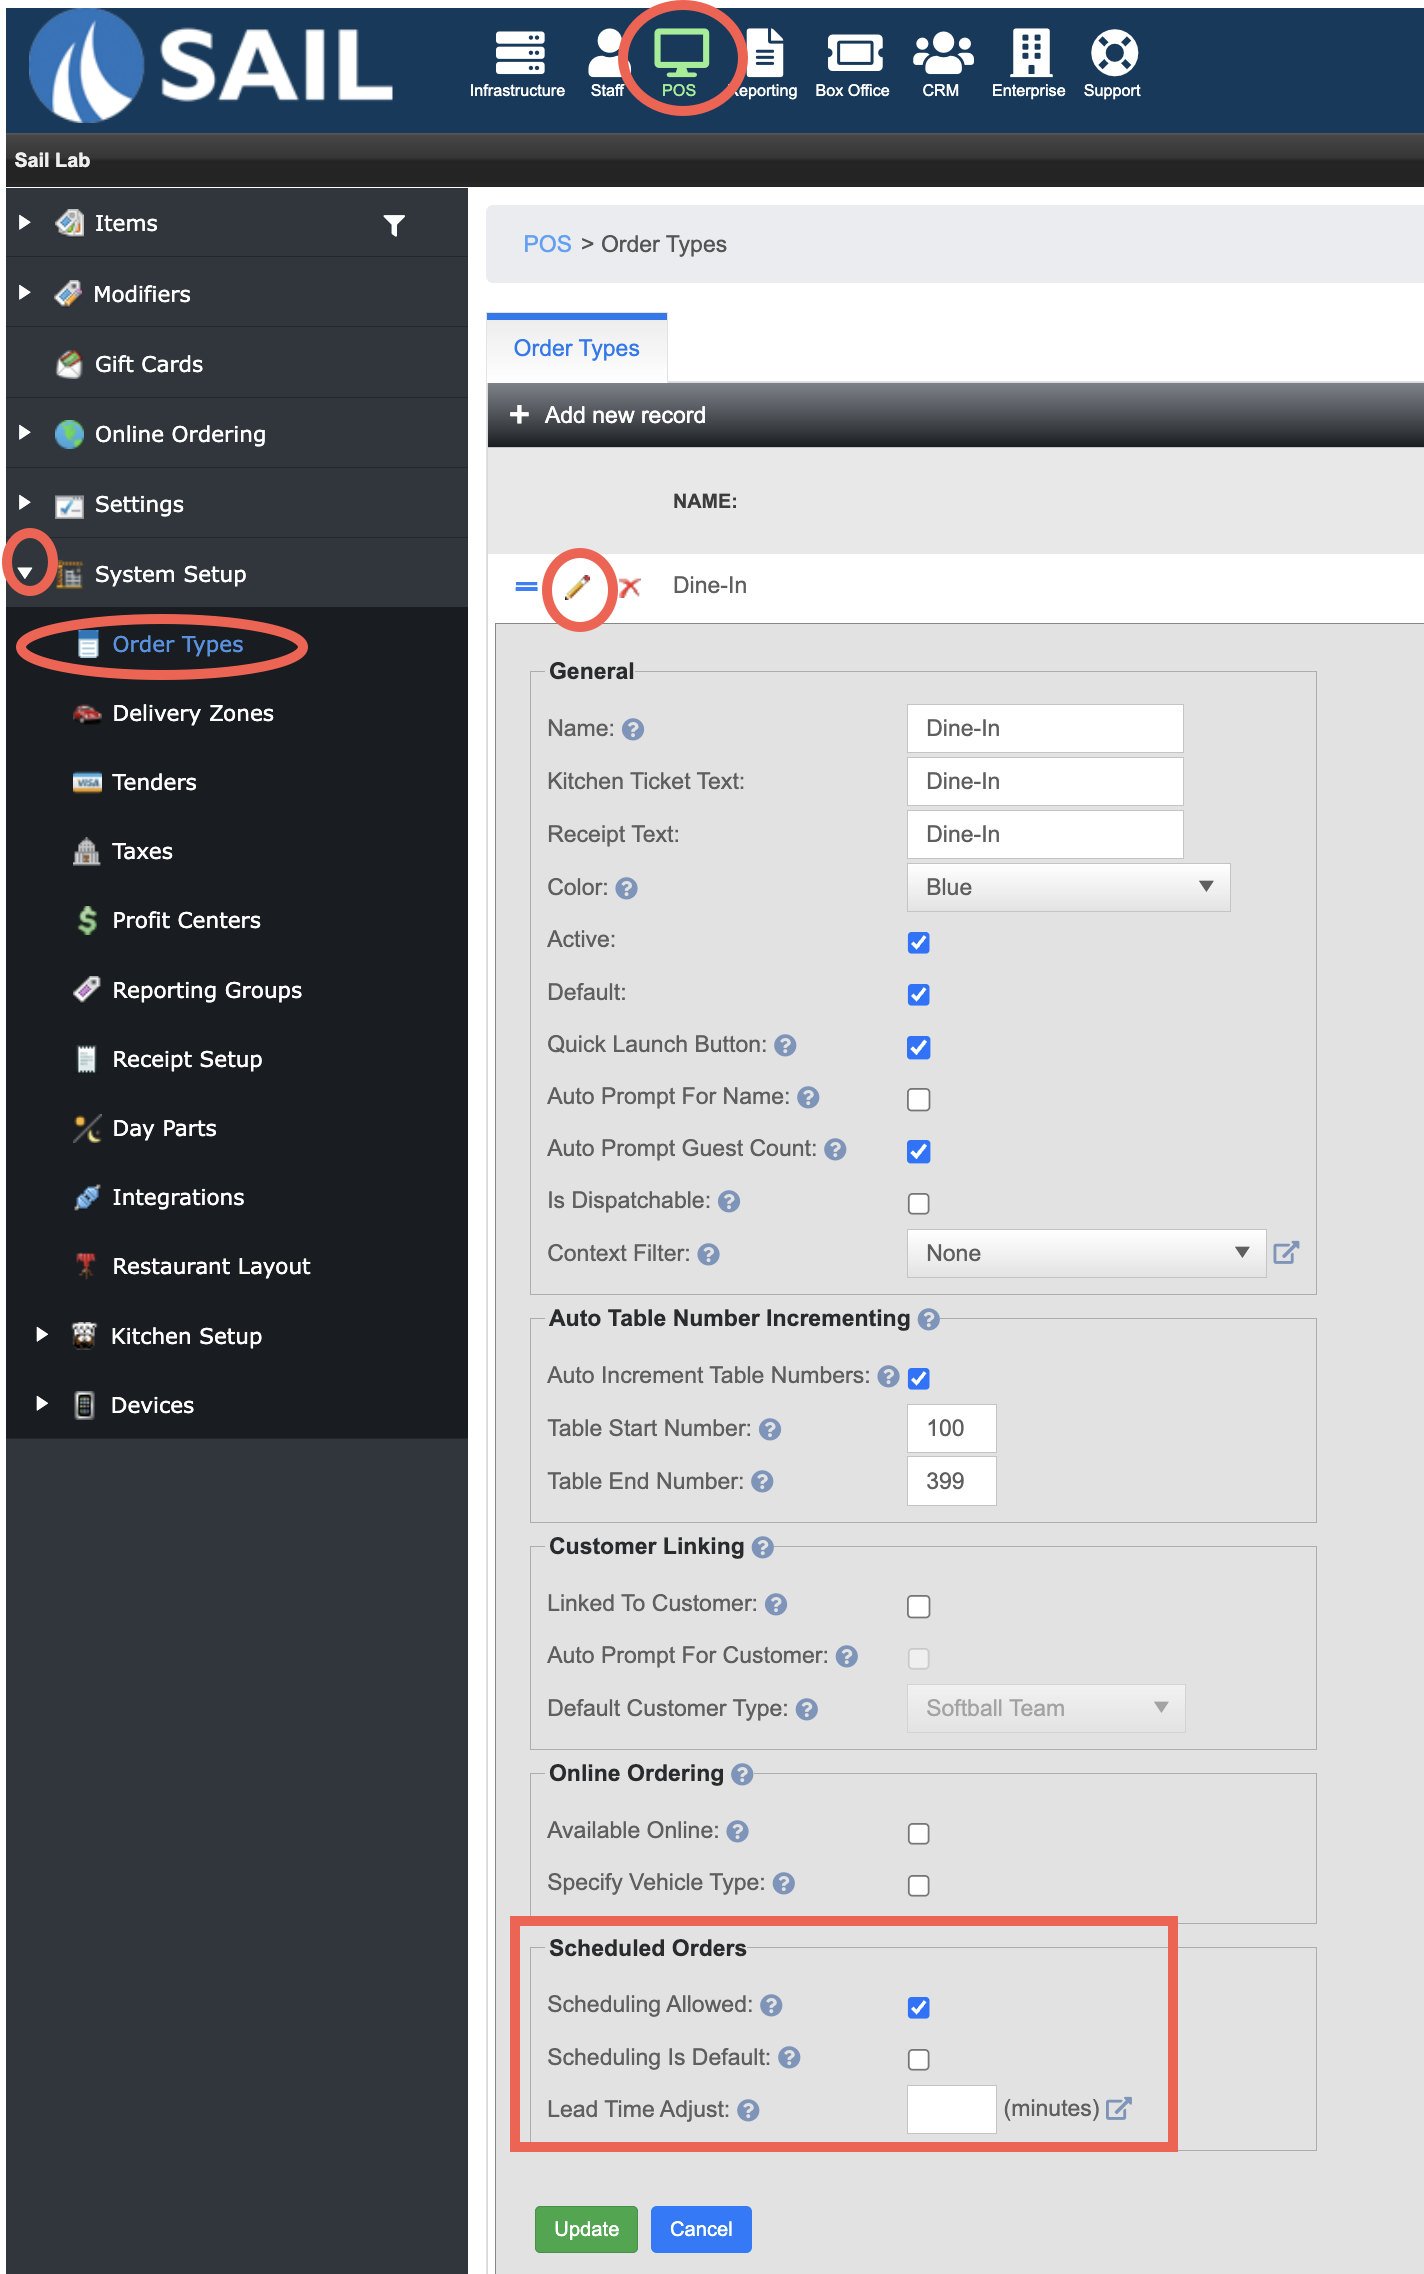
- In Backoffice --> POS --> System Setup --> Order Types
- Click the pencil next to the order type
- At the bottom there is a section called Scheduled orders
- Click the "Scheduling Allowed" checkbox if you'd like to be able to schedule orders with this order type
- "Scheduling is Default" will require this order type to always be scheduled
- "Lead Time Adjust" is used if you'd like to add time to the Default Prep Lead Time you set above
- Example: the Default Prep Lead time is set at 30 minutes, but for Delivery orders you'd like to give an extra 20 minutes so they have time to drive it to a customer. Then you would put 20 in the "Lead Time Adjust" box
Setting itup upscheduled orders for Online Ordering
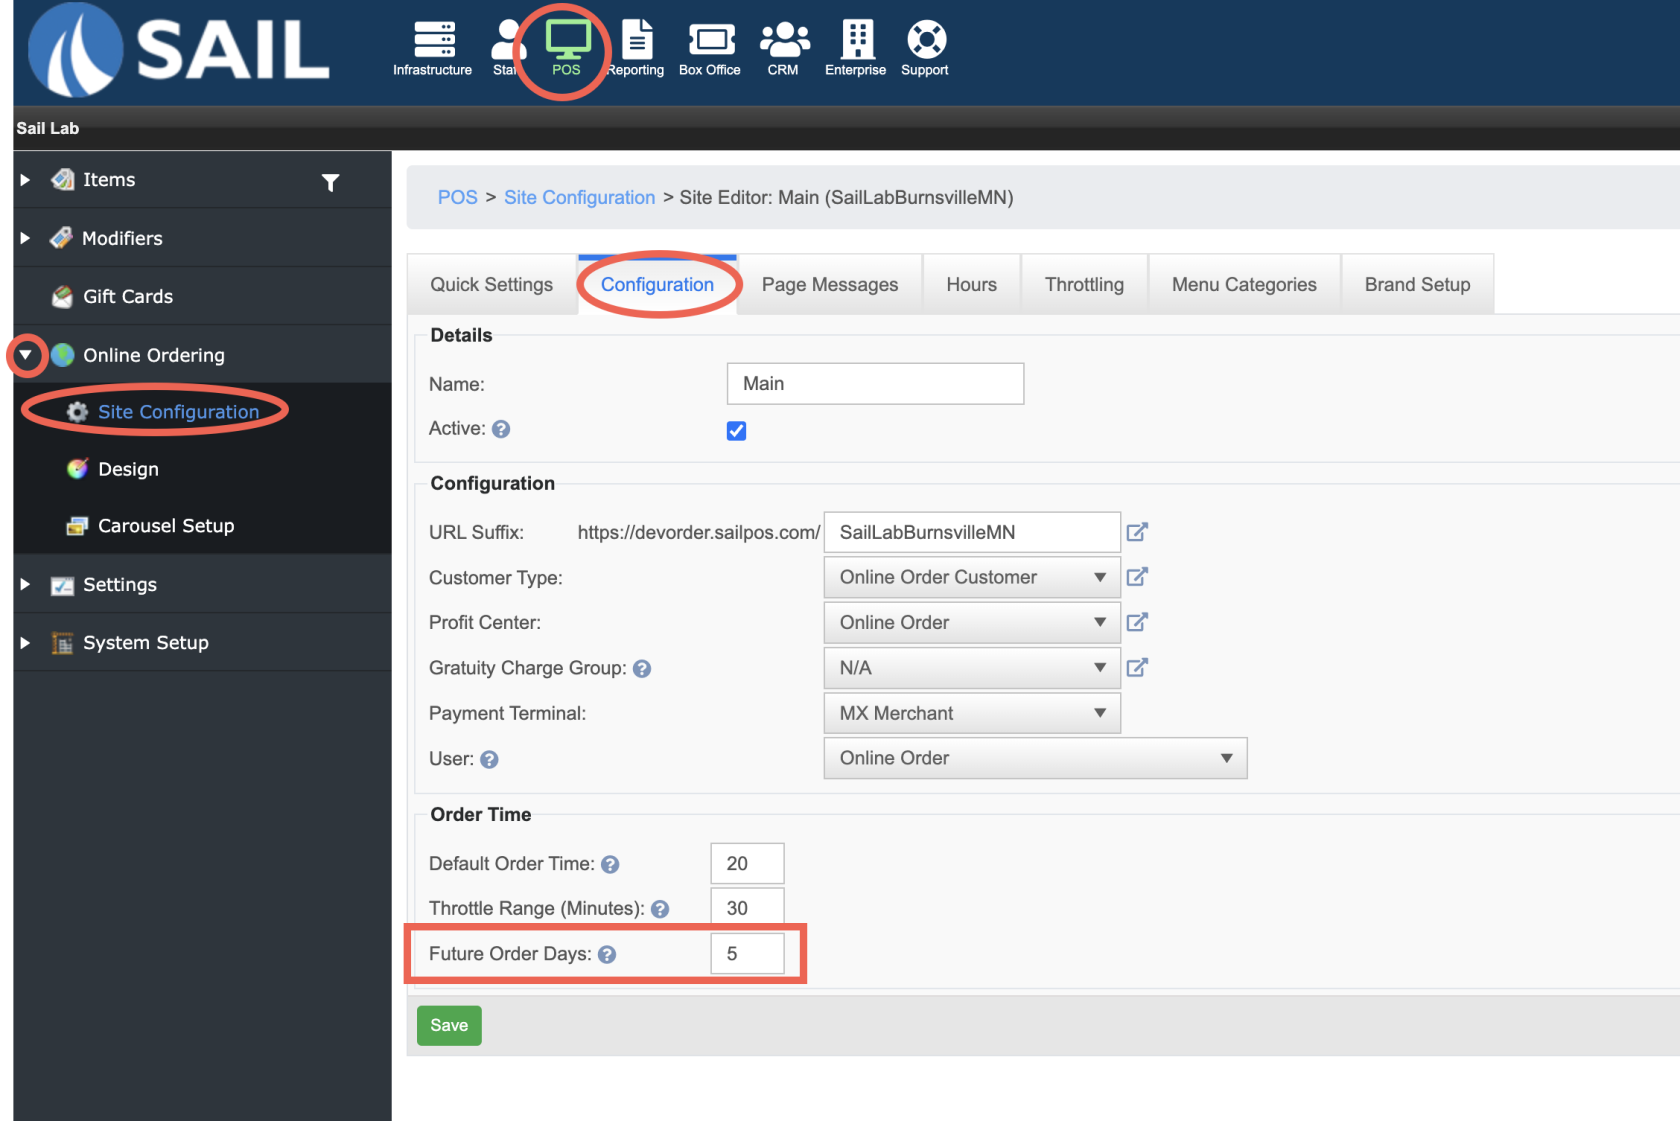
- In Backoffice --> POS --> Online Ordering --> Site Configuration --> Click the pencil --> Configuration tab
- "Future Order Days" is where you can set how many days in advance you'd like people to be able to schedule orders out
- The "Default order time" will be the prep time for all online orders
- Online Order will respect the checkboxes you set up in settings for "Print when ordered," "Print at specific time," and/or "Print at Lead time"
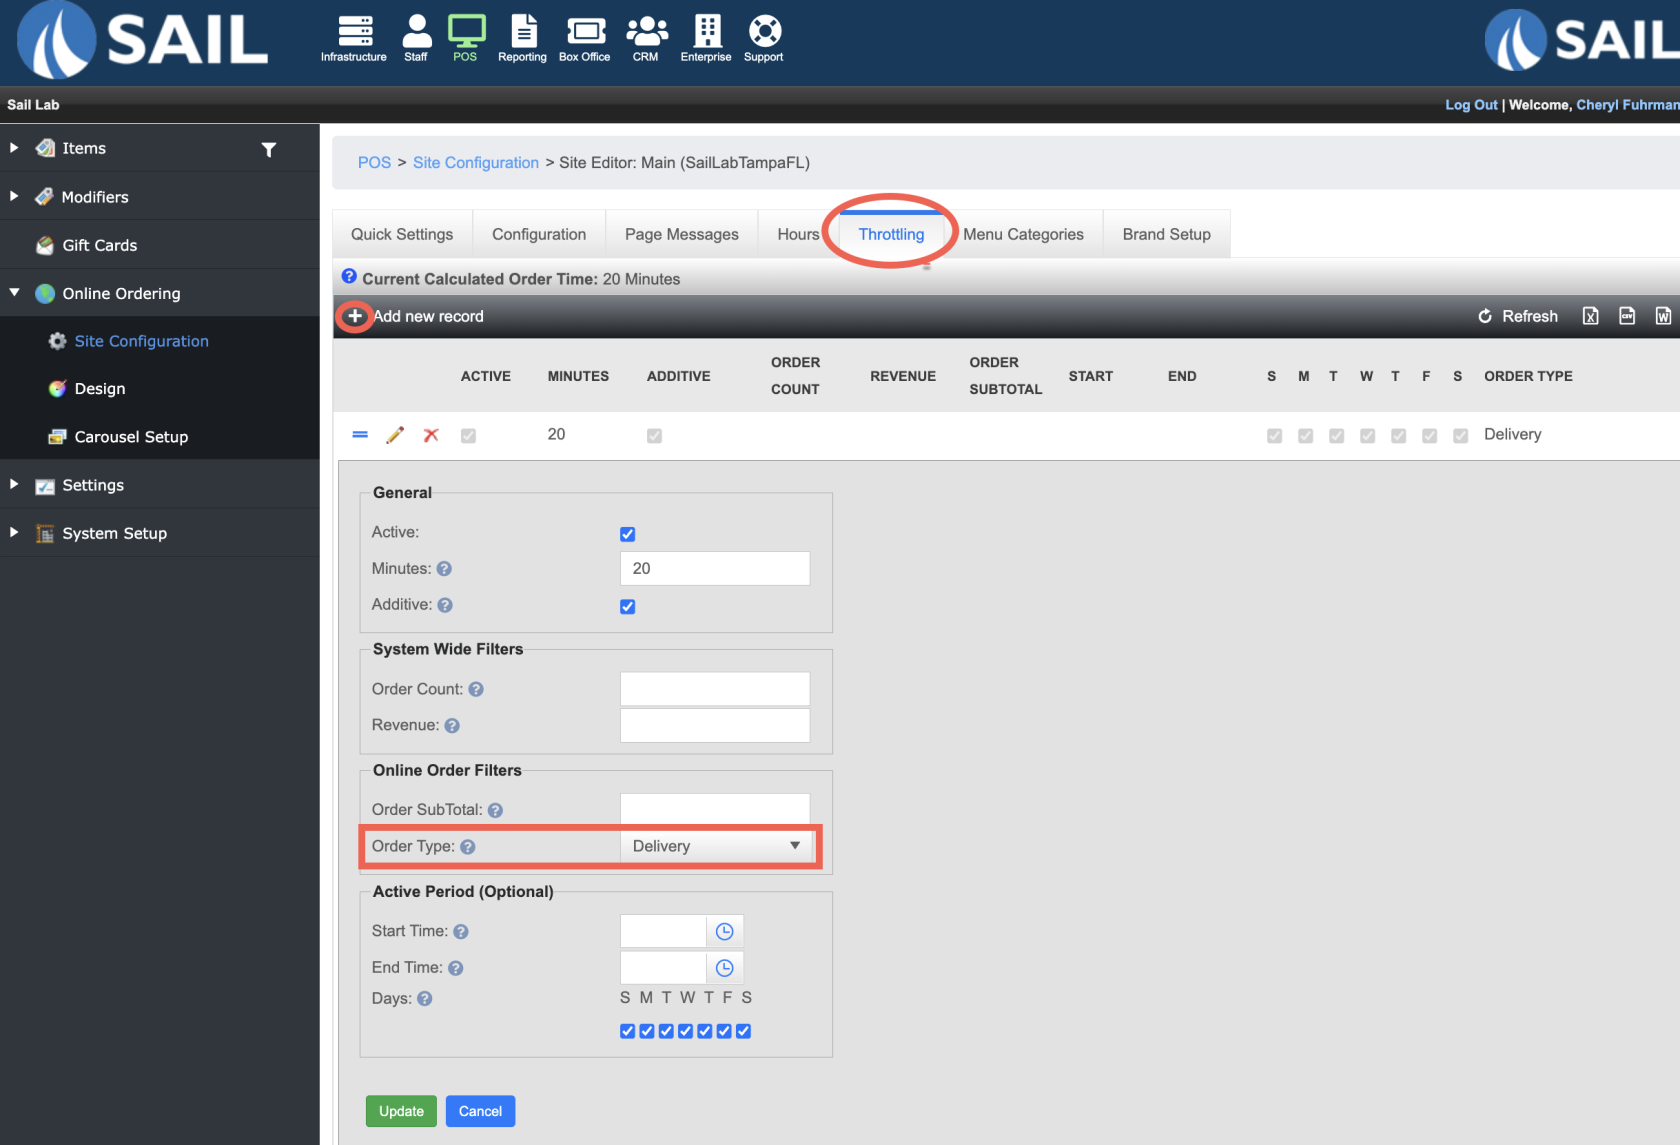
- The Online Ordering Prep Lead time can be modified by throttling rules.
- Example below: create the rule so that if its the delivery order type it will add 20 minutes to the "default order time" that is set on the configuration tab. So in this example the Delivery order type will have a prep time of 40 minutes.
Throttling Rule Example:
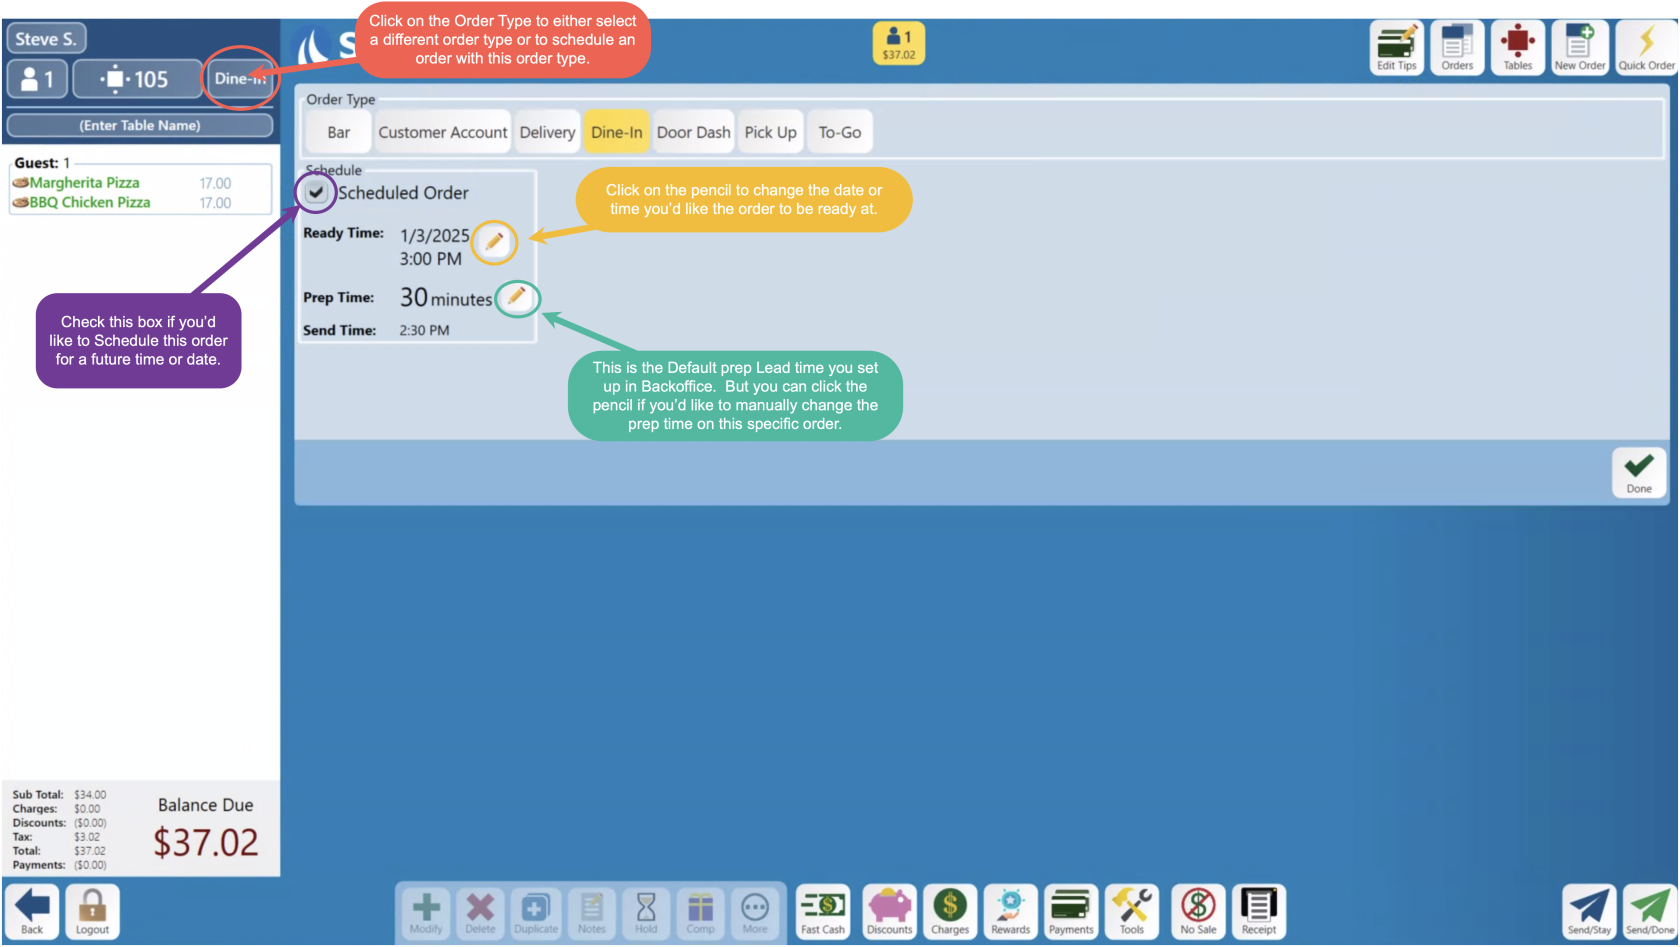
How to schedule an order on a terminal
- Open a new order
- Add items to the order
- Click on the Order Type button on the top of the check
- If the order type is scheduleable, there will be a checkbox. Once checked it will show the time and date options.
- Click the pencil next to the time and date to set what time you'd like the order to be ready.
- You can also optionally change the prep time on this specific order if you want it to be different than the default by clicking on the pencil next to the prep time
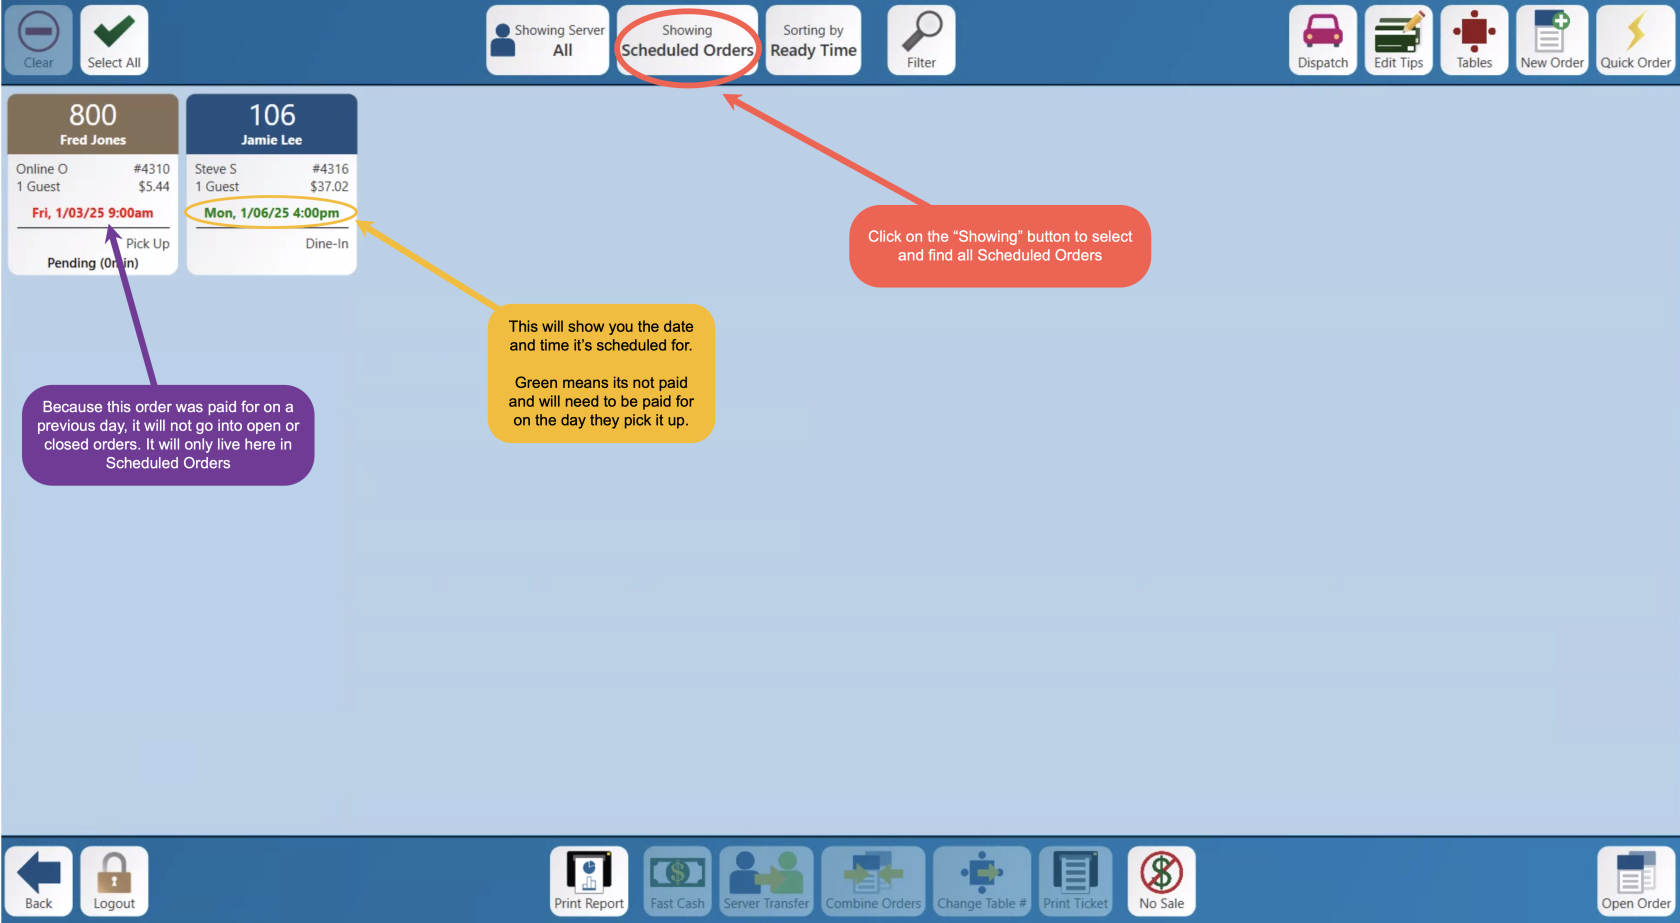
Where to see scheduled orders
- From the Launch screen, click on the "Orders" button
- Once in there click on the "Showing" button on the top middle
- You will have an option to click on Scheduled orders.
- Here is what that will look like:
- All orders will have the time and date that its scheduled for
Important information regarding scheduled orders:
- They will ALWAYS live in the scheduled order section until the end of the scheduled day.
- They are not accountable until paid in full, or the scheduled time
- They will not live in Opened/Closed order until the scheduled time,
expectexcept on the day its paid for.
When does the Sale hit the reports?
- The Sale of the order will go on the report on the day the order is fully paid for.
- If you want the sale of the scheduled order to be on the date that it's scheduled for then you have 2 options:
- Start a CC Tab and then run the card on the scheduled day (this is the highly recommended option)
- Leave it Open and have the customer pay for it when they pick it up.
- If the order is paid for on the day the order is taken, then the sales, and tip will be reported on that day, for the person who took the order. Once the day is closed, that order is accounted for on the servers close and the daily close, so the order CAN NOT be edited or manipulated on the day its scheduled for.
- There will be a Lock icon on the order and if you try to edit it you will get a message that says "This order is attached to a server close on a previous day and cannot be edited"

