
How to create a modifier set
This will walk you through creating a modifier set.
-
Open
back office.Backoffice. -
SelectClickthePOStabat the top of the page. Then click the arrow next to Modifiers in the menu on the left, and click Modifier Sets.
Navigate to modifier set.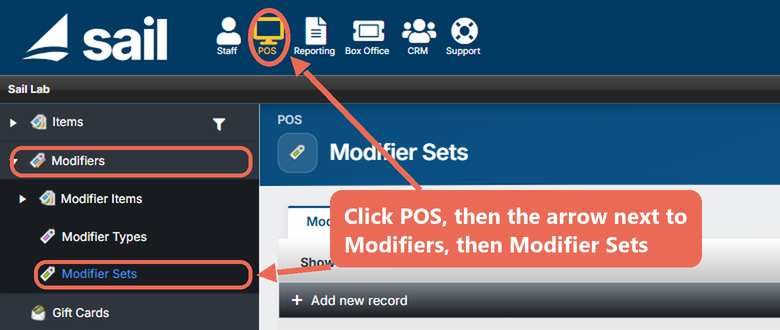

-
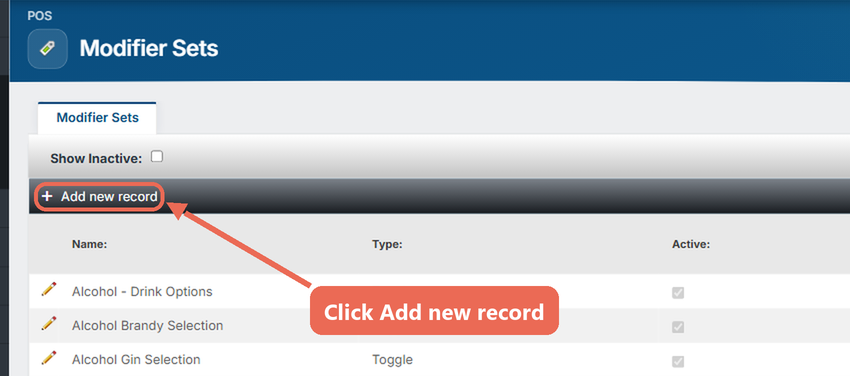
To create a new modifier set
selectclick Add new record at theplus sign in the upper left cornertop of thesetlist.
-
Details.

-
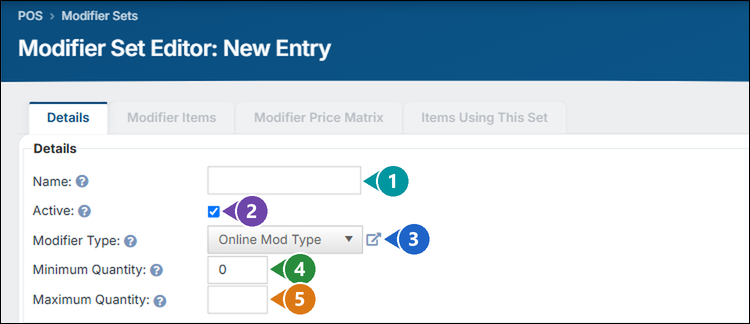
Make the name easily recognizable. That way it's easy to find and assign from a list of modifier sets.
-
Be"Active"sureistocheckedcheck this box when makingfor a new set.IfLeave it checked: if the“Active”"Active" checkbox is not checkeditthe set will not be visible in the system when you try to assign the set toaanPLU.item. (Ifyouaforgetsetthiswasstepmadeyouinactive,can selectcheck theshowShowinactiveInactive boxinat the topleftof themodifierModifiersetsSets list and it will show all inactive sets. Find the setyou createdand edit it to make it active.) -
Modifier type selects what action can be
preformedperformed on the modifier list. The options can be adjusted, so the options here might be different than what you have. Most locations include what follows.-
Standard: The standard modifier set is a basic set of instructions for preparation which includes, No, Add, Sub, On side, Add on side, Easy on, Extra, and Qty.
-
Toggle: Toggle lets you select options from a list by highlighting or un-highlighting options. This is
the default option andwhat will be selected for the majority of sets. -
Pizza: This provides options for pizza including whole, half 1, and half 2.
-
Quantity: This will provide number options such as 1, 2, and 3.
-
-
“"Minimum Quantity" sets how many options must be selected from the set list. Leave it at 0 to let the set be skipped. If this is something that needs to be selected, such as how well done the customer wants a steak, set it to 1. -
"Maximum
Quantity”Quantity" will set how many options can be selected from the set list. Leave this blank to set it to unlimited.
-
-
Overall Price Override.


-
Quantity
toTo OverrideSetssets how many items from the set get changed to the price override number. Leave thisblankat 0 to set the prices to inherit from thePLU.item. -
Price Override This will change what the price is for all the
PLUsitems in the set. It will override the price on thePLUitem to the one entered in this field. -
Example: To provide two dressings with a salad without charging you would set $0.00 for the price override and 2 for the quantity. The first two selected dressings will be free, but any additional will have their price set by the dressing
PLUitem instead of the set. This will charge for any additional dressings added to the order.
-
-
Advanced


-
ShowSelectin category:Category: This will group items by category when shown in theterminal.terminal (a tab for each category; handhelds ask for the category first). Generally is not used unless there are a lot of items. -
Show in
reporting.Reporting: This will add the modifier set to the modifier reports. -
Prompted Context Filter: Optionally, select a context filter so the set is only prompted when that filter applies. Leave it at None to always prompt it.
-
-
Online Ordering. This only shows up if your location is utilizing the online ordering feature.

-
Collapsed by Default: Online ordering shows this set closed, and the guest opens it to make their selections. An item that uses the set can change this for that item.
-
-
Click Save. The other tabs (Modifier
PLUs:Items, Modifier Price Matrix and Items Using This Set) open once the set is saved.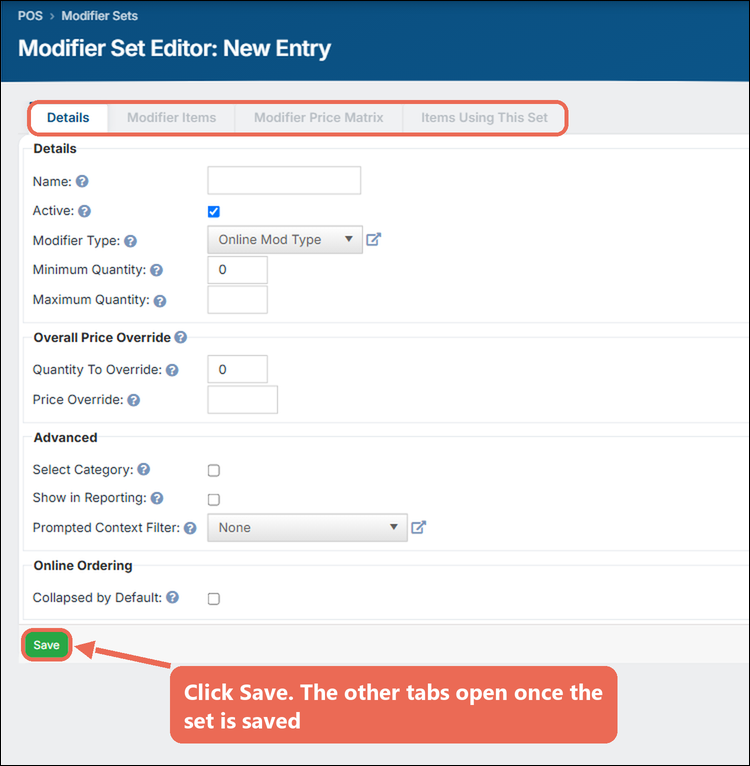
-
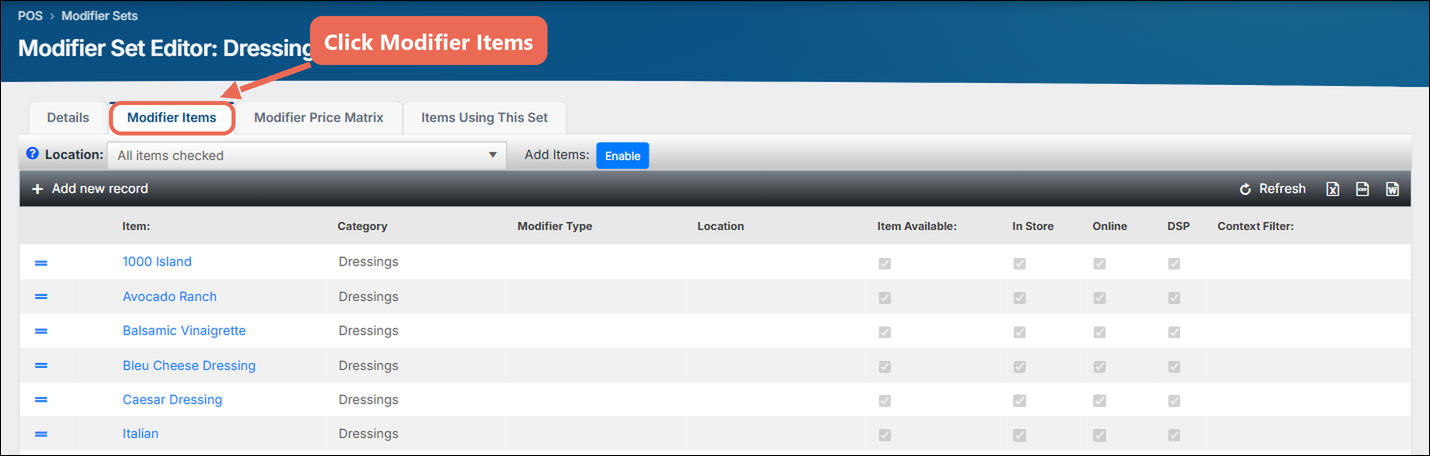
Modifier Items:
-
This is where you will add the Modifier
PLUsItems to the Modifier Set.
-
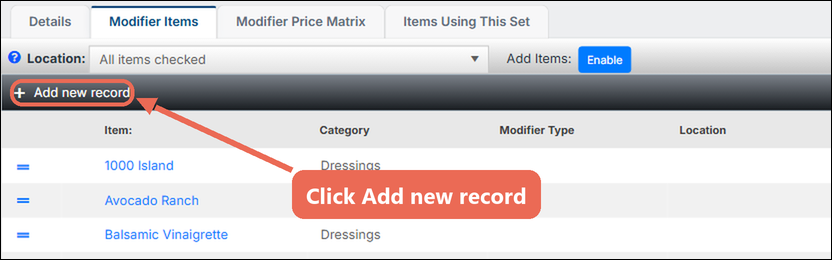
PressClicktheAddplusnewsignrecord to open a prompt for adding ModifierPLUsItems to the Set. This will allow you to add a singlePLUitem to the set.
-
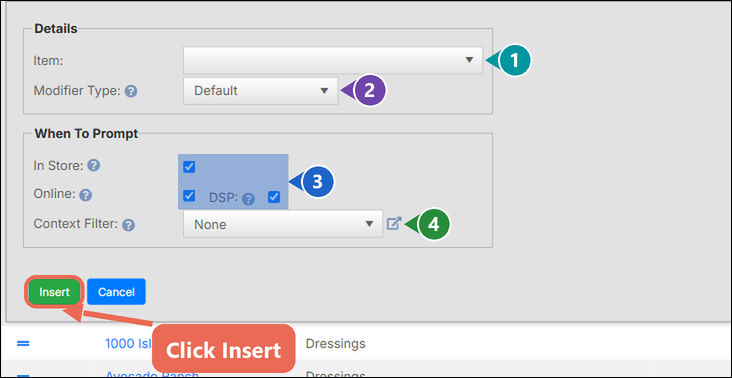
Details.Fill in the prompt.
-
Select a Modifier
PLUItem fromathe drop down list ofPLUs.

-
SetModifier Type: Leave this at Default to use thePricemodifierOverridetypefieldof the set, or select a different one for this item only. -
When To Prompt: Select if you want this to be available in store, online or with integrated delivery services (DSP). It can be any of them, but if none are selected the modifier will not prompt in the system. This only shows up if your location is utilizing the online ordering feature.
-
Context Filter: Optionally, select a context filter so this item is only offered when that filter applies.
-
-
Click Insert and the item will be added to the set.
-
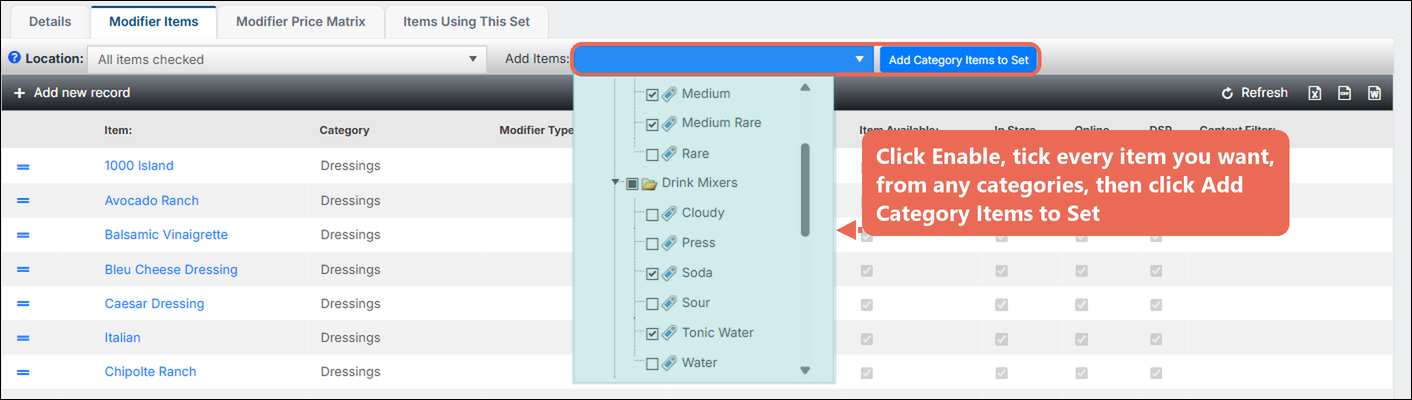
There is another way to add items to a modifier set from this tab, and it adds several at once. Click Enable next to "Add Items", then open the drop box and check every item you would like to add. They can come from different categories: for example, if you're adding veggies, meats and sauces to one set, check them all here. Checking a category's box adds all of the items in that category. Then click the blue Add Category Items to Set button.
-
Once your Modifier Items are added to the set you can change their order and settings.
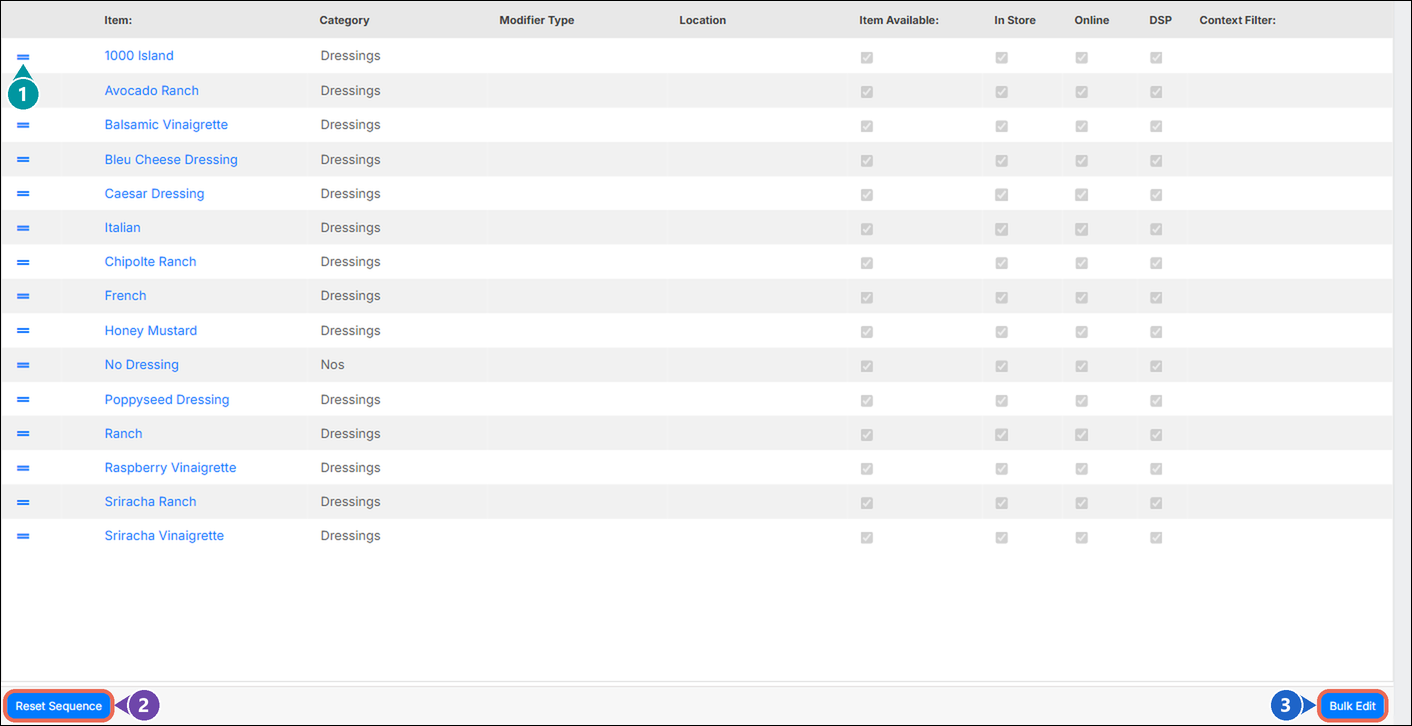
-
The sort order can be changed by dragging each Modifier Item into place by the handle on the left of its row.
-
Reset Sequence puts the items back in their own order (by name).
-
Bulk Edit lets you change several items at the same time. You can also edit each one individually by pressing the pencil icon, and any Modifier Item can be removed from the set by pressing the red x.
-


Modifier Price Matrix. This is where you set prices for the items in this set.
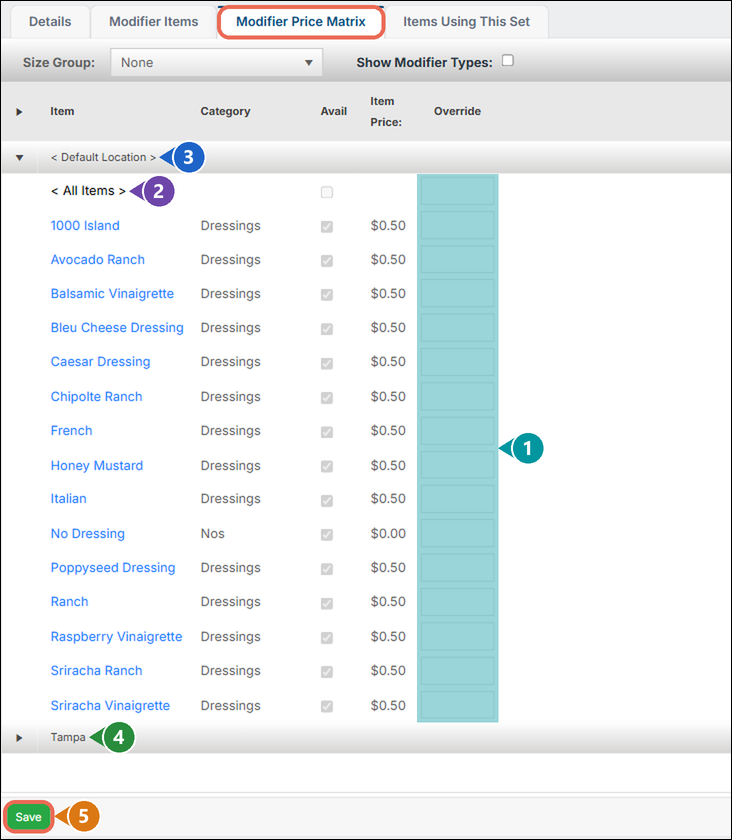
-
Override: Set this if you want the price of the Modifier
PLUItem to be set individually by this Modifier Set. The item's own price is shown next to it.-
PLUItem pricing can be thought of as a hierarchy where the amount entered overrides the price of those below it. ThePLUitem itself is at the bottom of the hierarchy, then the modifier set (price override above), then at the top is the modifiers in the set. -
Set the price to be empty if you want the price to be inherited from the level below it. If nothing is entered the price will not be overridden. Entering zero will not let the level below it inherit, it will set the price to zero.
-
-
< All Items >: A price entered here is used for every item in the set.
-
< Default Location >: Prices here are used at every location.
-
Each location has its own list below it. Click the arrow next to a location to set prices for that location only.
-
Click Save.
WhenItems Using This Set. This tab will list the items that use this set.
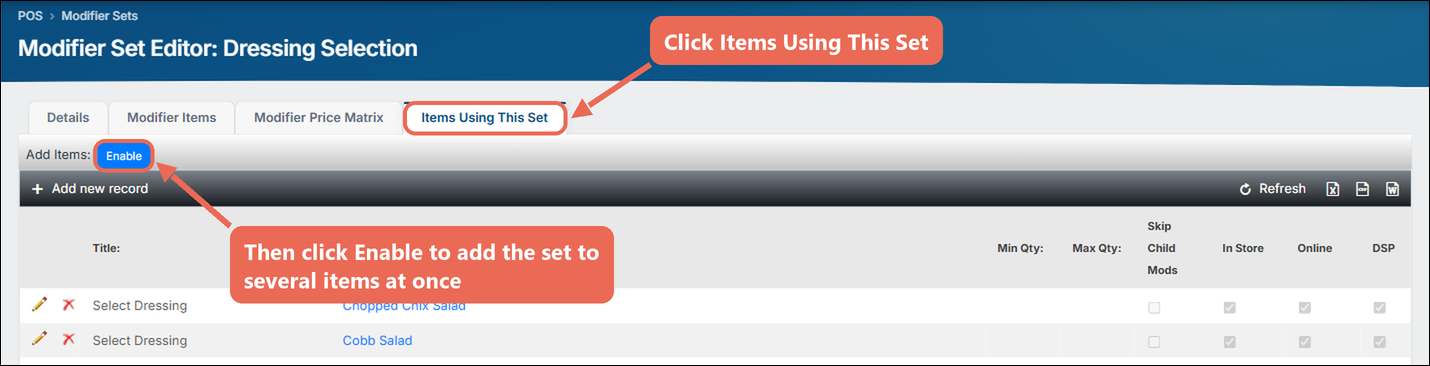
-
To add the set to
Prompt.several items at once (the way it's usually done), click Enable next to "Add Items" at the top of the tab.
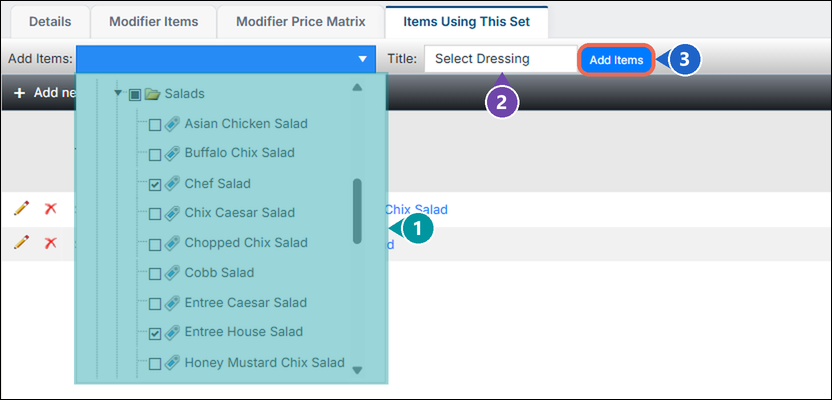
-
-
SelectEnterifthe Title. It's used for every item youwantcheckedthis to be available in store or online. It can be one or both, but if neither are selected(see themodifierTitlewill not prompt in the system. This only shows up if your location is utilizing the online ordering feature.
below). -
PressClickinsertAddandItems.theThePLUsetwill beis added tothe set.
There is another way to add PLUs to a modifier set from this tab. Selectall thedropcheckedboxitems,abovepromptedtheinplusstore,signonline andselectwiththeDSP.categoryToyouchangewouldonelikeoftothemadd. Thenafterwards, press thebluepencil“AddiconCategory PLUsnext toset button.” This will addallof the Modifier PLUs that are in that category.it.
Once your Modifier PLUs are added to the set you can edit each one individually by pressing the pencil icon. You can set all there prices at the same time by pressing the blue “Bulk Edit” button. The sort order can be changed by dragging each Modifier PLU into place and any Modifier PLU can be removed from the set by pressing the red x.
-
-
PLUs using this set. This tab will list the PLUs that use this set.
Press the plus sign toTo add the set totheonedesireditemPLU.at a time, click Add new record.
-
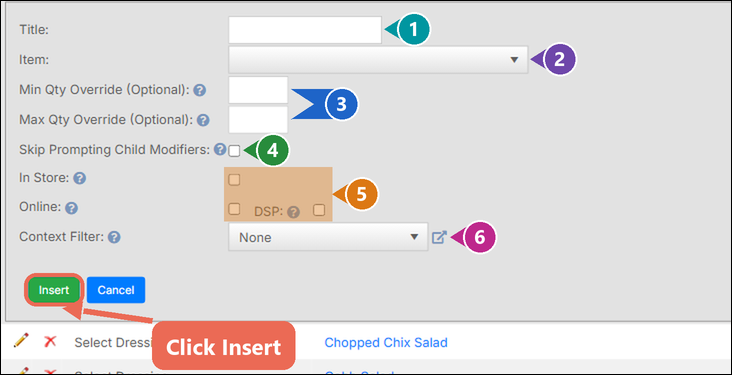
A prompt to set the connection up will appear.

-
The Title will set what the section is called when the modifier set is prompted on the screen. We frequently suggest posing this in the form of a question such as
“"Would you like to add cheese?”" or“"What size would you like?”" or you can simply say“"DressingOptions”Options". However, this can be set to anything you would like. -
The
PLUItem section sets whatPLUitemyouryou're attaching the modifier set to. Once added to the list selecting thePLUitem on a terminal orhand heldhandheld will prompt the set. -
SelectMin“AllowQtyNone”Override and Max Qty Override: Leave these blank to use the Minimum and Maximum Quantity of the set, or enter different numbers for this item. To let this modifier set be skippable for the specificPLU.item, the minimum must be 0. If this is something that needs to be selected such as how well done the customer wants a steak, thenleaveset the minimum to 1. -
Skip Prompting Child Modifiers: If the modifiers chosen from this
unchecked.
set have their own modifier sets, those will not be prompted. -
In Store, Online and DSP: These are not checked for a new connection. Check In Store (and Online and DSP if you want it there too). If none are checked the set will not prompt. This only shows up if your location is utilizing the online ordering feature.
-
Context Filter: Optionally, select a context filter so the set is only prompted when that filter applies.
-
-
Click Insert.
-
Modifier sets can also be connected from the
PLUitem you would like the set attachedto.to (the item's Modifiers tab, then Prompted Sets). There is additional modifier set related configuration that can be performed from thePLUitem.seeSee“"PLU:Item:PromptedModifiersModifier setsTab.”" for more information.


