
Release 2026.11.2 "Bryce Canyon"
Notes: This release consists of 8 New features and Improvements. Use the page navigation section on the top left of this screen to jump between the features you'd like to read about.
**This release WILL require a handheld update to version 2026.11.2**
If you would like any additional information or help setting up any of these new features, please contact support at:
Support@ingageit.com or call (612) 861-5277
New Features
1. Reporting Engine Overhaul!
We couldn't be more excited to announce that Sail's back office reporting engine has been completely redesigned from the ground up to offer you MANY new features and enhancements over our legacy reporting system.
- Running a report: Like before, select your report from the Reports tree in the Reportint tab. The long list of parameters on the previous on the classic reporting engine has been condensed into a much simpler Parameters Bar, where you can pick things such as your locations, the dates and any Filter or Options the report has. The report now shows directly in back office.
- Reading the results: After a run, your choices fold into one line at the top — click the pencil to change them and run again. Many reports start with summary totals (such as Net Sales and Units Sold), then a chart and the full table, which you can now search. The buttons next to Run allow you to download, print, schedule, email or favorite the report.
- Classic View: For this release you can still open the old version of a report with the blue switch icon next to report name in the page title at the top of the report. The old versions go away in release 2026.12.1.
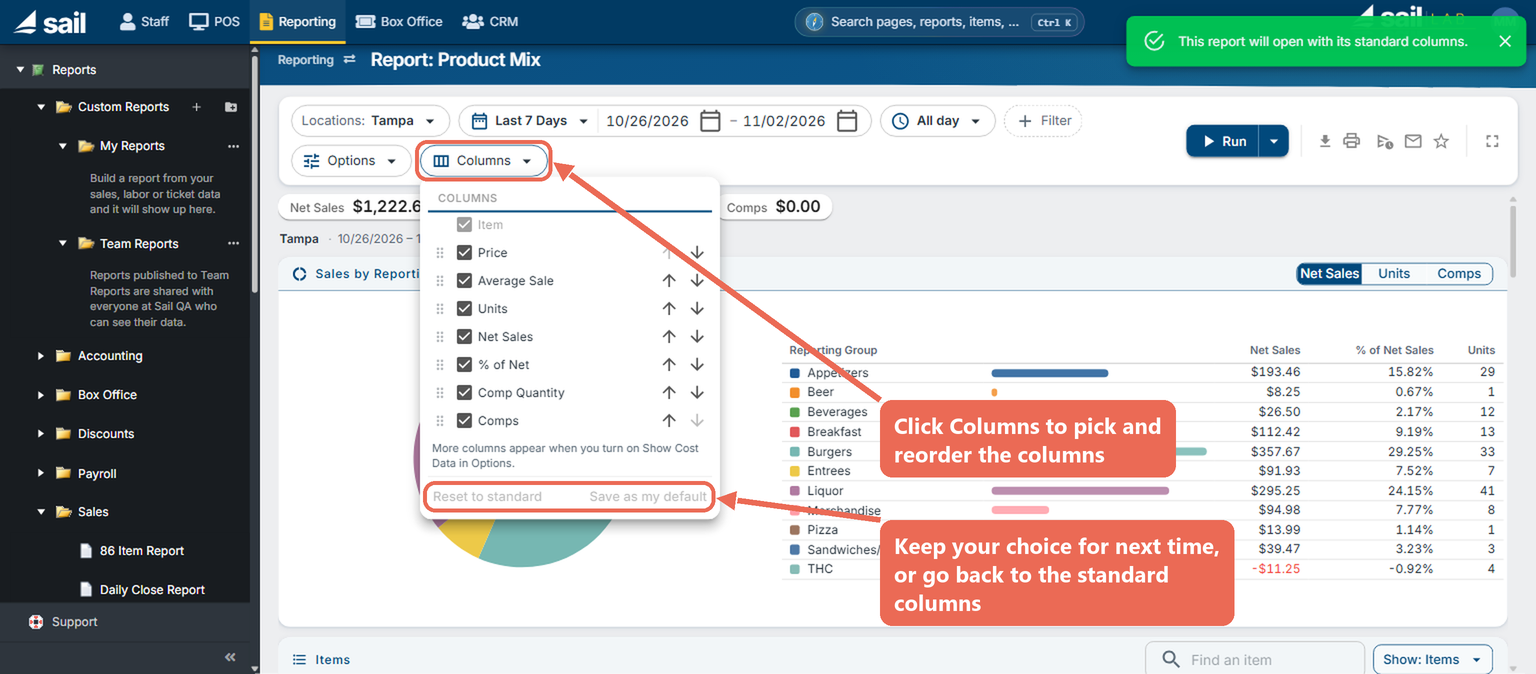
- Columns: Many reports now have a Columns button next to Options. Tick the columns you want, put them in order with the arrows or by dragging, and click Save as my default so the report opens that way next time for you. Reset to standard puts them back.
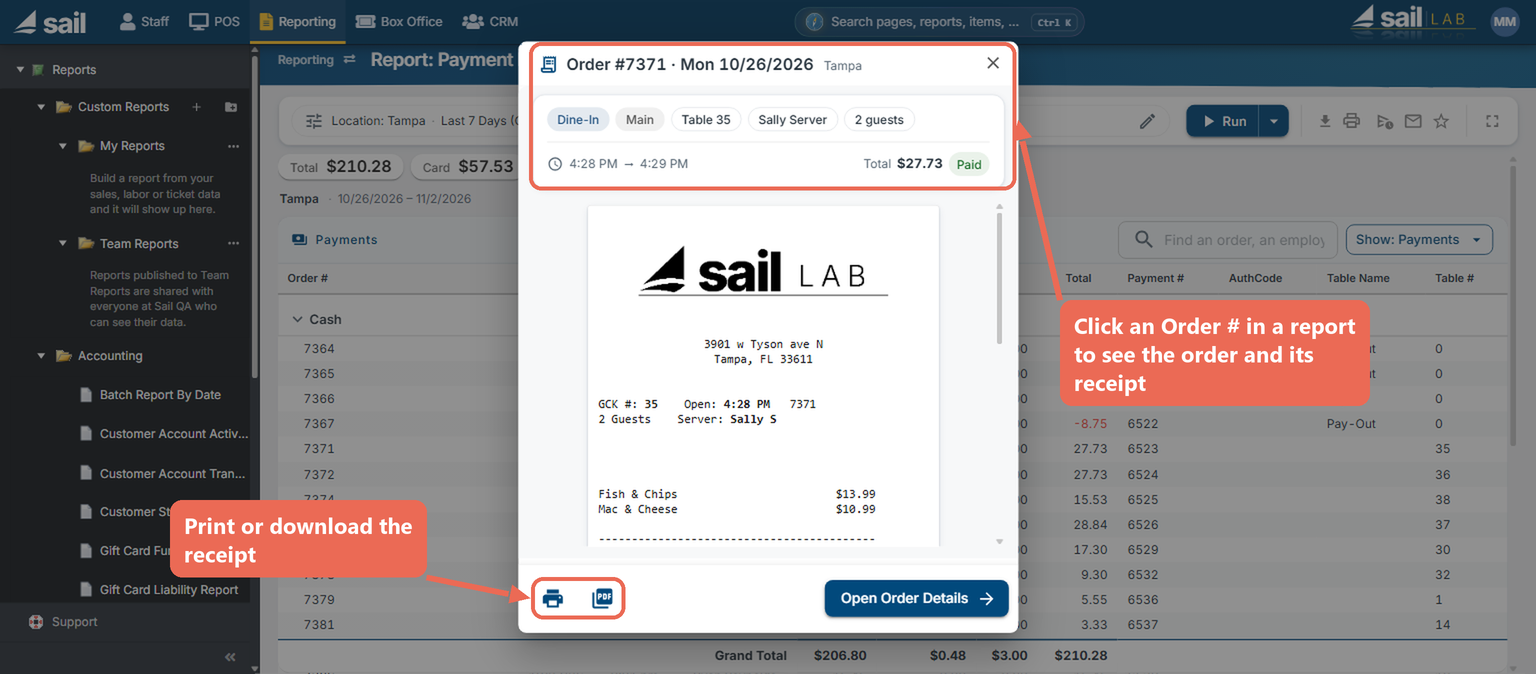
- See an order from a report: Click an Order # in a report (such as Payment Details, Discount Audit By Server or the Driver Report) to see the order and its receipt without leaving the report.
- Scheduled reports in Excel or CSV: The new reports lay out their Excel and CSV in a much cleaner, more consitent format. If one of your scheduled Excel or CSV files feeds a spreadsheet or another system, check the first one you get after the update
Note: The Payroll Report and Payroll Report With Overtime stay on the old version until they are retired on 12/28/26.


2. Favorite Reports: Save a Report with Its Settings
- You can now save any report with its location, dates and options as a favorite, and open it again with one click instead of setting it up each time.
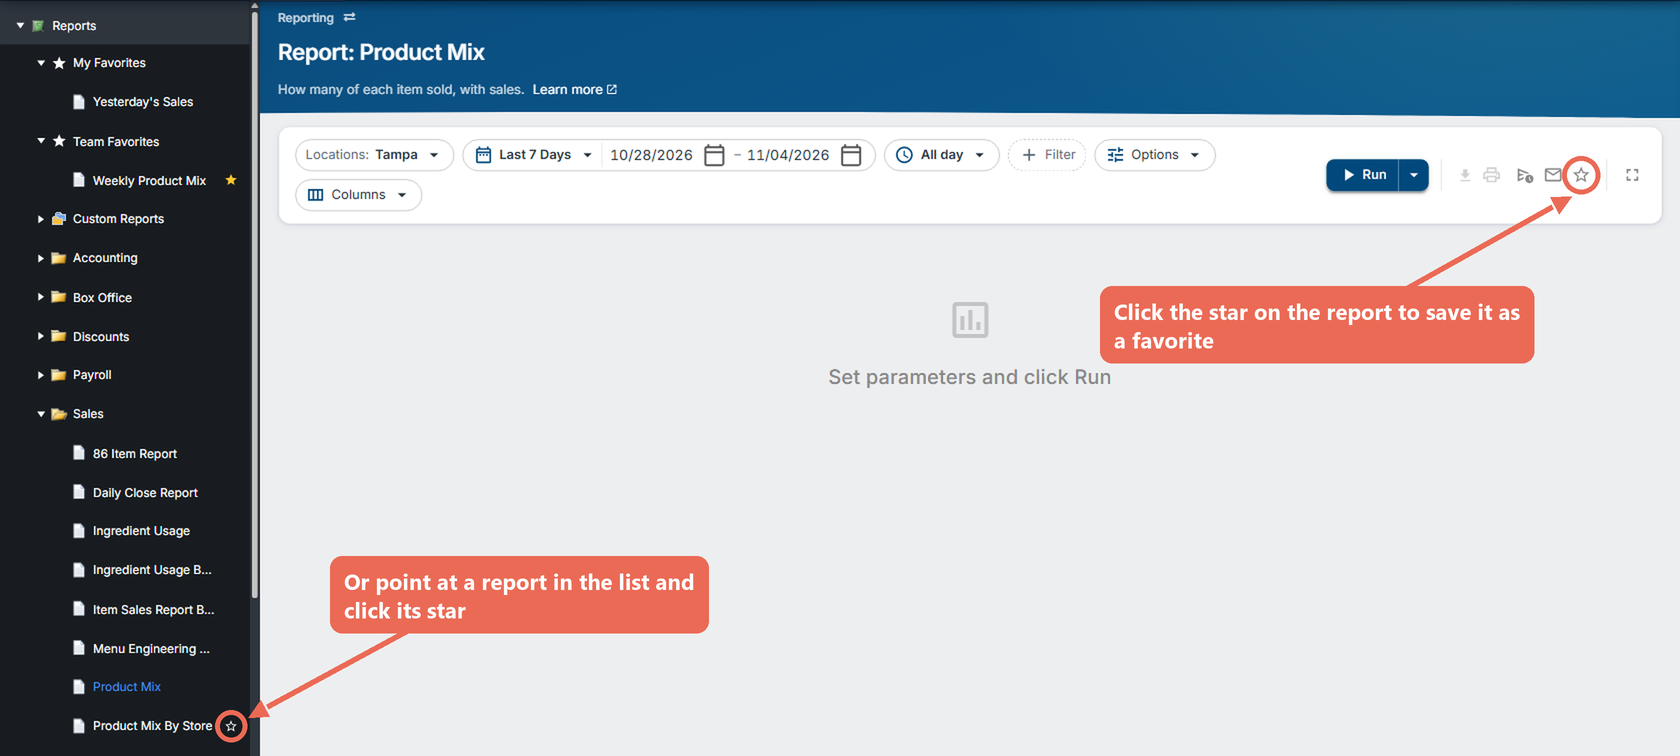
- Saving a favorite: Open the report, pick the location, dates and options you want, then click the star at the top right of the report. Give it a name and choose My Favorites (only you see it) or Team Favorites (everyone who can run that report sees it), then click Save Favorite.
- Dates: Dates picked from the list move with the day you open the favorite — Last Week is always the most recent week. Dates picked on the calendar stay those dates. Turn off Save dates to open the favorite on the report's usual dates instead.
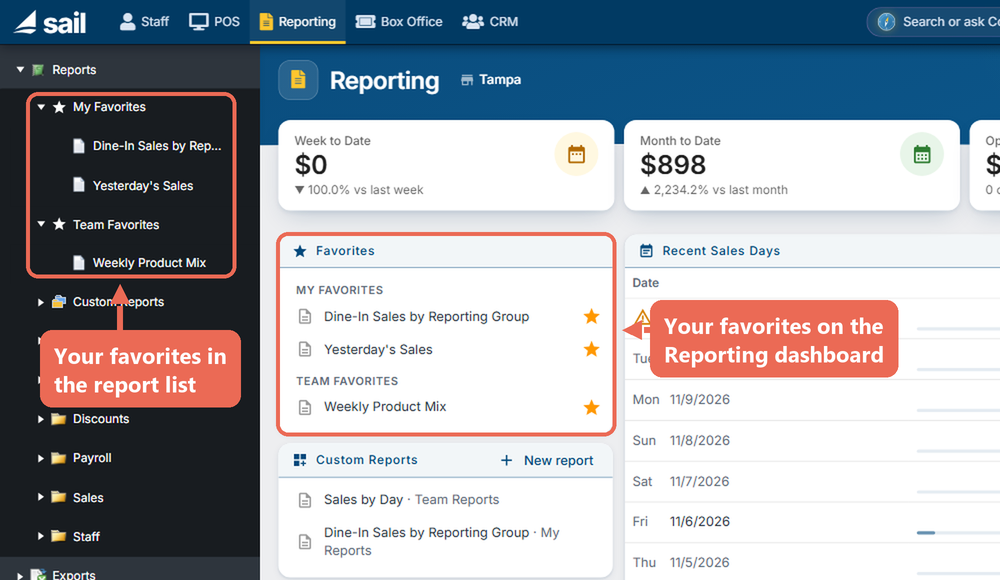
- Finding your favorites: They're at the top of the report list on the left, in My Favorites and Team Favorites, and on the Reporting page under Favorites. Click the gold star on a favorite to change or remove it.


Click here to learn more about saving a report as a favorite
3. Custom Reports: Build Your Own Reports
- You can now build your own reports from your sales, labor and ticket data — choose the numbers to show, how to group them and what to leave out, and see them as a table and a chart. Once it's saved, a custom report works like any other report: run it for any dates and locations, favorite it, schedule it, email it, and export it to PDF, Excel or CSV.
- Backoffice Setup: Go to Backoffice --> Reporting --> Reports --> Custom Reports, click the ... next to My Reports and click New report. Choose what to report on — Sales Items, Orders, Payments, Labor, Sales & Labor or Box Office — or start from a ready-made template such as Sales by Day or Top 20 Items.
- Building the report: Add the numbers to Show (such as Net Sales or Quantity Sold), what to Group by (such as Reporting Group, then Item), an optional Compare across (a column for each week or location), Filters (such as Order Type is Dine-In) and the Chart. The preview at the bottom changes as you go. Click Save.
- Running it: Your reports are under Custom Reports in the report list — in My Reports, which only you see, or Team Reports, shared with the rest of your team — and can be organized in folders. Click here to learn more about running a custom report.
- Note: Sales figures match the regular reports, such as Sales Period and Product Mix, to the cent and include today so far.
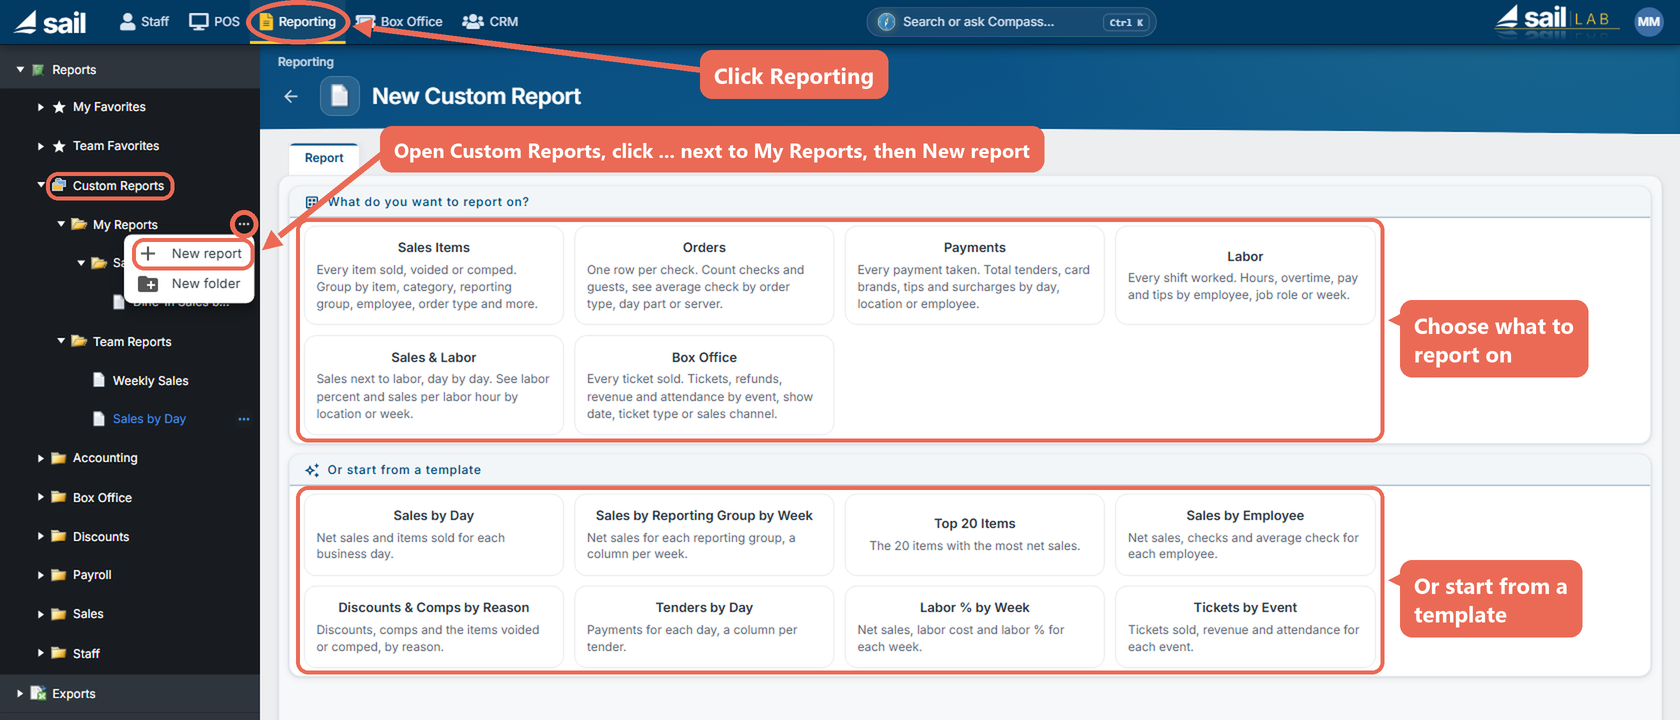


Click here to learn more about building a custom report
4. Compass: Search and Ask Backoffice
- The search box at the top of every Backoffice screen is now called Compass — one place to find pages, reports, settings, menu items, orders, customers and help articles, so you don't have to remember where something is in the menus. Click Search or ask Compass… or press Ctrl+K from anywhere in Backoffice.
- Finding an order: Type the order number — the last 4 digits are enough — to see the order with its location, time and total. For an older order, click Find order to look through every date.
- Ask about your numbers: Type a question in your own words — "What were sales yesterday?", "Top 10 items this month", "Comps by server last month" — and the answer opens right there as a number, a list or a chart. Click a chip (the number, dates, location or breakdown) to change the answer, or click Open in Report Builder to keep it as a custom report. Click here to learn more about asking Compass about your sales.
- Ask how to do something: "How do I fix a time card?" gives short steps with buttons that open the right page. The steps stay docked on the right while you follow them, checking off each one. Ask "Why can't I see Payroll?" and Compass tells you where the page is or that your job role doesn't have it. Click here to learn more about getting help from Compass.


Click here to learn more about searching with Compass
5. Terminal defaults by Job Roles
- You can now decide where the terminal starts for each job role — the screen it opens after logging in, the screen tab and order type new orders start with, the profit center, and the part of the floor plan Table View shows first. Example: bartenders start on the Orders screen with the Cocktails tab, while servers start on Table View in the Dining section — on the same terminal.
- Backoffice Setup: Go to Backoffice --> Staff --> Job Roles, click the job role, then the Terminal Defaults tab. Each location has its own row: pick the Screen Tab, Order Type, Destination On Login, Profit Center and Table Layout, then click Save.
- Leave a box blank and the terminal uses its own Terminal Settings for it. A job role with every box blank works just as before.
- On the terminal: The defaults apply on every terminal at that location while someone is clocked in under the job role, starting at their next login, and they win over the terminal's own settings. Someone with more than one job role gets the defaults of the job role they clocked in as.
- Note: Handhelds don't use the Terminal Defaults.
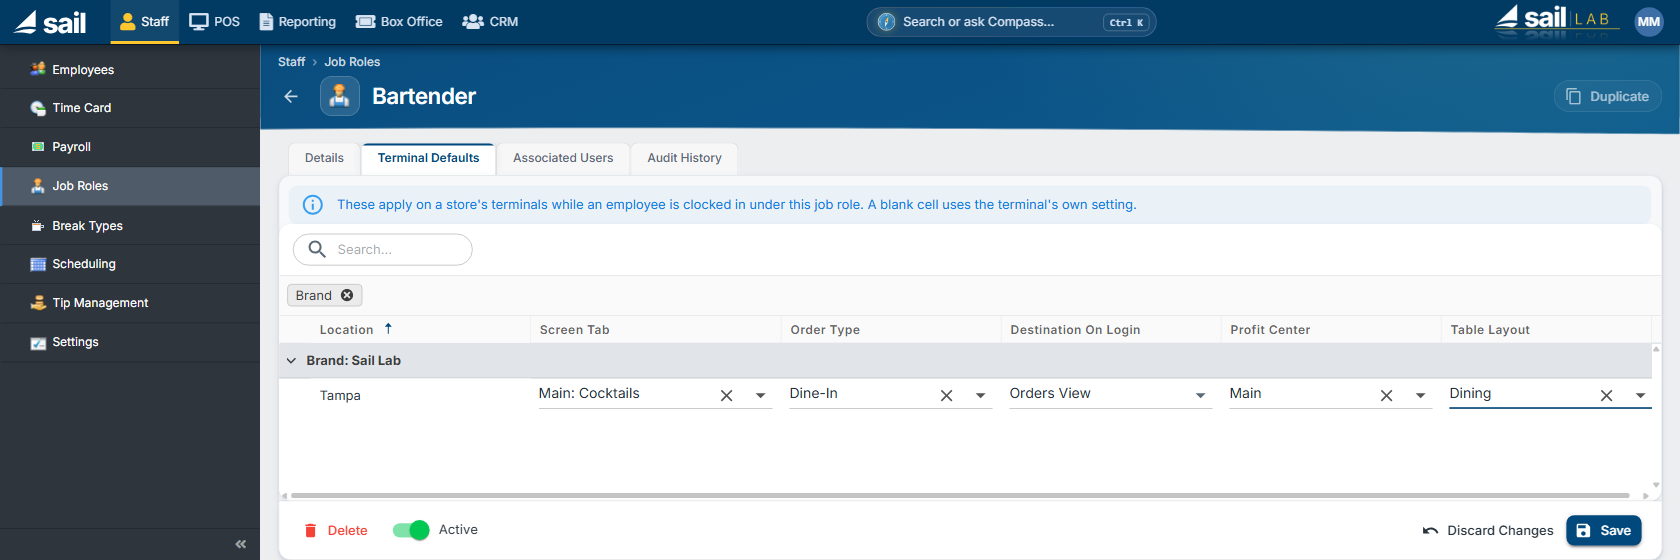

Click here to learn more about setting Terminal Defaults for a job role
Improvements
6. Ability to edit/change your scheduled reports
- Backoffice --> Reporting --> Scheduled Reports lists all of your scheduled reports in one place: the report, when it runs, who gets it, its status, and when it was last sent.
- Click a schedule's name to change anything about it — the name, frequency, day and time, who gets it and the format, and now also the report's own options, such as the location, filters and date range. Turn Active off to stop sending it without deleting it.
- Send now: The arrow at the end of a row emails the report right away, without changing the schedule. Tick several schedules to send them, add a recipient, or turn them on or off all at once.
- Audit History: Shows every change to a schedule — who made it, when, and the old and new values.
- Note: A schedule that fails 10 times in a row is paused. Open it, fix the problem (for example a wrong email address), turn Active back on and click Save.


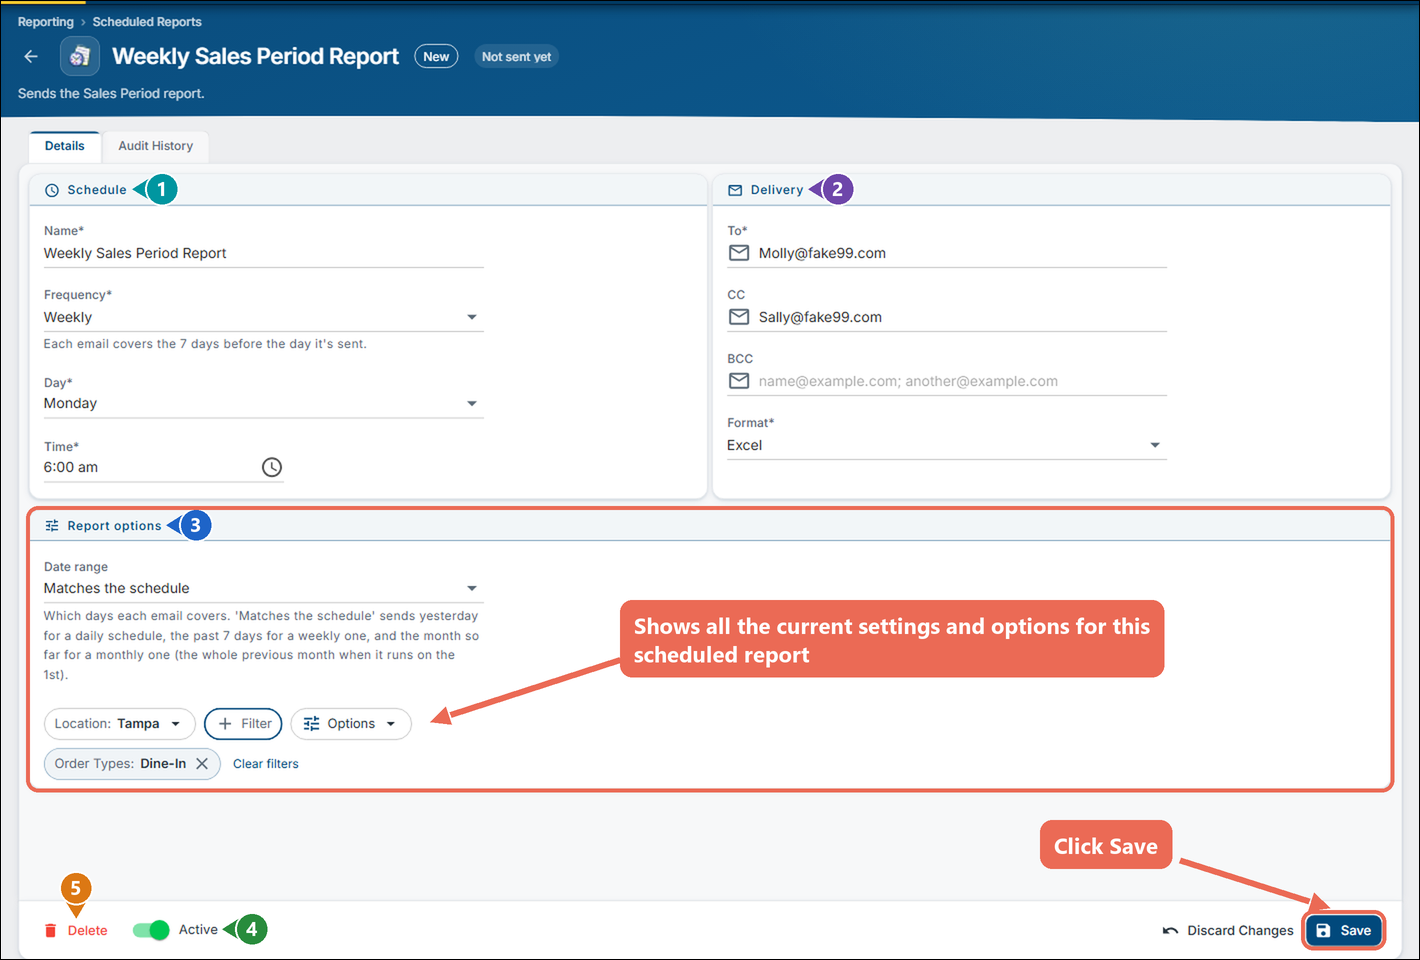

Click here to learn more about setting up Scheduled Reports
7. Rewards: Look Up a Member by Name
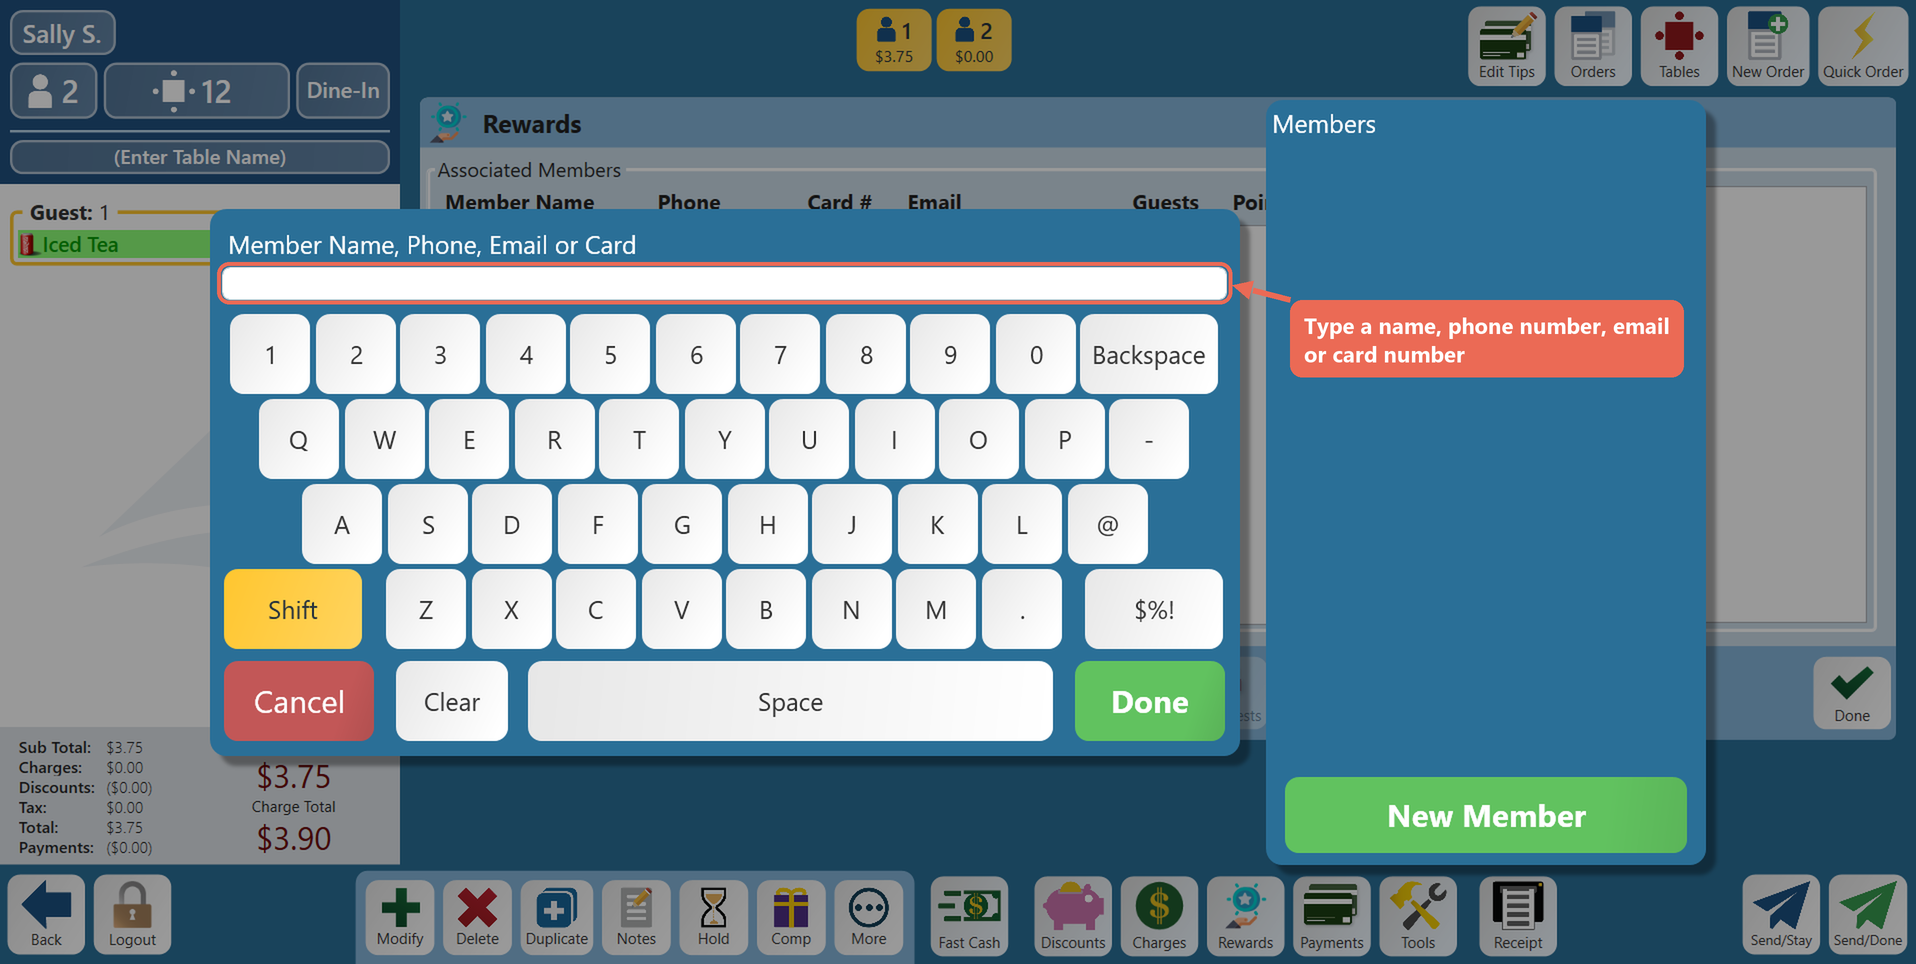
- For restaurants using Sail Rewards, the Rewards Lookup window on the terminal now has a full keyboard, so you can find a member by name as well as by phone number, email or card number.
- On the terminal: On the order, tap Rewards, then Lookup, and start typing. The Members list fills in as you type — tap the member to add them to the order.
- New Member registers a new member from the same window with their mobile phone number.

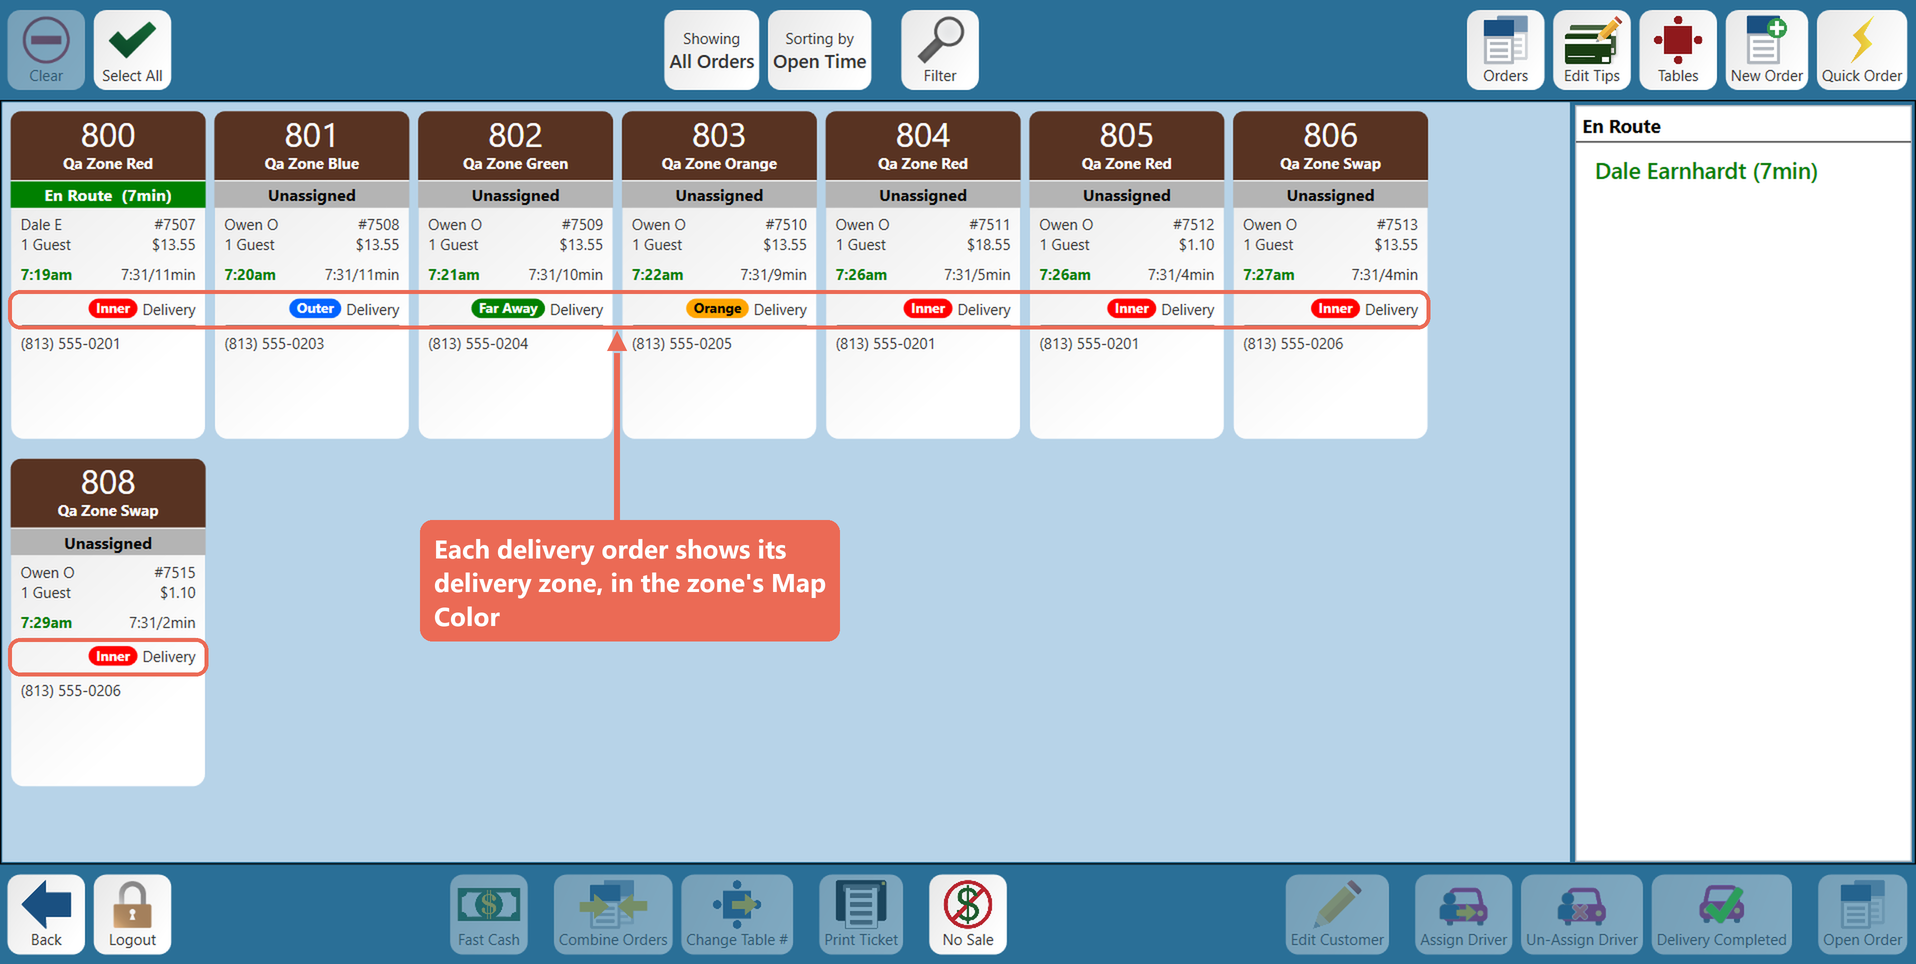
8. Dispatch: Delivery Zone on Each Order
- On the Dispatch screen, each delivery order now shows a colored chip with the name of its delivery zone, so you can see at a glance which orders go to the same area.
- The chip uses the Map Color you picked for the zone in Backoffice --> POS --> System Setup --> Delivery Zones.
- Until a driver is assigned, the chip shows the customer's zone; once a driver is assigned, it keeps the zone the order had at that moment. An order whose customer isn't in a delivery zone has no chip.

Fixes
- Fixed an issue where Email Report on the Customer Statement report didn't send the report.
- Fixed an issue where the last column of the Product Mix of Prompted Modifiers report multiplied the item's price by the number of modifiers used, so the column and its total were wrong.
- Fixed an issue where duplicating an item could put a price on its instruction modifiers, which should stay $0.00.
- Fixed an issue where items added to a scheduled order after it was sent didn't print in the kitchen, either when they were added or on the day of the order.
- Fixed an issue where press and hold didn't work on touch screens on a freeform screen tab with an item category on it.