Building and publishing the schedule
The
Schedule page is where you build each week's schedule, publish it so your team can see it, and send everyone their shifts. This guide walks managers throughcovers the processwhole ofprocess, creatingfrom an empty week to a newprinted schedule inon Ingagethe Scheduling.wall.
You covers howneed to addbe shifts,a reviewManager availabilityor andAdministrator time-offat requests,a publishlocation theto schedule,change andits shareschedule. itStaff members see a read-only view with published shifts only.
Find your team.way around
Step 1: Open the Schedule View

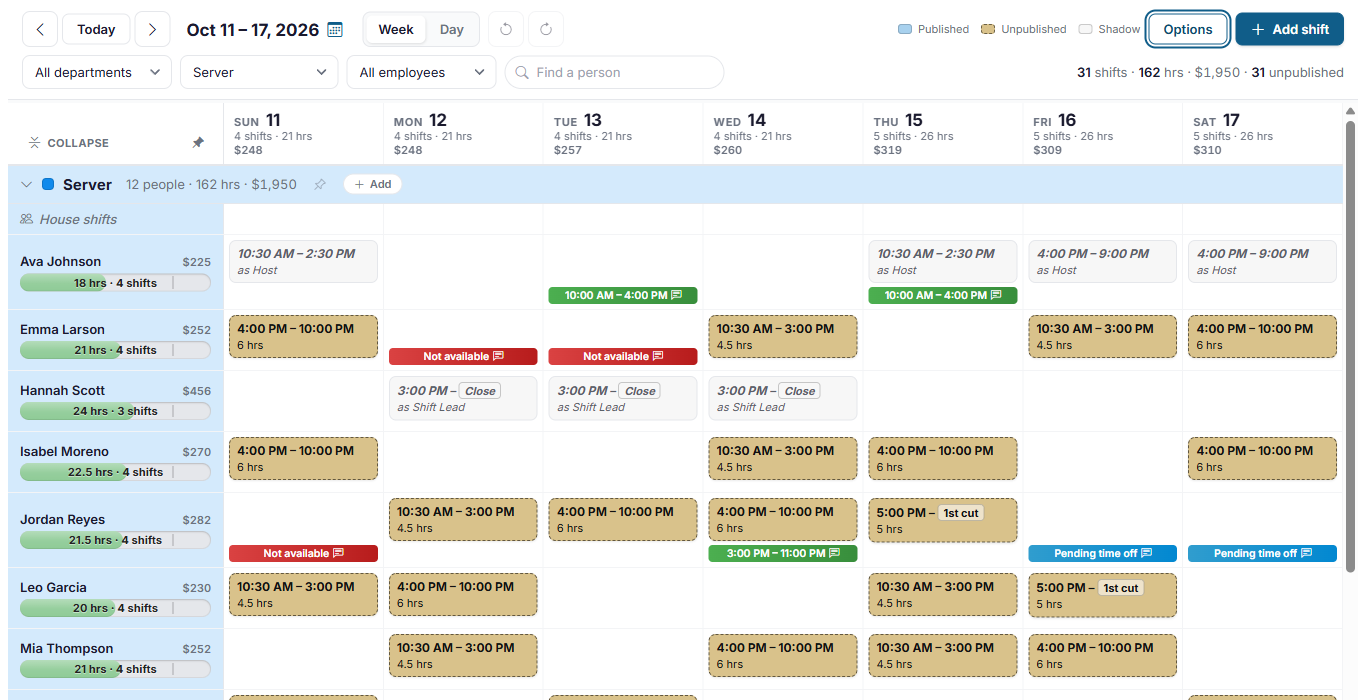
- Moving between weeks: use the arrows beside Today, or the calendar button beside the dates to jump to any week. Week and Day switch between the whole week and a single day.
- The summary at the top right adds up what is on screen: shifts, hours, projected labor cost, and how many shifts are still unpublished.
- Each day's heading shows that day's shifts, hours and labor cost.
- Filters: narrow the schedule
willto one department, one job role or one employee, or type in Find a person. Anything you do from the Options menu, such as publishing, applies only to what the filters leave on screen.
How the schedule is laid out
The schedule is grouped by job role. Each job role has a row for every employee who works it at this location, and a House shifts row at the top for shifts that don't have anyone on them yet, unless house shifts are switched off (see House shifts and open shift pickup). Click a job role's heading to collapse or expand it, or click its pin to keep it at the currenttop week.of your schedule.
UseNext to each employee's name you'll see:
- Their projected cost for the
dateweek,controlsbased on their pay rate or salary. Click any cost figure to see how it was worked out. An Administrator can switch the cost off, or leave salaried pay out of it, on the Settings page. - A bar showing their hours this week across every job role they work. The bar is green while they are comfortably under the location's hours limit, turns orange once they pass the warning level, and turns red when they are in overtime. The limits are set for each location on the Locations page.
What the colors mean
| You see | It means |
|---|---|
| Tan shift with a dashed border | Unpublished. Only managers can see it. The employee can't see it yet. |
| Blue shift | Published. The employee can see it in the app and on the website. |
| Envelope icon on a shift | The employee has been sent this shift. |
| Gray shift in italics, "as Host" | A shadow shift: the same employee is already working in another job role at that time. It's there so you don't double-book them. |
| Red bar, Not available | The employee's weekly availability says they can't work that day. |
| Green bar with times | The employee is only available during those hours that day. |
| Blue bar, Pending time off | A time off request is waiting for a manager to review it. If the employee calls another location home, that location reviews it, and clicking the day tells you which one (see Time off from other locations in Reviewing time off requests). |
| Red bar, Time off all day | Approved time off for the whole day. |
| Orange bar, Time off with times | Approved time off for part of the day. |
A small speech-bubble icon on a bar means the employee left a note. Click the day to read it. You can also click Published, Unpublished or Shadow at the top of the screenpage tofor movea forwardreminder orof backwardwhat betweeneach weeks.one Make sure you are viewing the correct week before adding or editing shifts.means.
Step 2: Review Availability & Time-Off Requests
Before adding shifts, review employeeCheck availability and any time-off requests on the schedule.
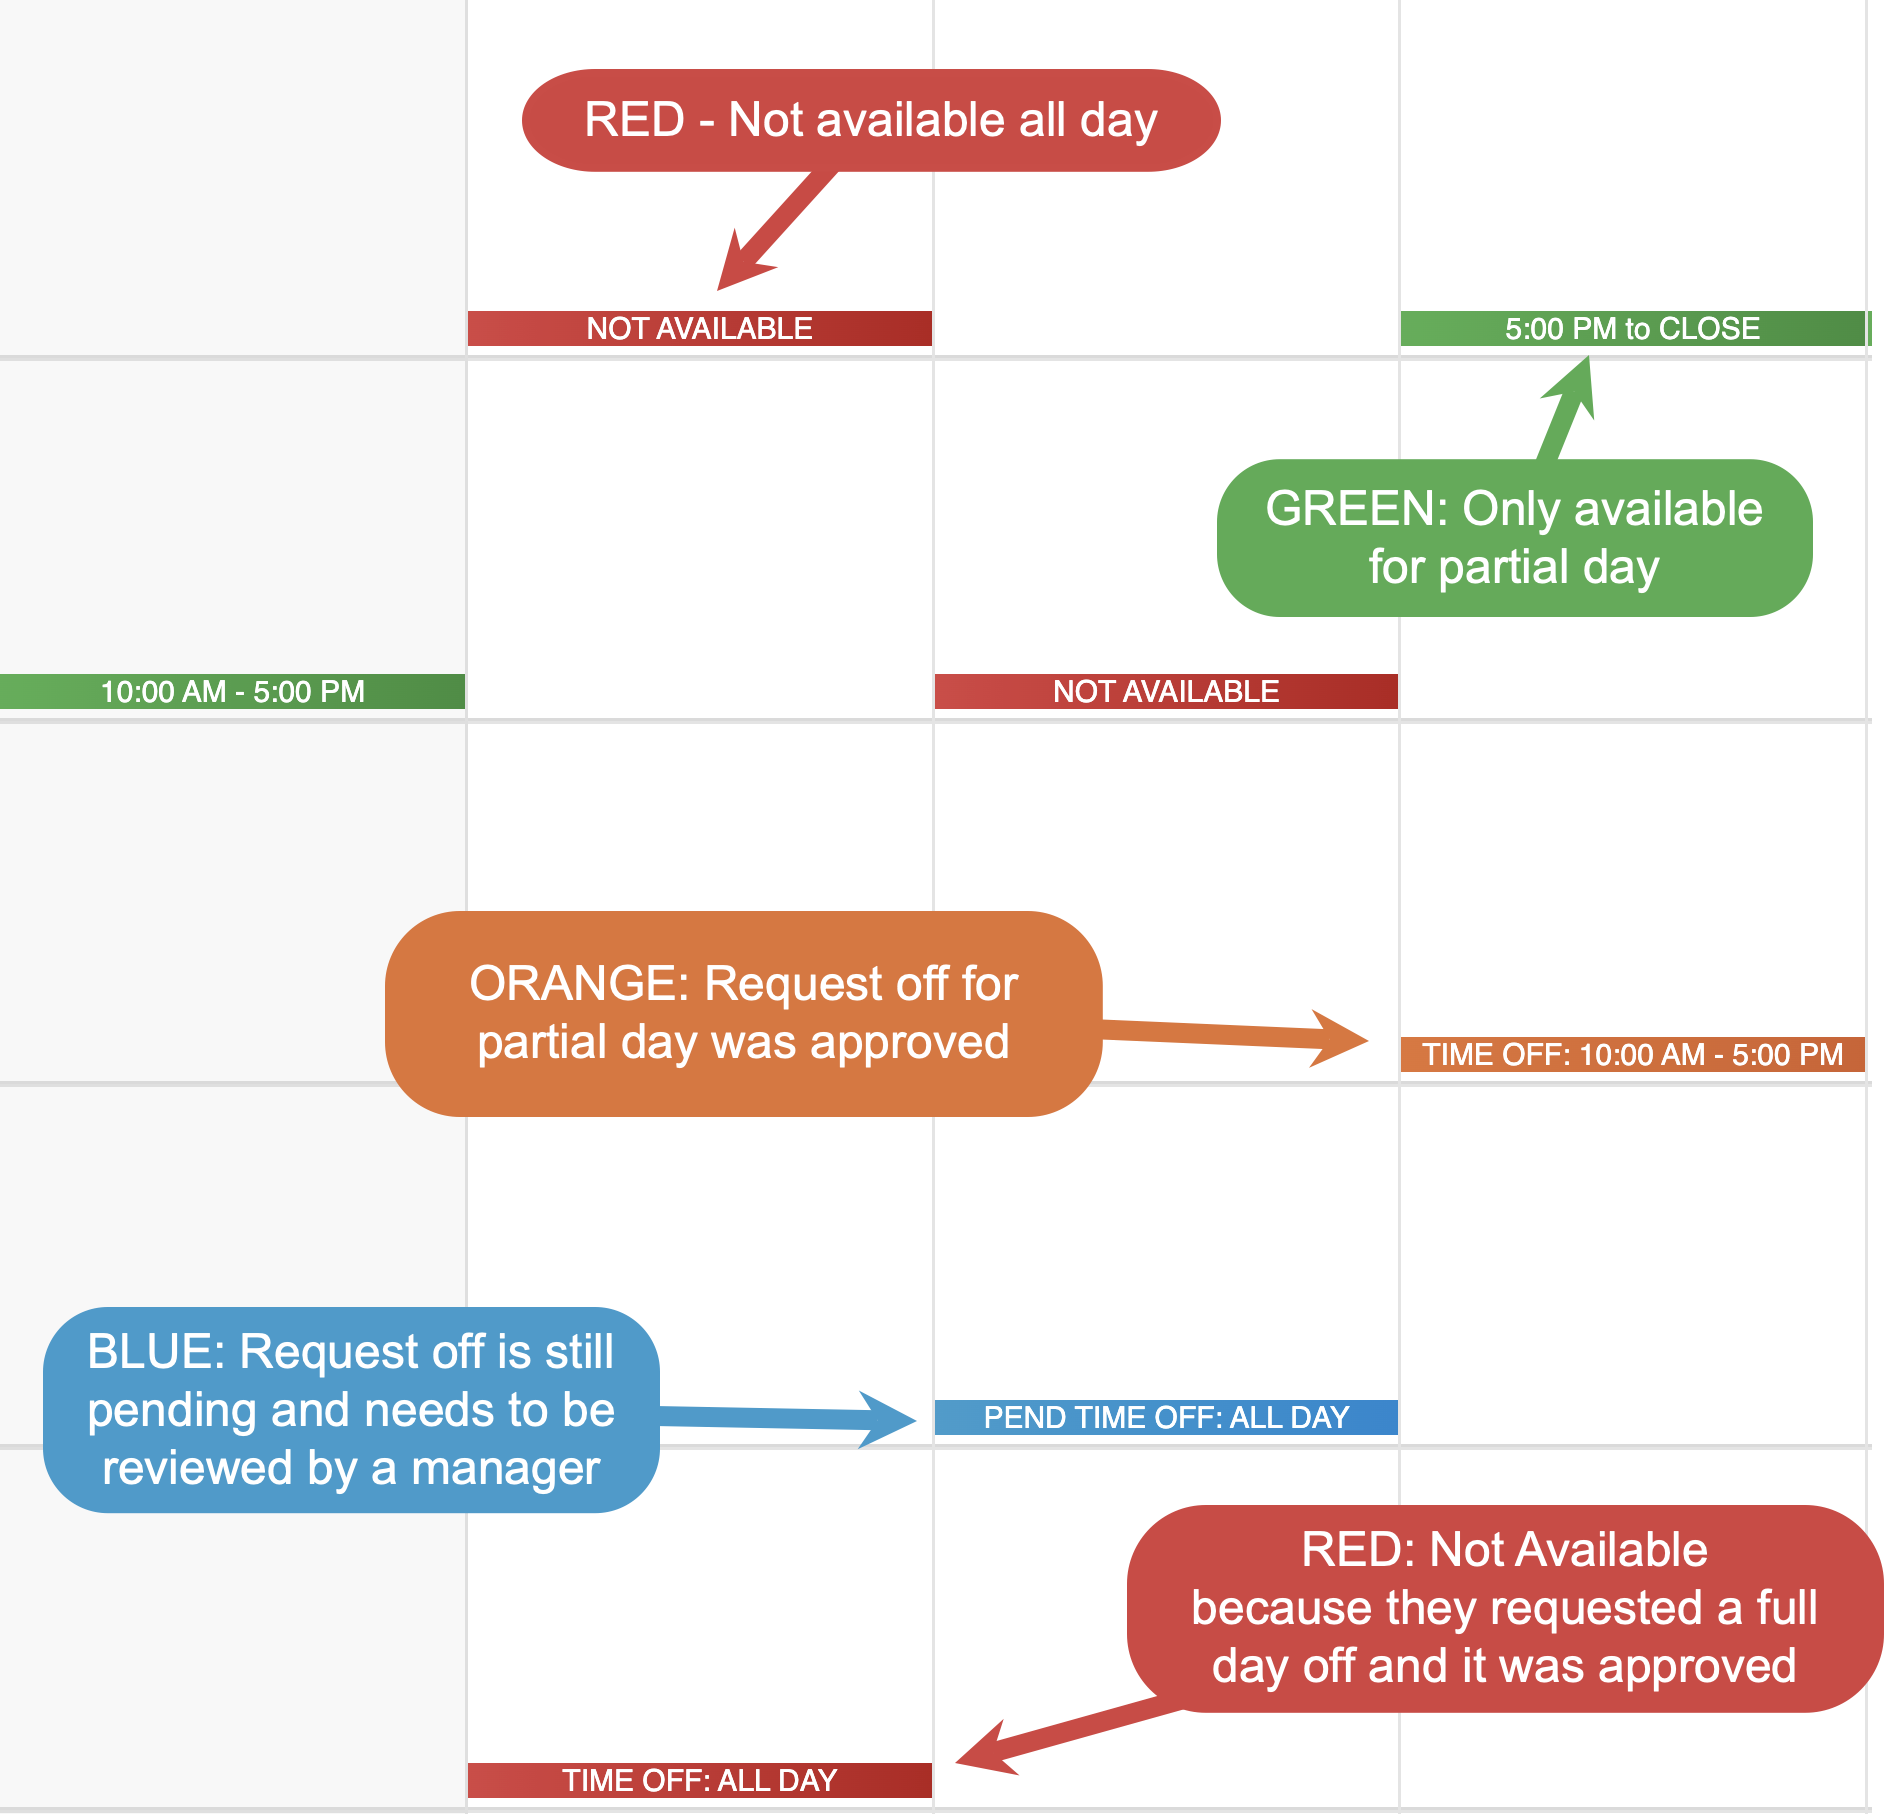
Availability and time-off requests are color-coded to make conflicts easy to spot:
Availability ColorsRED - Not available for the whole dayGREEN - Only available for part of the day
Time-Off requests colorsRED - Requesttime offfor the full day was approvedORANGE - Request off for part of the day was approvedBLUE - Still has a pending request off that needs to be reviewed by a manager
Any notes added by the employee will also be visible on the schedule.
Reviewing this information first helps ensure employees are only scheduled when they are available and prevents conflicts before shifts are added.
Step 3: Add Shifts
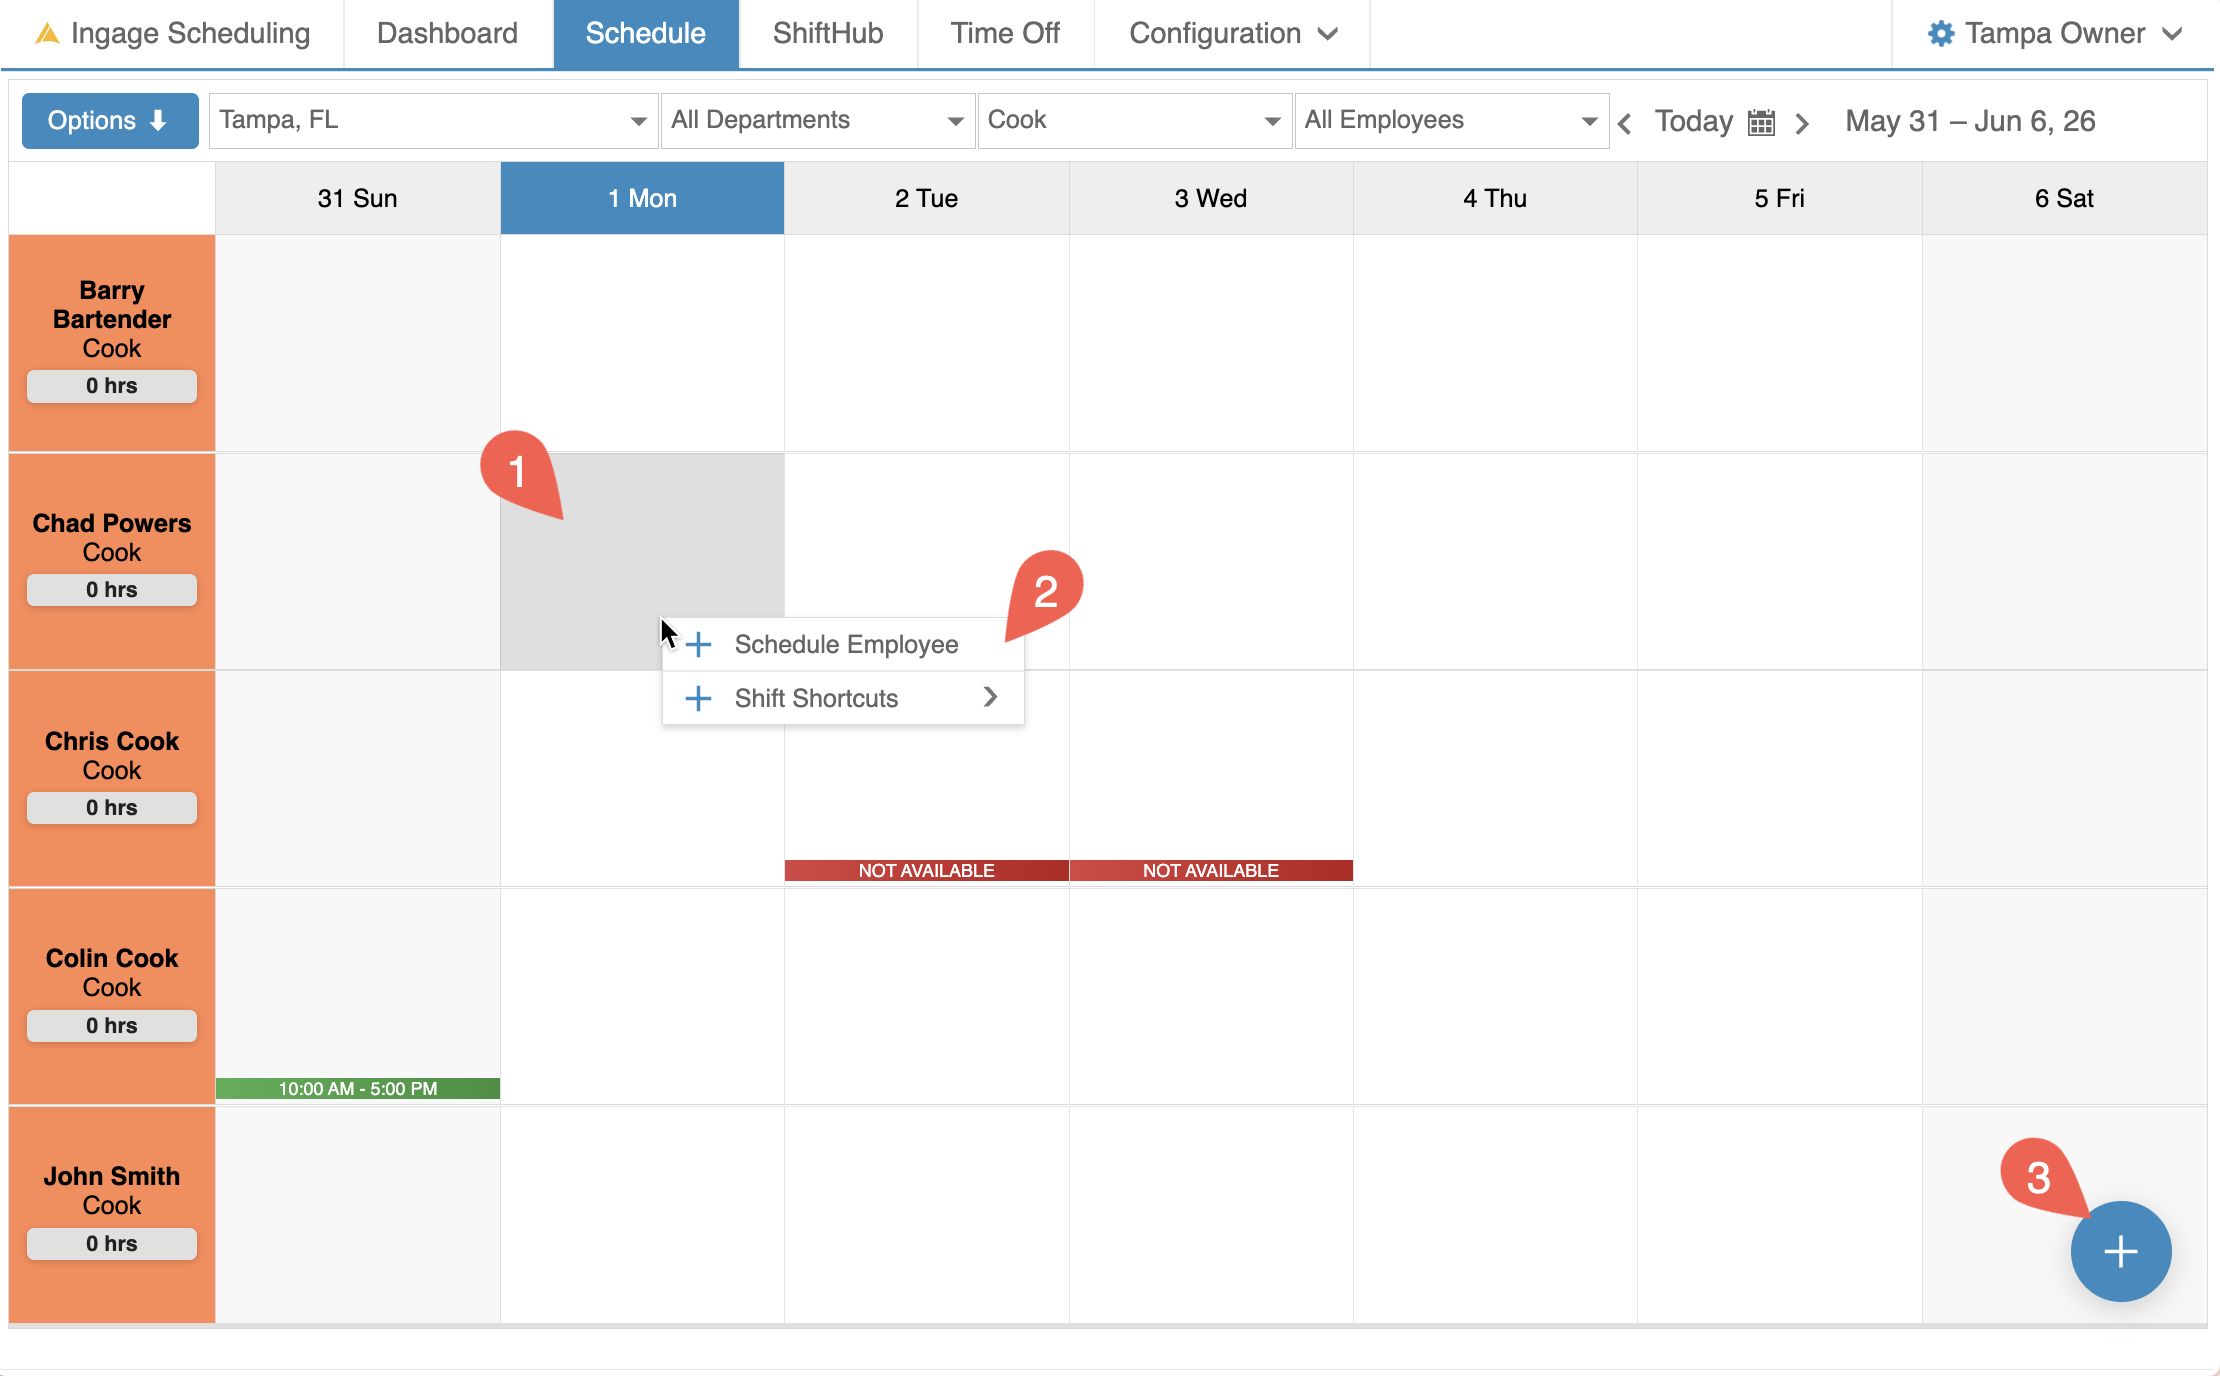
To add a shift,you start byadding selectingshifts. the day and employee row where you want the shift. There are three ways to open the Shift Editor:
showsDouble-click in theThe schedulecellRight-click in the cell and select Schedule EmployeeOr select a shift shortcut from here without needing to go into the shift editor
Single-click the cell to highlight it, then click the blue + button in the bottom-right corner of the screen
Any of these options will open the Shift Editorthem so you can enterplan around them, but it won't stop you from scheduling somebody who has asked for the shiftday details.off.
Add a shift
Click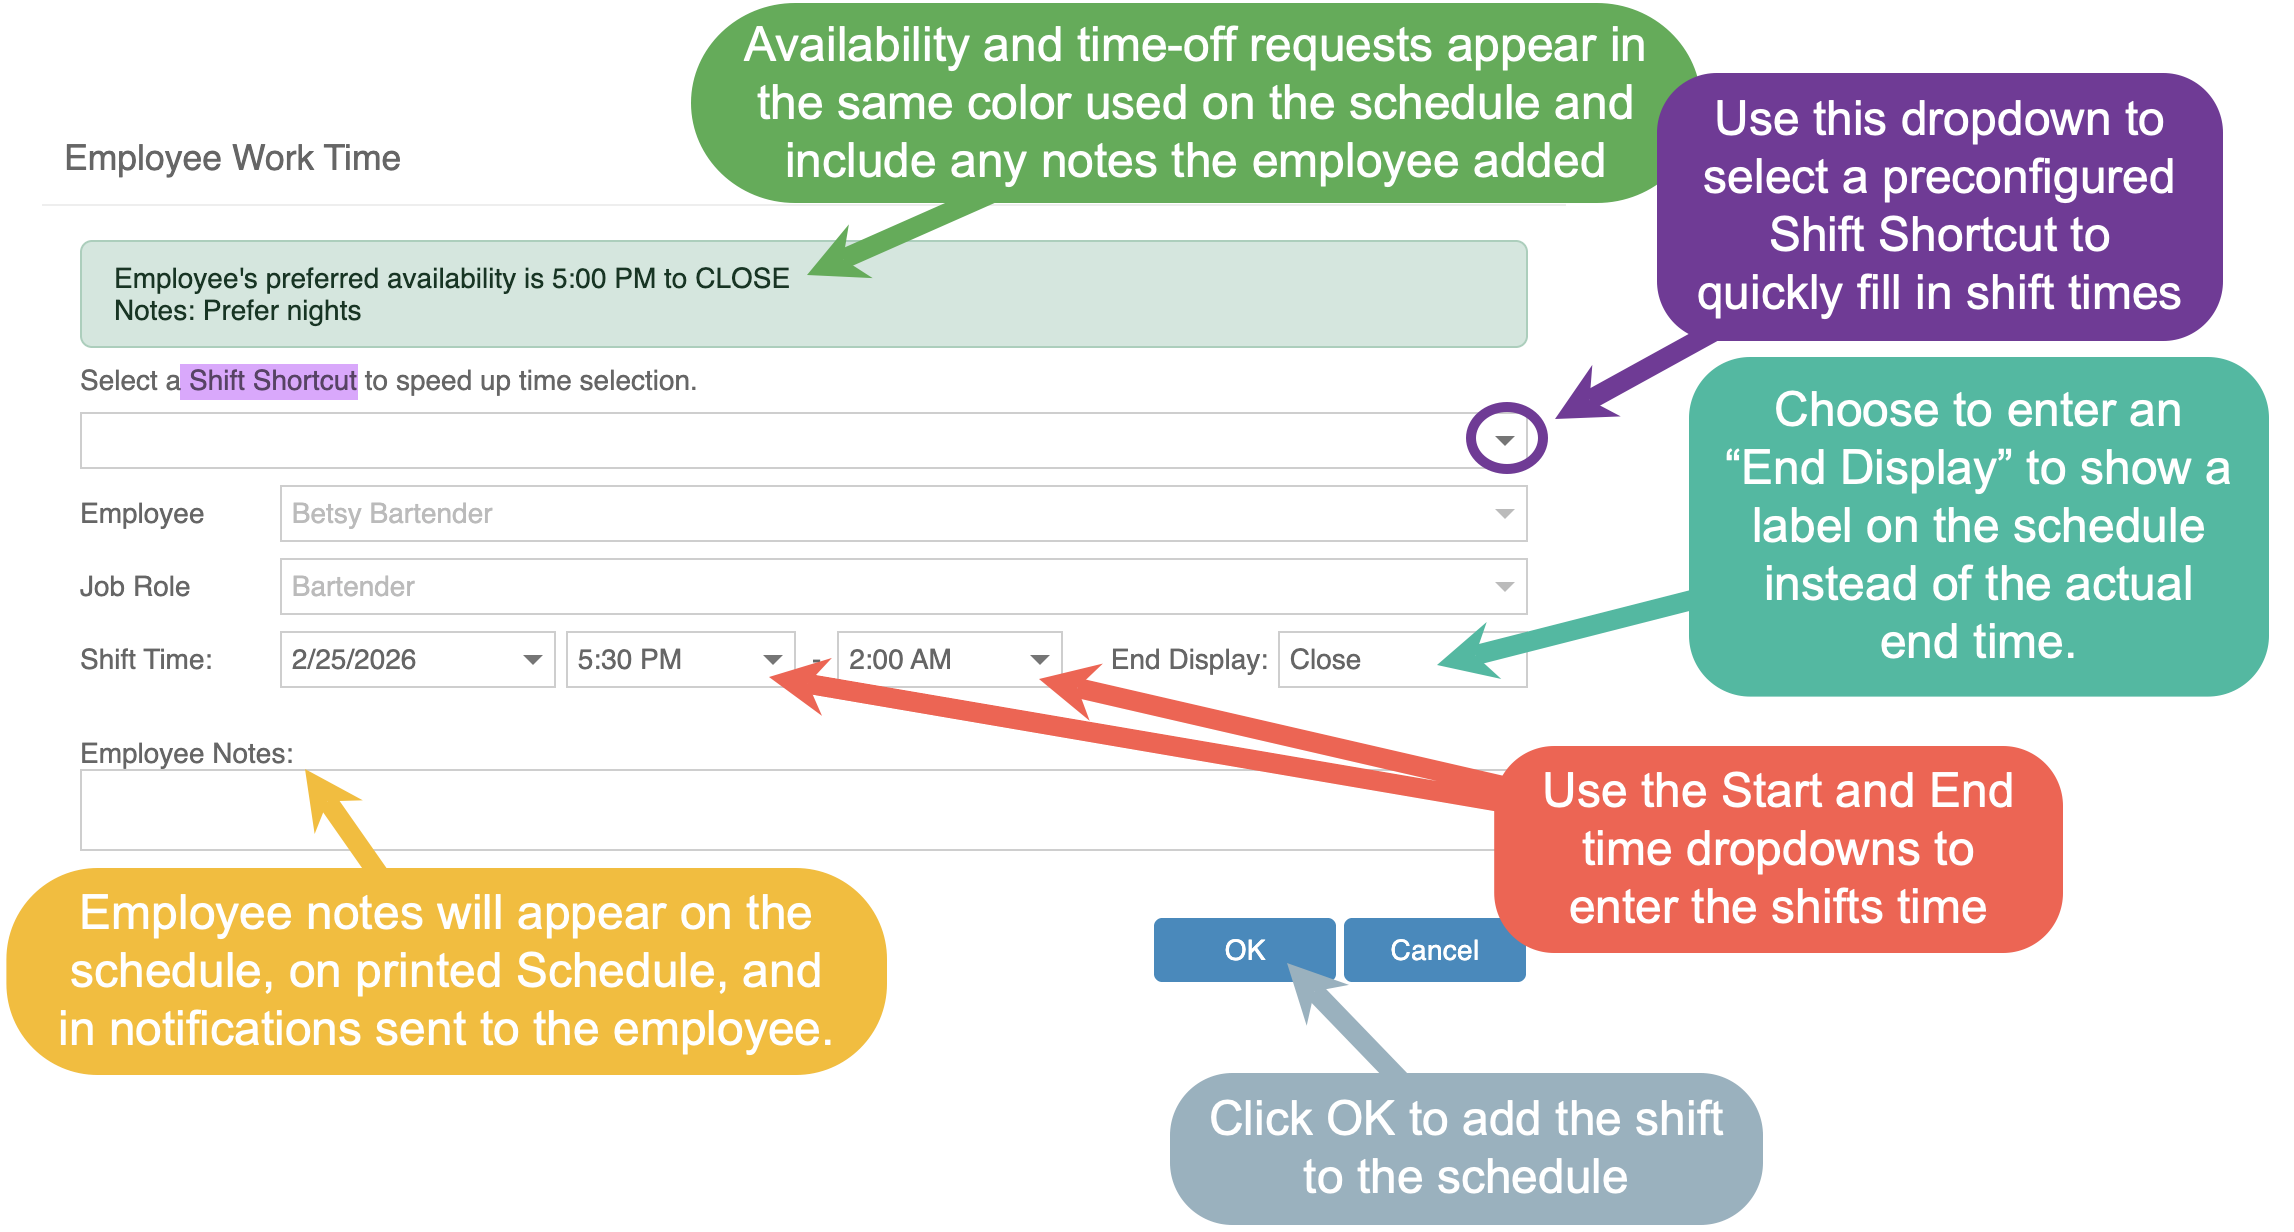
Inday in an employee's row. A menu opens with New shift… and the Shiftlocation's Editor,shift youshortcuts canfor eitherthat selectjob role. Click a Shift Shortcutshortcut to automaticallyadd that shift immediately, or click New shift… to fill in preset start and end times, or manually enter the shiftdetails times.yourself.
To enter times manually:
Click into the Start or End time fieldBegin typing a time to quickly filter the list (for example, typing 9 will show 9:00 AM, 9:30 AM, etc.)Select the correct time from the dropdown
An end time is required for scheduling and calculating weekly hours, but you can choose to enter an End Display (such as Close, 1st Cut, or 2nd Cut) to control what employees see on the schedule. This allows you to schedule the actual end time while displaying a more realistic or operational label to staff.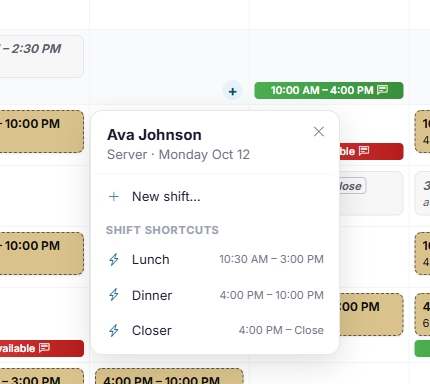
You can also addclick notes+ toAdd shift at the top of the page, or + Add beside a job role's name, and choose the employee in the form.
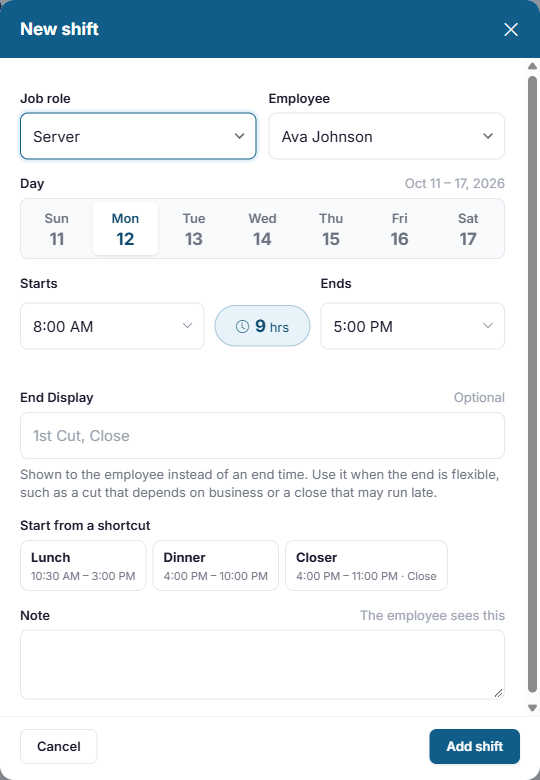
- Job role and Employee: filled in from the row you clicked. The employee list shows everyone who works this job role here. Anyone already working at that time is grayed out, with the shift
ifthey'reyouworking,needbecause nobody can be in two places at once. Choose House shift - nobody yet toprovideaddadditionaladetails,shift that someone can pick up later. - Day: any day of the week on screen.
- Starts and Ends: type a time or choose one from the list. Typing 4p, 4:30p or 16:30 all work. The length of the shift is shown between the two times.
- End Display (optional): what the employee sees instead of the end time, such as
section assignments, firstClose orsecond1stcut,cut. Use it when the end is flexible: a cut that depends on how busy it is, orcloser.aTheseclosenotesthatwillmayappearrun late. Hours and labor cost are still worked out from the end time. - Start from a shortcut: fills in the times and End Display from one of your shift shortcuts. The shortcut you picked stays highlighted until you change the start or end time yourself. When you edit a shift, the shortcut it matches is highlighted.
- Note (optional): anything the employee needs to know, such as their section. They see it with their shift, in the app and on the printed
schedule,schedule.
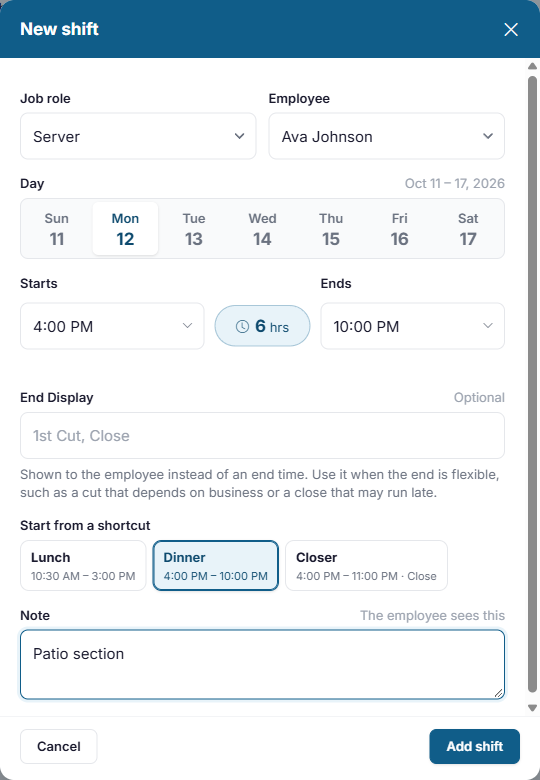
Click Add shift. The new shift appears in notificationstan: sentit is saved, but nobody can see it until you publish it.
Sail Scheduling checks every location, not just the one on screen: it won't let you schedule someone at two locations at the same time.
Change, move and copy shifts
Click a shift to thesee employee,its details and inwhat you can do with it.
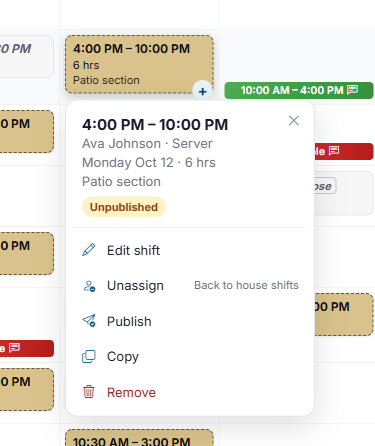
- Edit shift opens the form again. Double-clicking a shift does the same.
- Unassign takes the employee
appoffwhenandthey view their schedule.
jobClick OK to addmoves the shift to theschedule.Oncerole's House shifts row. It's only offered while house shifts are switched on. - Publish publishes just this one shift.
- Copy copies the shift. Then click an empty day on any row, in this week or another, and choose Paste.
- Remove deletes the shift. You can also select a shift
isandadded:press the Delete key.
Drag and drop
Drag a shift to move it to another day, to another employee, or to another job role that the same employee works. Hold Ctrl (or Alt) as you let go to drop a copy instead. While you drag, days where the shift can't go are shaded, and a label under the shift tells you what will happen when you let go, or why it can't.
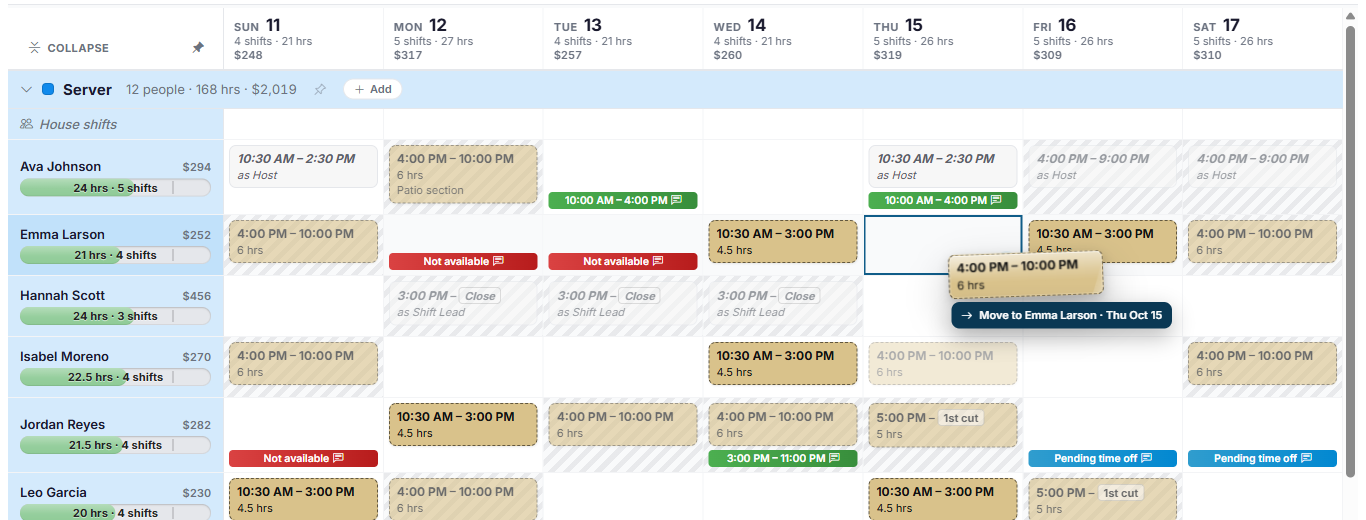
On a phone or tablet, press and hold a shift until it lifts, then drag it.
Undo and redo
Made a mistake? The two curved arrows beside Week and Day undo and redo your last changes, including publishing, copying and applying a template. You can also press Ctrl+Z and Ctrl+Y (Cmd+Z and Shift+Cmd+Z on a Mac).
Fill a week quickly
You don't have to build every week from scratch. The Options menu has four shortcuts:
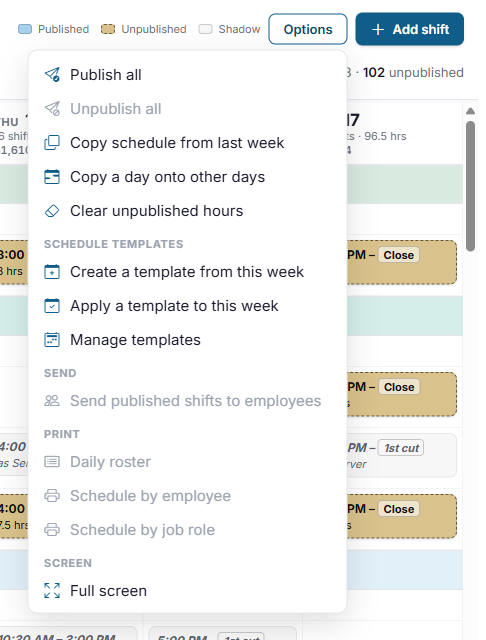
TheCopyshiftschedulewillfromappearlastinweeklightcopiestan,lastindicatingweek'sthatpublished shifts into this week.- Copy a day onto other days copies one day's shifts onto any other days of this week. You can also hover over a day's heading and click its copy button.
- Apply a template to this week adds the
shiftshiftsisfromunpublished.a schedule template you've saved. See Schedule templates. IfClearanunpublishedemployeehoursworksremovesmoreeverythan one job role, scheduling them for aunpublished shift inonetheroleweek,will cause that shift to appear in their other job role rows in light gray. These"Shadow Shifts"helpso youquicklycanseestartwhenover. Published shifts are left alone.
Everything these shortcuts add is unpublished, so you can check it first. Afterward, a summary tells you what was added and what was skipped, and why, for example because an employee is no longer at this location or is already scheduled,working preventingat accidentalthat overlappingtime. shifts.Look it

Copy schedule from last week doesn't check time off. It can put an employee on a day they have approved time off. Check the time off bars after copying. Applying a template and copying a day can skip approved time off for you.
Publish the schedule
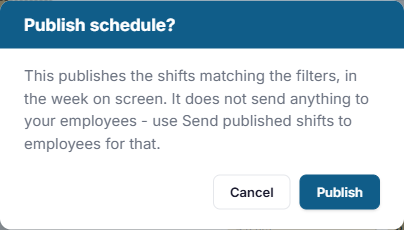
Nobody can see a shift until it is published. When the week is ready, open Options and choose Publish all, then confirm.
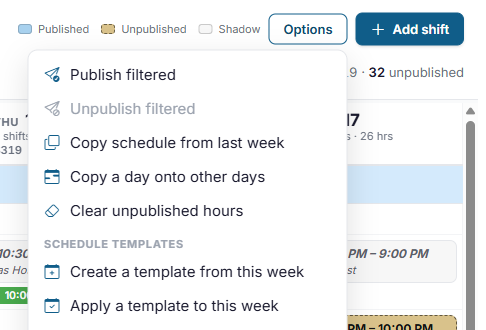
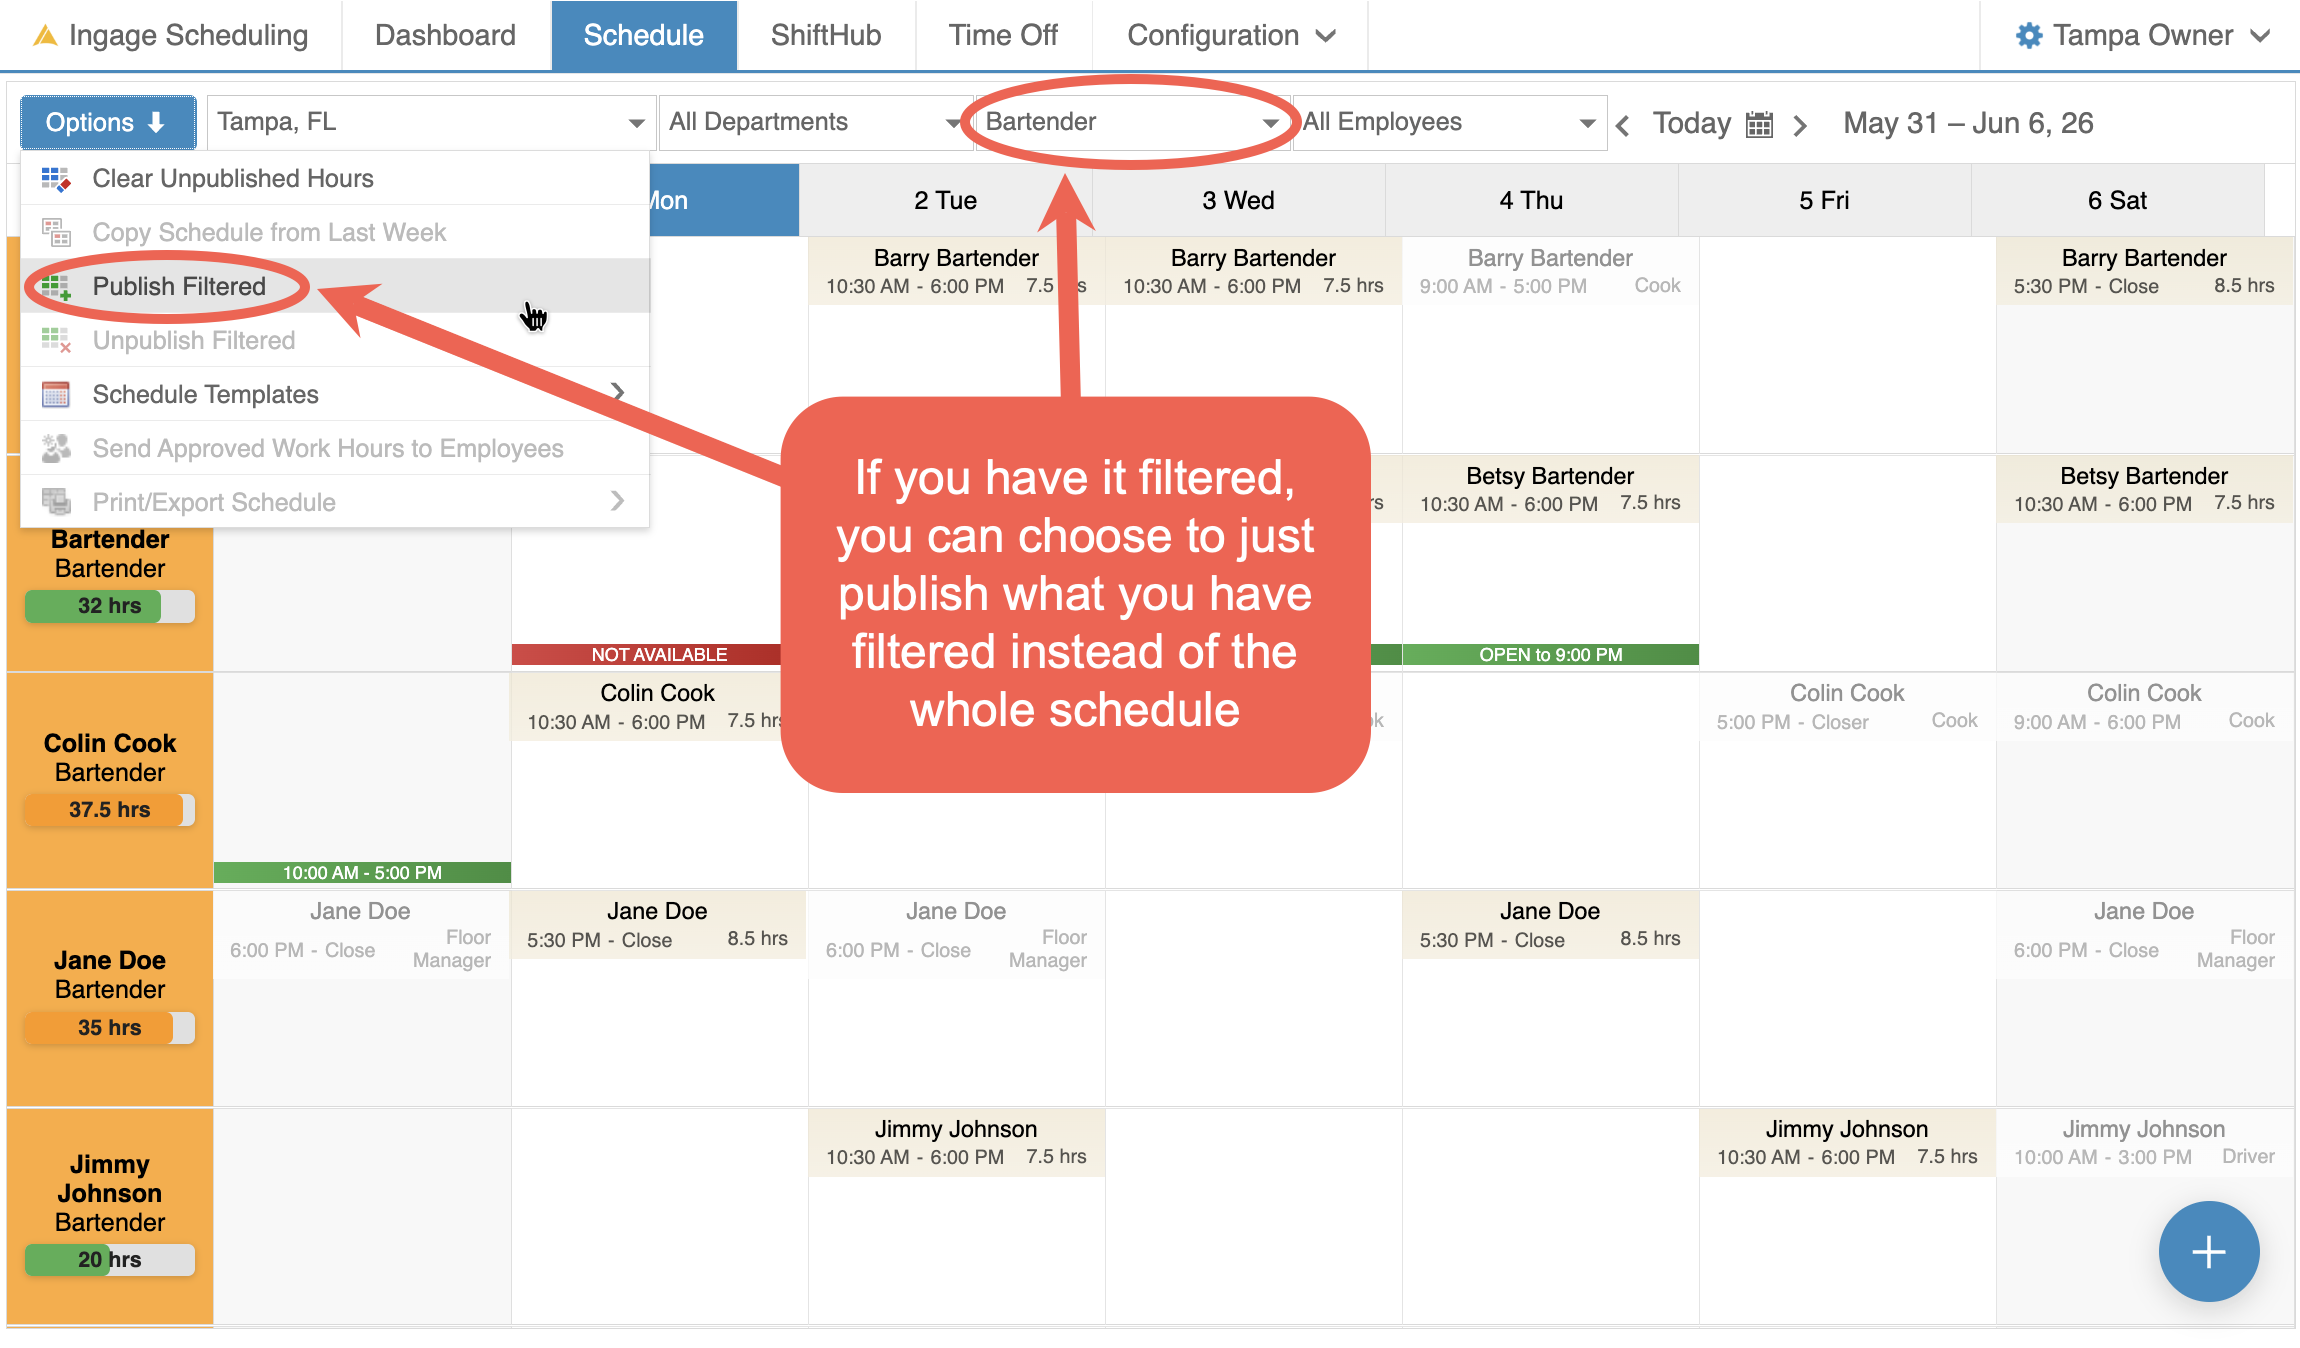
To publish only part of the week, use the filters first. For example, filter to the Server job role to publish just the servers' shifts. With a filter on, the menu says Publish filtered and publishes only what's on screen.
StepPublished 4:shifts Review,turn Adjustblue, &and Balanceemployees Coverage
can - see
Review each day to ensure proper staffingCheck total scheduled hours per employeeTotal hours for each shift are displayedthem in thebottom-rightappcorner of the shift.Total weekly hours for each employee appearand on theleft-handwebsitesiderightunderaway.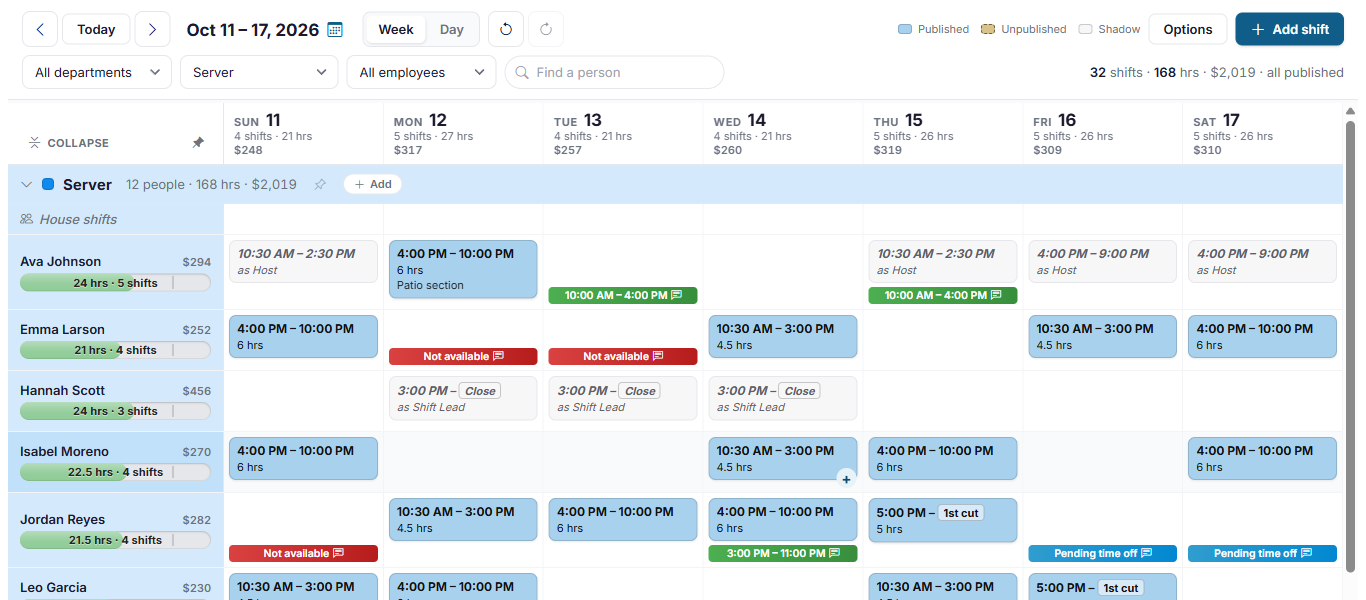
Publishing doesn't notify anyone. Employees are only emailed, texted or sent a push notification when you send the
employee’sschedulename(see below). That way you can publish, make final changes, andjobsendrole.onceThisyou'retotalhappyincludeswithallit.shiftsChanging
acrossaallpublishedjob roles.
- shift
MakeAadjustmentspublishedasshiftneededhastofeweravoidoptions:over-Details, Unassign, Unpublish and Copy.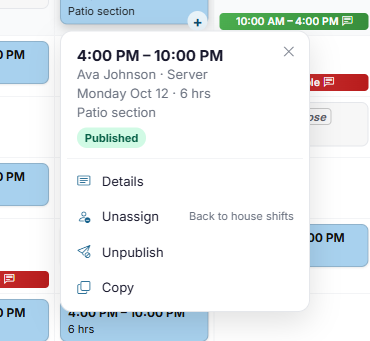
To change its times or
removeunder-schedulingit,
Editingfirst, make your change, then publish it again. To give a shift
Shifts can be edited at any time before they are published.Double click on thepublished shiftto get back into the shift editorRight click on the shifts and click "Open" or "Delete"Select the shift, and the blue circle in the bottom-right corner will change to show options to edit or delete the shift.
A shift can be draggedto a differentdayemployee, let them trade it through ShiftHub, or unpublish it and change it yourself. Options also has Unpublish all (or Unpublish filtered) for the whole week.Send the schedule to your team
When you're ready for everyone to hear about their shifts, open Options and choose Send published shifts to employees.
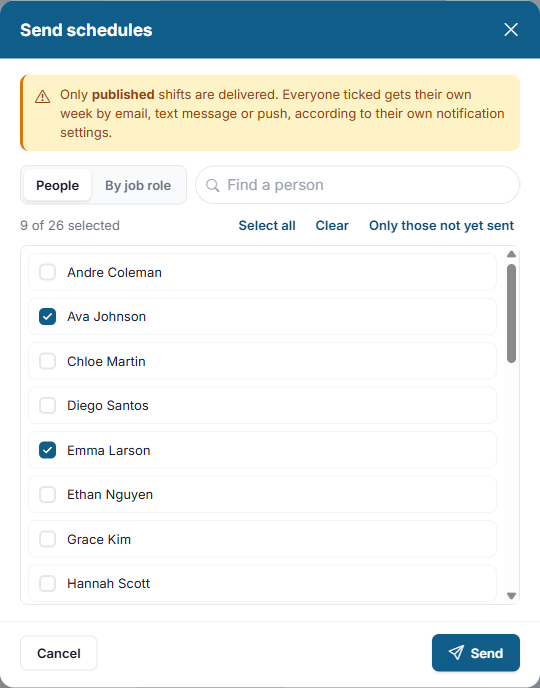
- Everyone with a published shift this week who hasn't been sent it yet is already ticked. Change the ticks if you need to: Select all, Clear and Only those not yet sent help you pick, and By job role lists people under their job roles.
- Click Send.
Each employee gets their own week by email, text message or push notification, depending on their notification settings. Only published shifts are sent. Afterward, an envelope icon appears on each shift that was sent.
Print the schedule
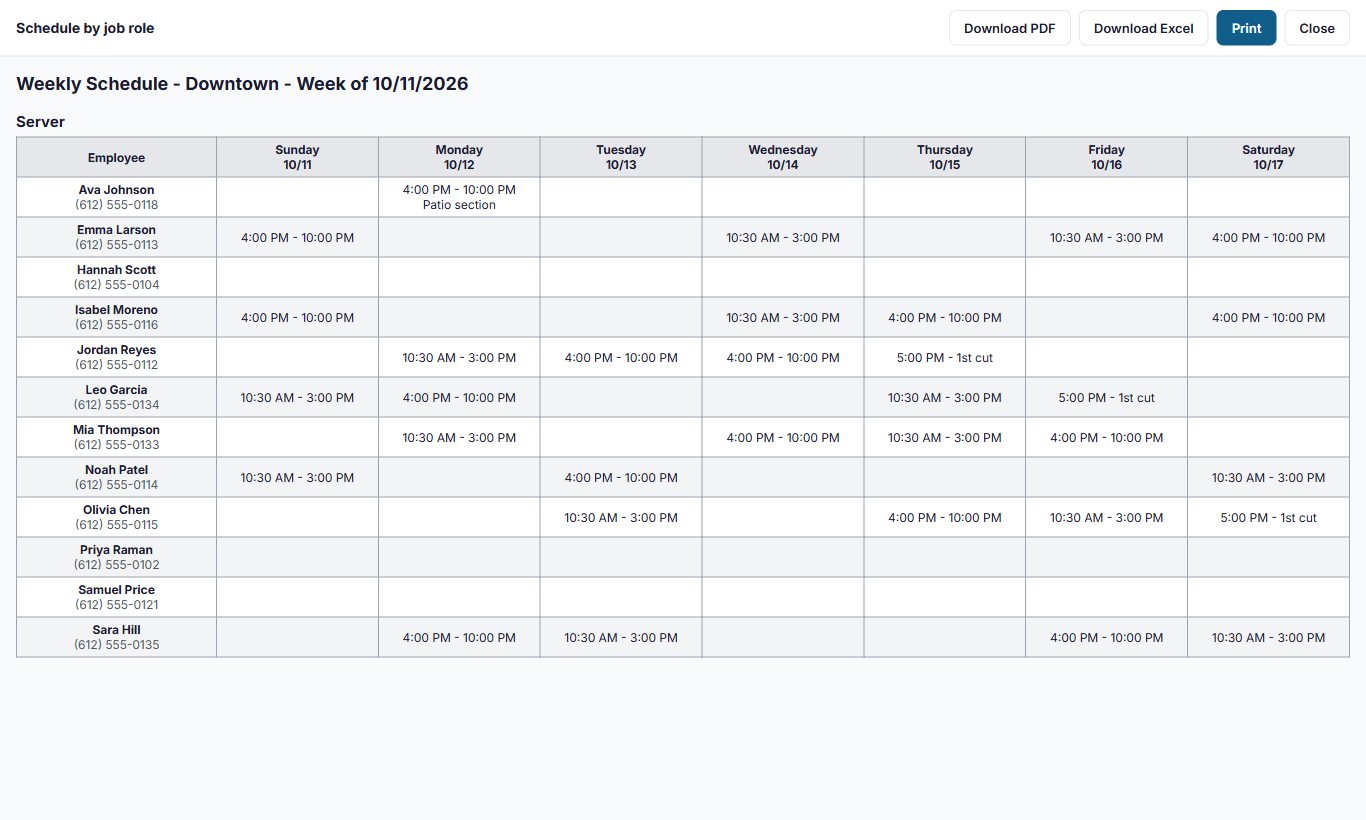
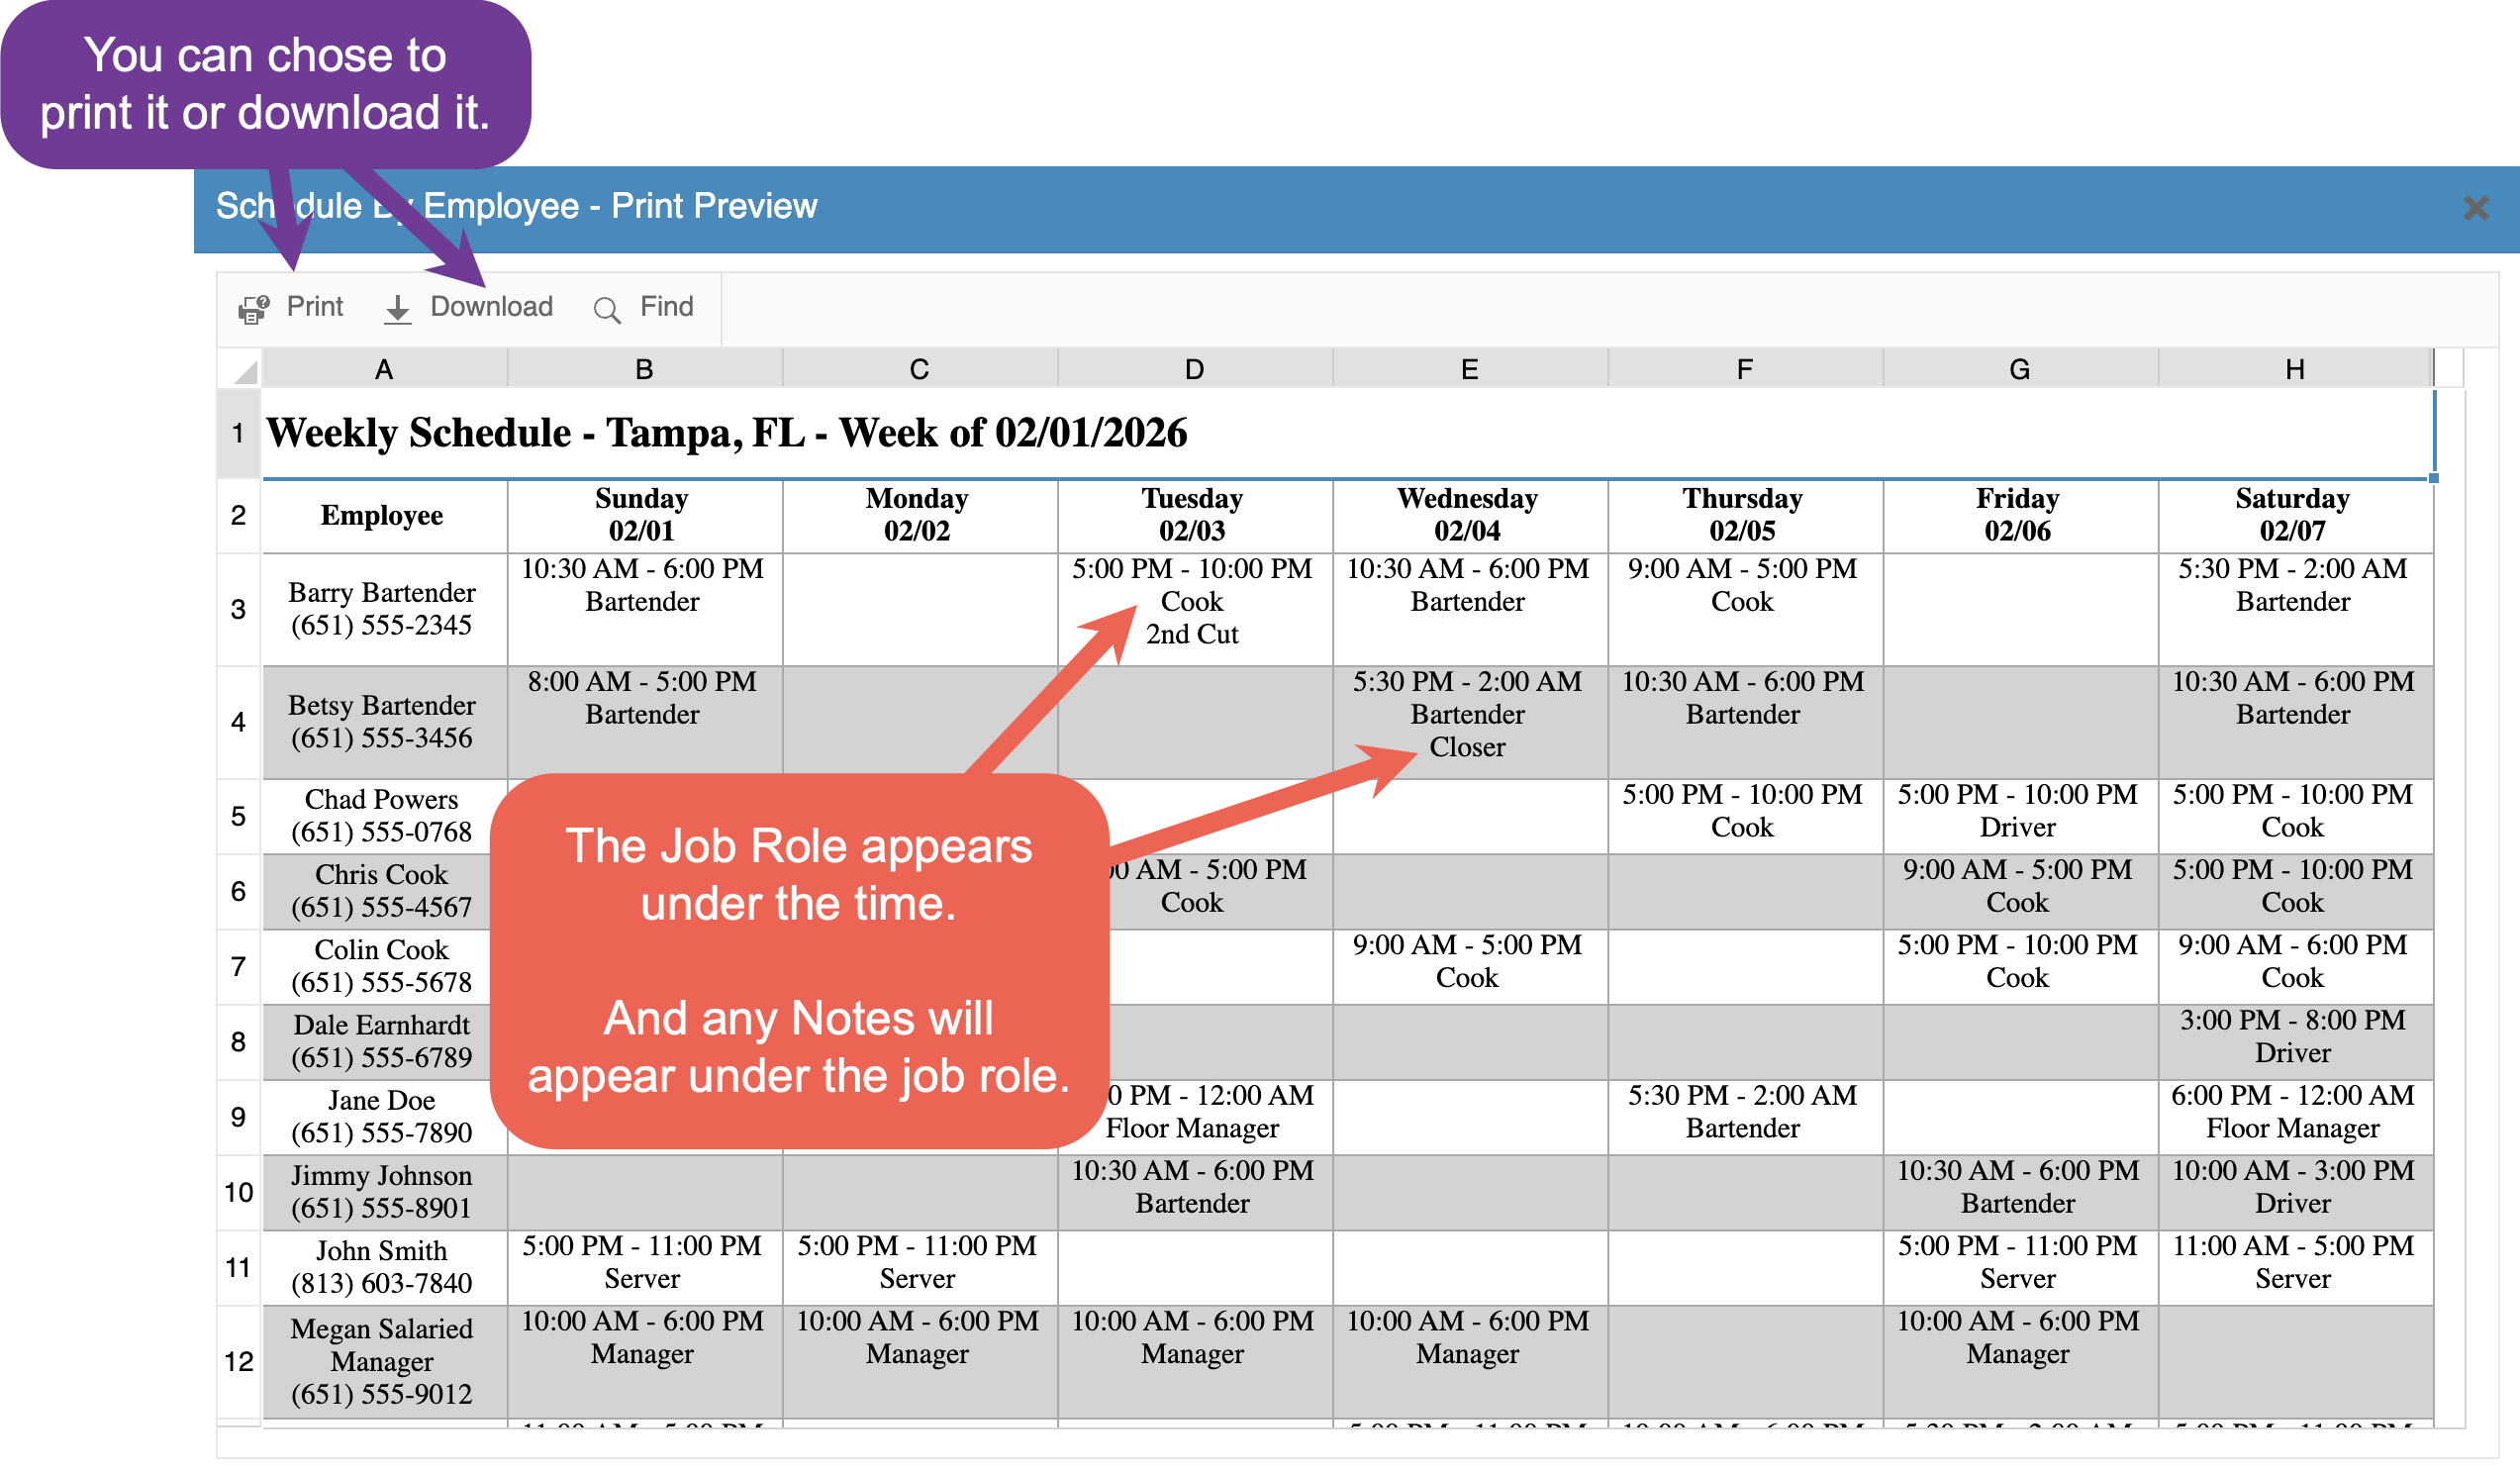
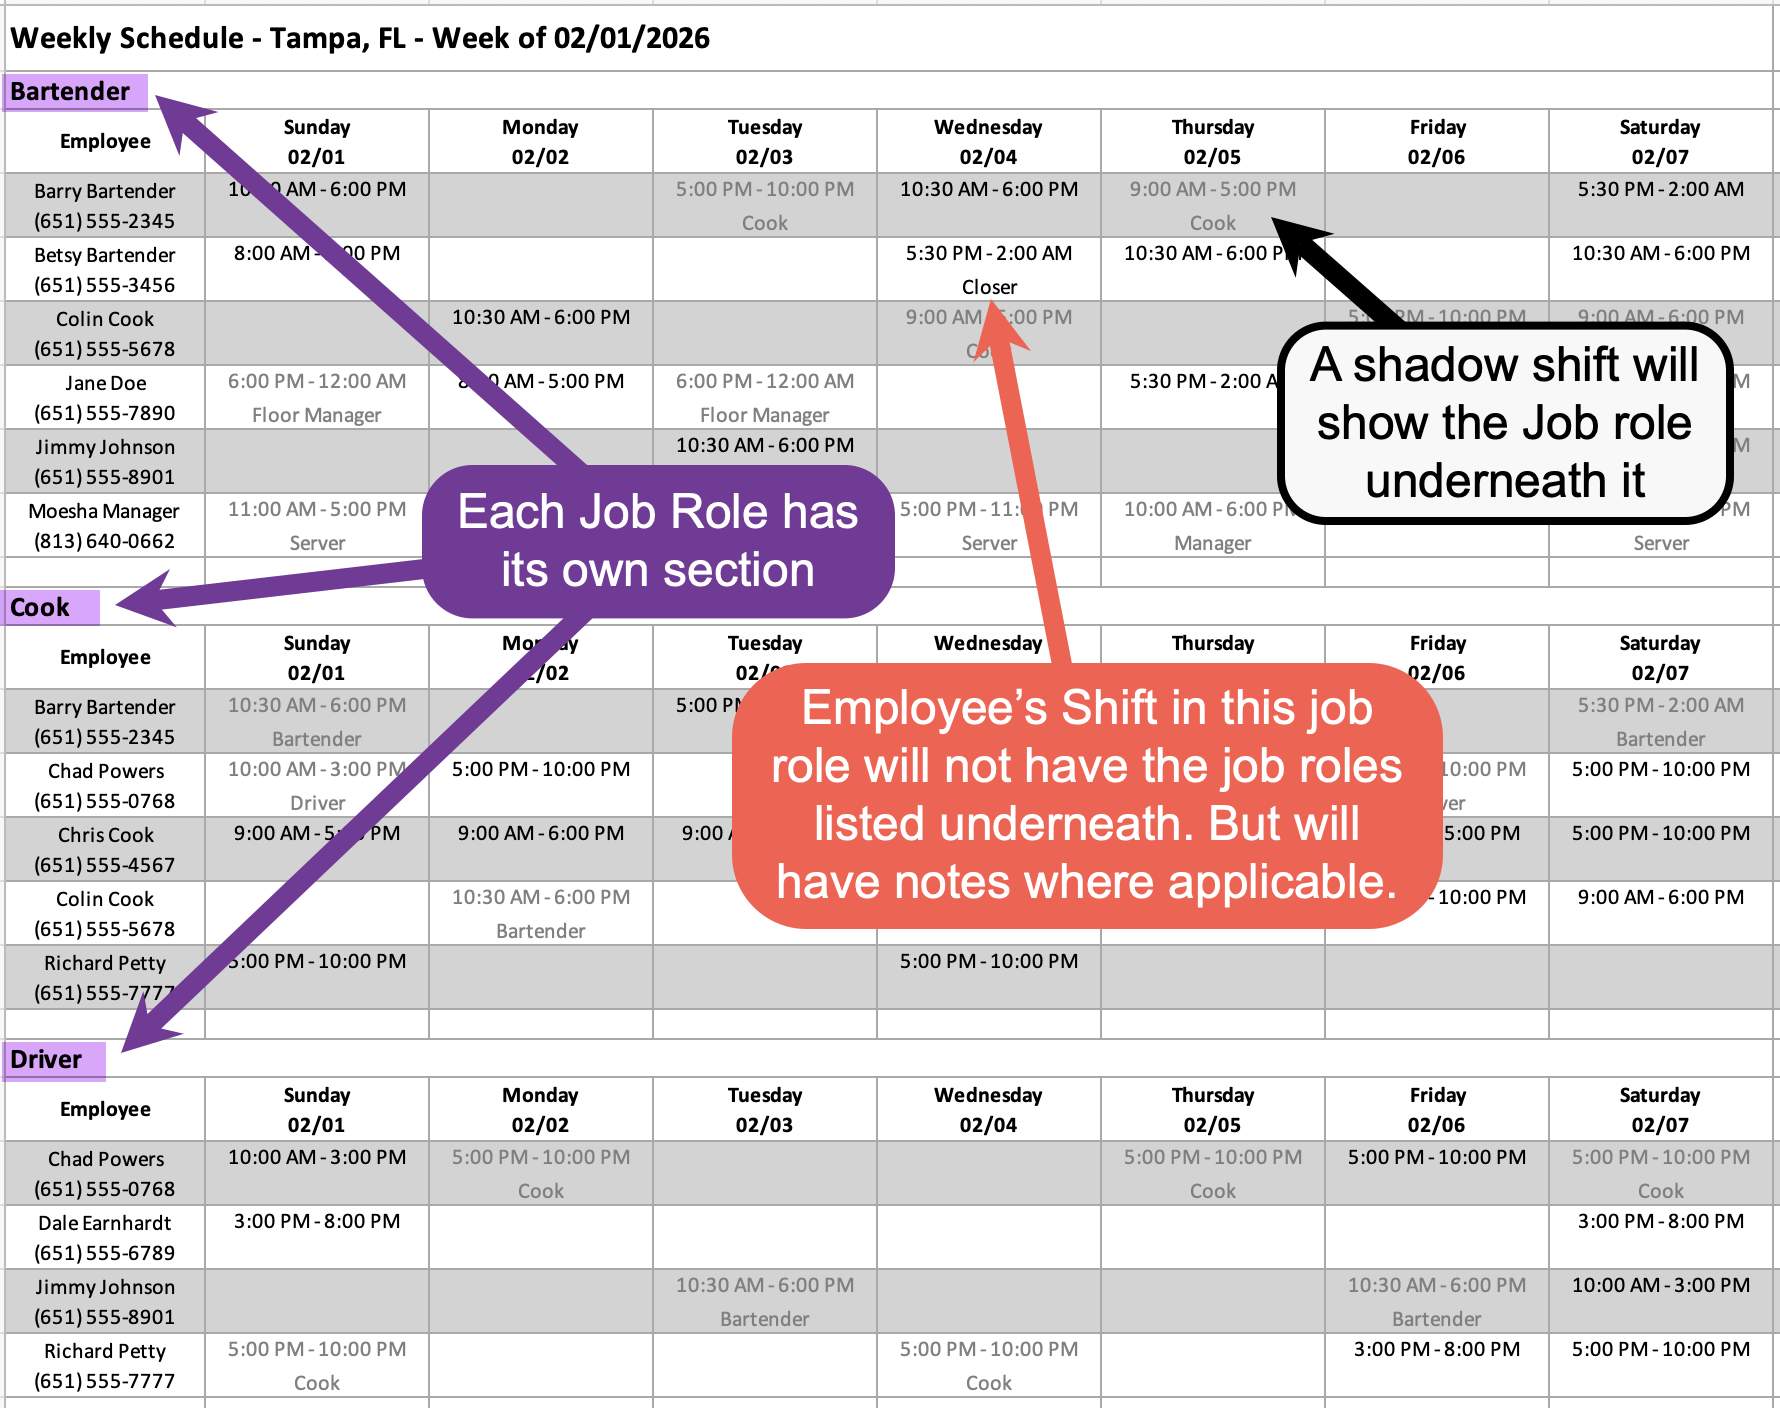
The Print section of the Options menu has three printouts. Each one shows published shifts only.
ClickSchedule by employee: everyone in alphabetical order, with the job role under each shift.- Schedule by job role: grouped the same way as the schedule. Someone who works two job roles appears in both, with their other shifts shown grayed out so they don't miss one.
- Daily roster: one day's shifts on a single page, grouped by the location's day parts (such as Lunch and
holdDinner). See The daily roster.
The weekly printouts open in a new tab, with buttons to Download PDF, Download Excel and Print. The filters apply, so you can print one department's schedule on its own.
On a phone
On a phone, the
shift,schedulethenopensdraginitDay view with a strip of days across the top. Swipe left or right to moveitbetween days, tap the funnel button toafilterdifferentit,dayandfortap thesameroundemploye+
- button
Click and holdis theshift,Optionsthen drag it up or down to move it to a different job role for the same employee
menu.
You can use the Filters along the top to narrow in on specific departments, job roles, or individual employees.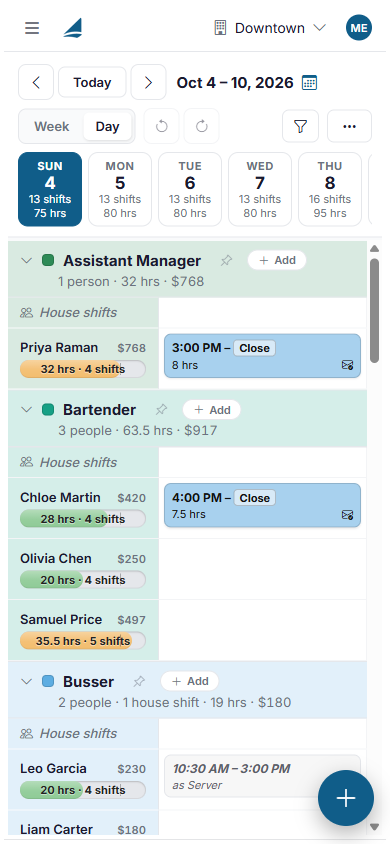
Filters work from top to bottomIf a higher-level filter changes after a lower-level filter is set, the lower filters will reset to AllIf a higher-level filter is set first, only compatible options will appear in the lower filters
Step 5: Publish the Schedule
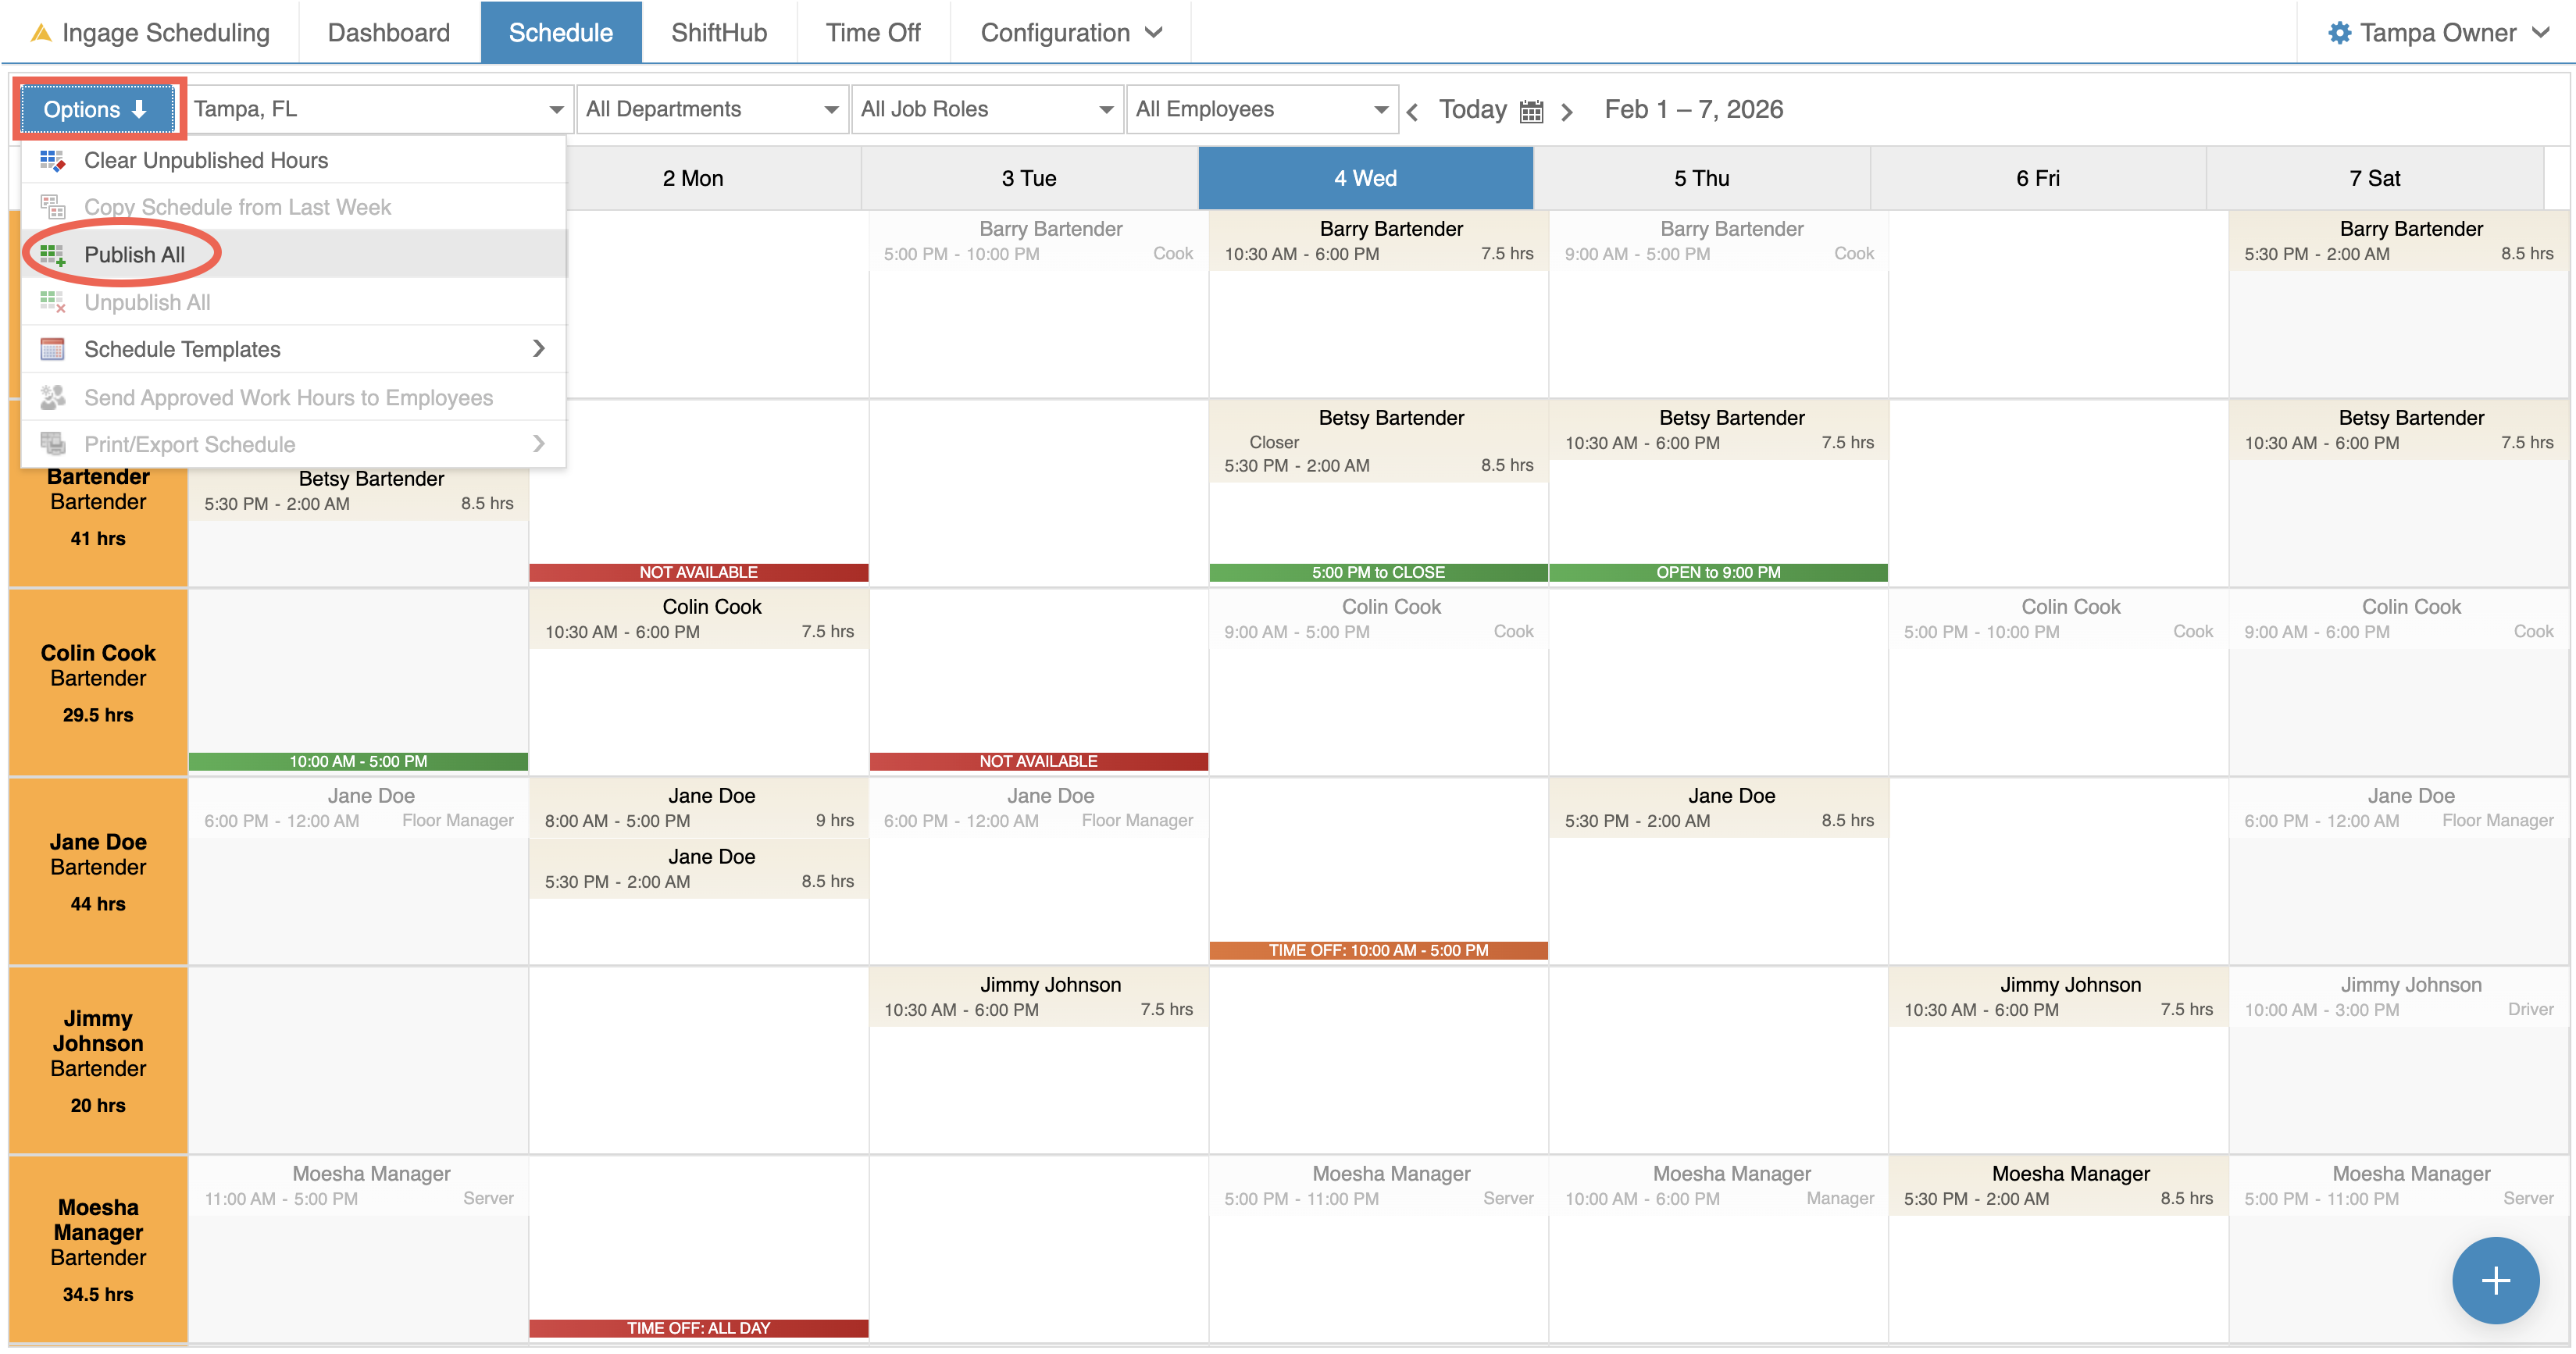
Once your schedule is complete, the next step is to publish it so employees can view their shifts.
To publish the entire schedule:
Click Options in the top-left cornerSelect "Publish All"
This will publish all unpublished shifts currently displayed on the schedule.
Sometimes you may want to publish only part of the schedule while continuing to work on the rest.
You can use the filters at the top of the schedule to display only:
A specific departmentA specific job roleA specific employee
Once the schedule is filtered:
Click Options in the top-left corner.Select Publish Filtered.
Only the shifts currently displayed by the selected filters will be published. All other unpublished shifts will remain unpublished.
Example: If you filter the schedule to show only Bartenders and select Publish Filtered, only bartender shifts will be published. Any shifts for servers, cooks, or other job roles will remain unpublished until they are published separately.
When the schedule is published:
All shifts will change from light tan to light blue
Employees will immediately see their scheduled hours in the appNo notifications are sent to employees at this time

Publishing allows you to make the schedule visible to employees while giving you control over when notifications are sent.
Step 6: Send the Schedule to Employees
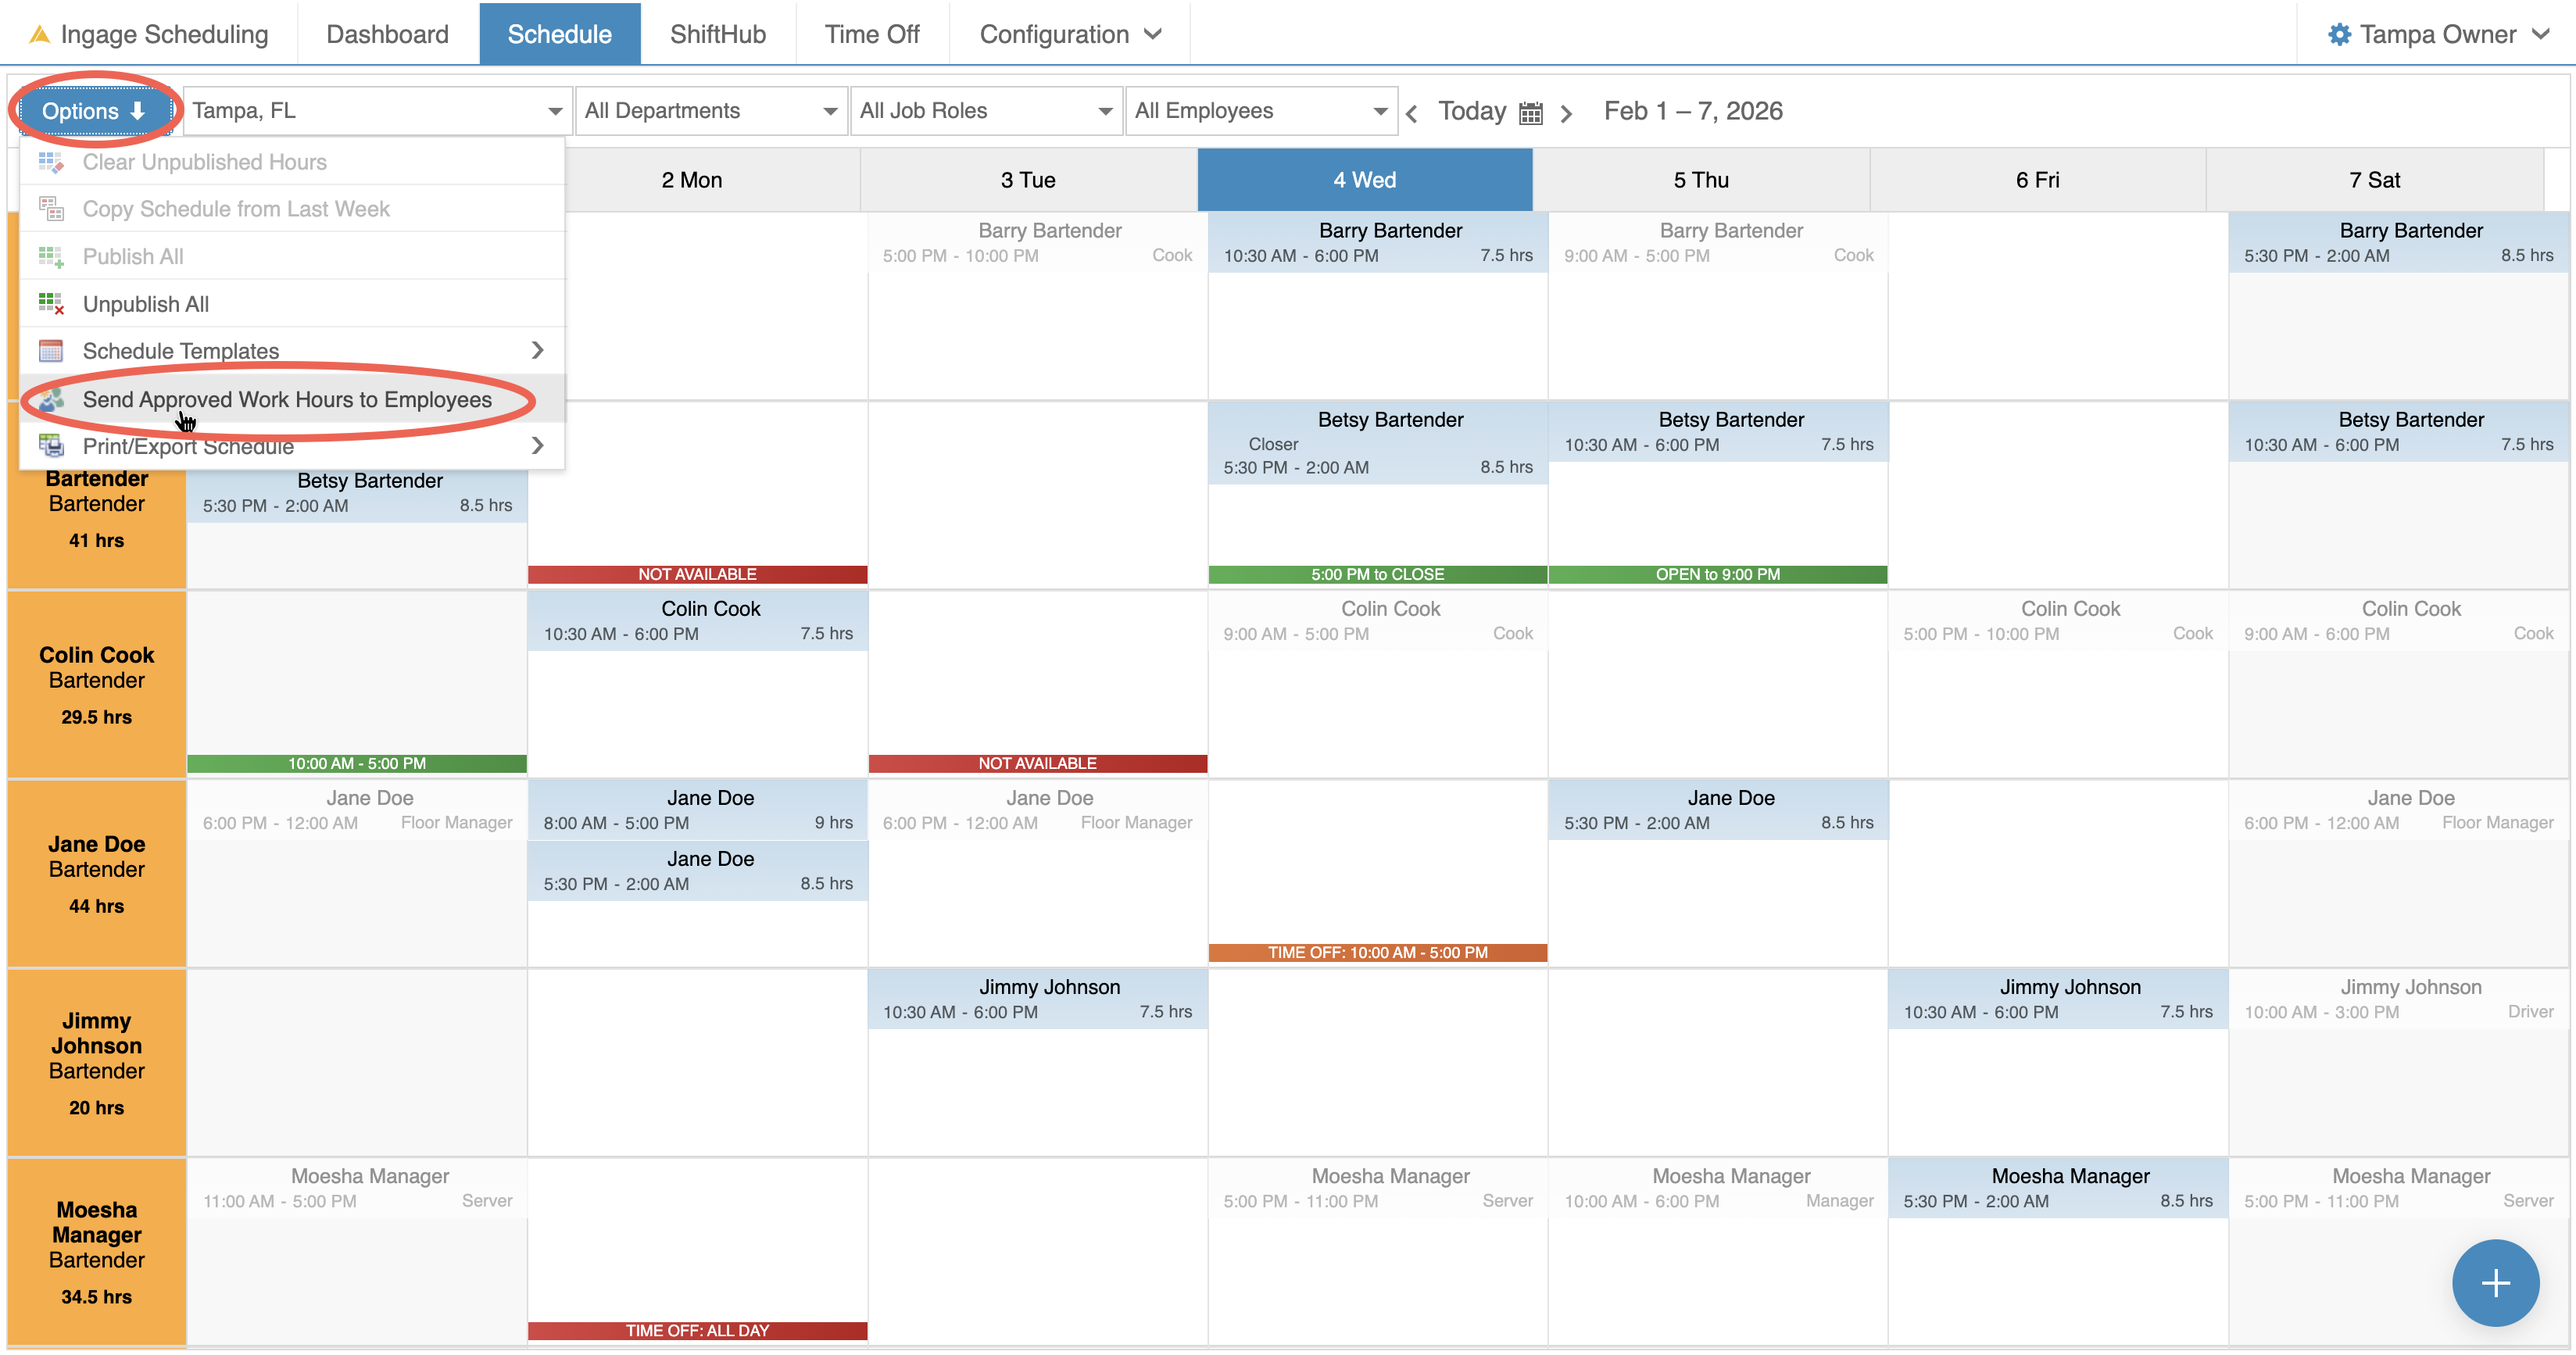
Once the schedule has been published and you’re ready to notify employees, you can send the schedule directly from the Schedule view.
To send the schedule:
Click Options in the top-left cornerSelect "Send Approved Work Hours to Employees"
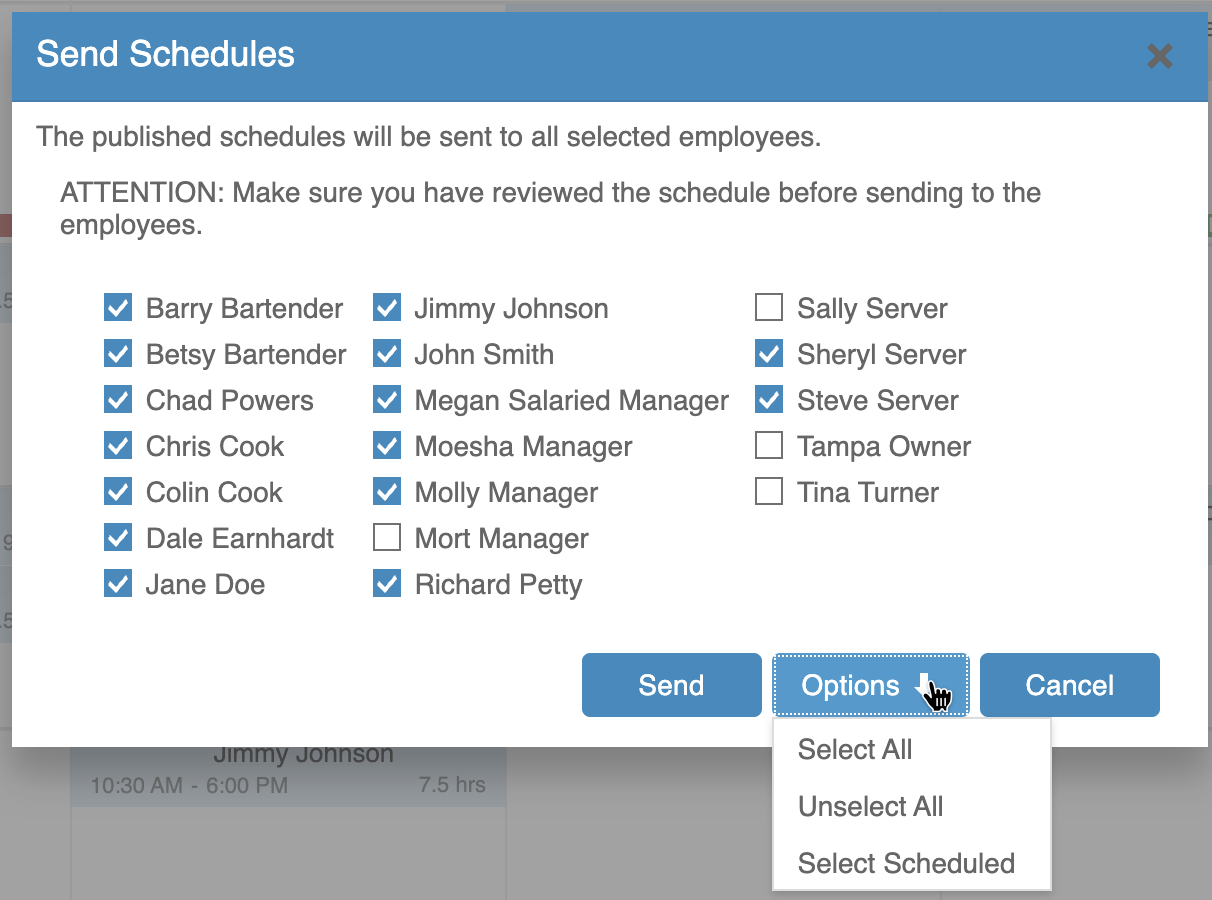
A pop-up will appear allowing you to choose which employees to notify.
By default, all employees with a scheduled shift during that time period will be selectedUse the options to Select All, Unselect All, or reselect only the scheduled employees
Once you’ve selected the employees you want to notify, click Send.
After the schedule is sent:
A mail icon will appear in the top-left corner of each shift
This icon indicates the schedule has been sent to the employee

Employees will receive their schedules by email or text, based on their notification preferences. They will also receive a push notification to the app
Step 7: Print the Schedule
If you need a physical copy of the schedule for posting or reference, you can print it directly from the Schedule view.
To print the schedule:
Click Options in the top-left cornerSelect "Print / Export Schedule"
You can choose to print the schedule in two different formats:
By EmployeeEmployees are listed alphabeticallyEach shift displays the employee’s job role under the shift, so they know which position they are working that day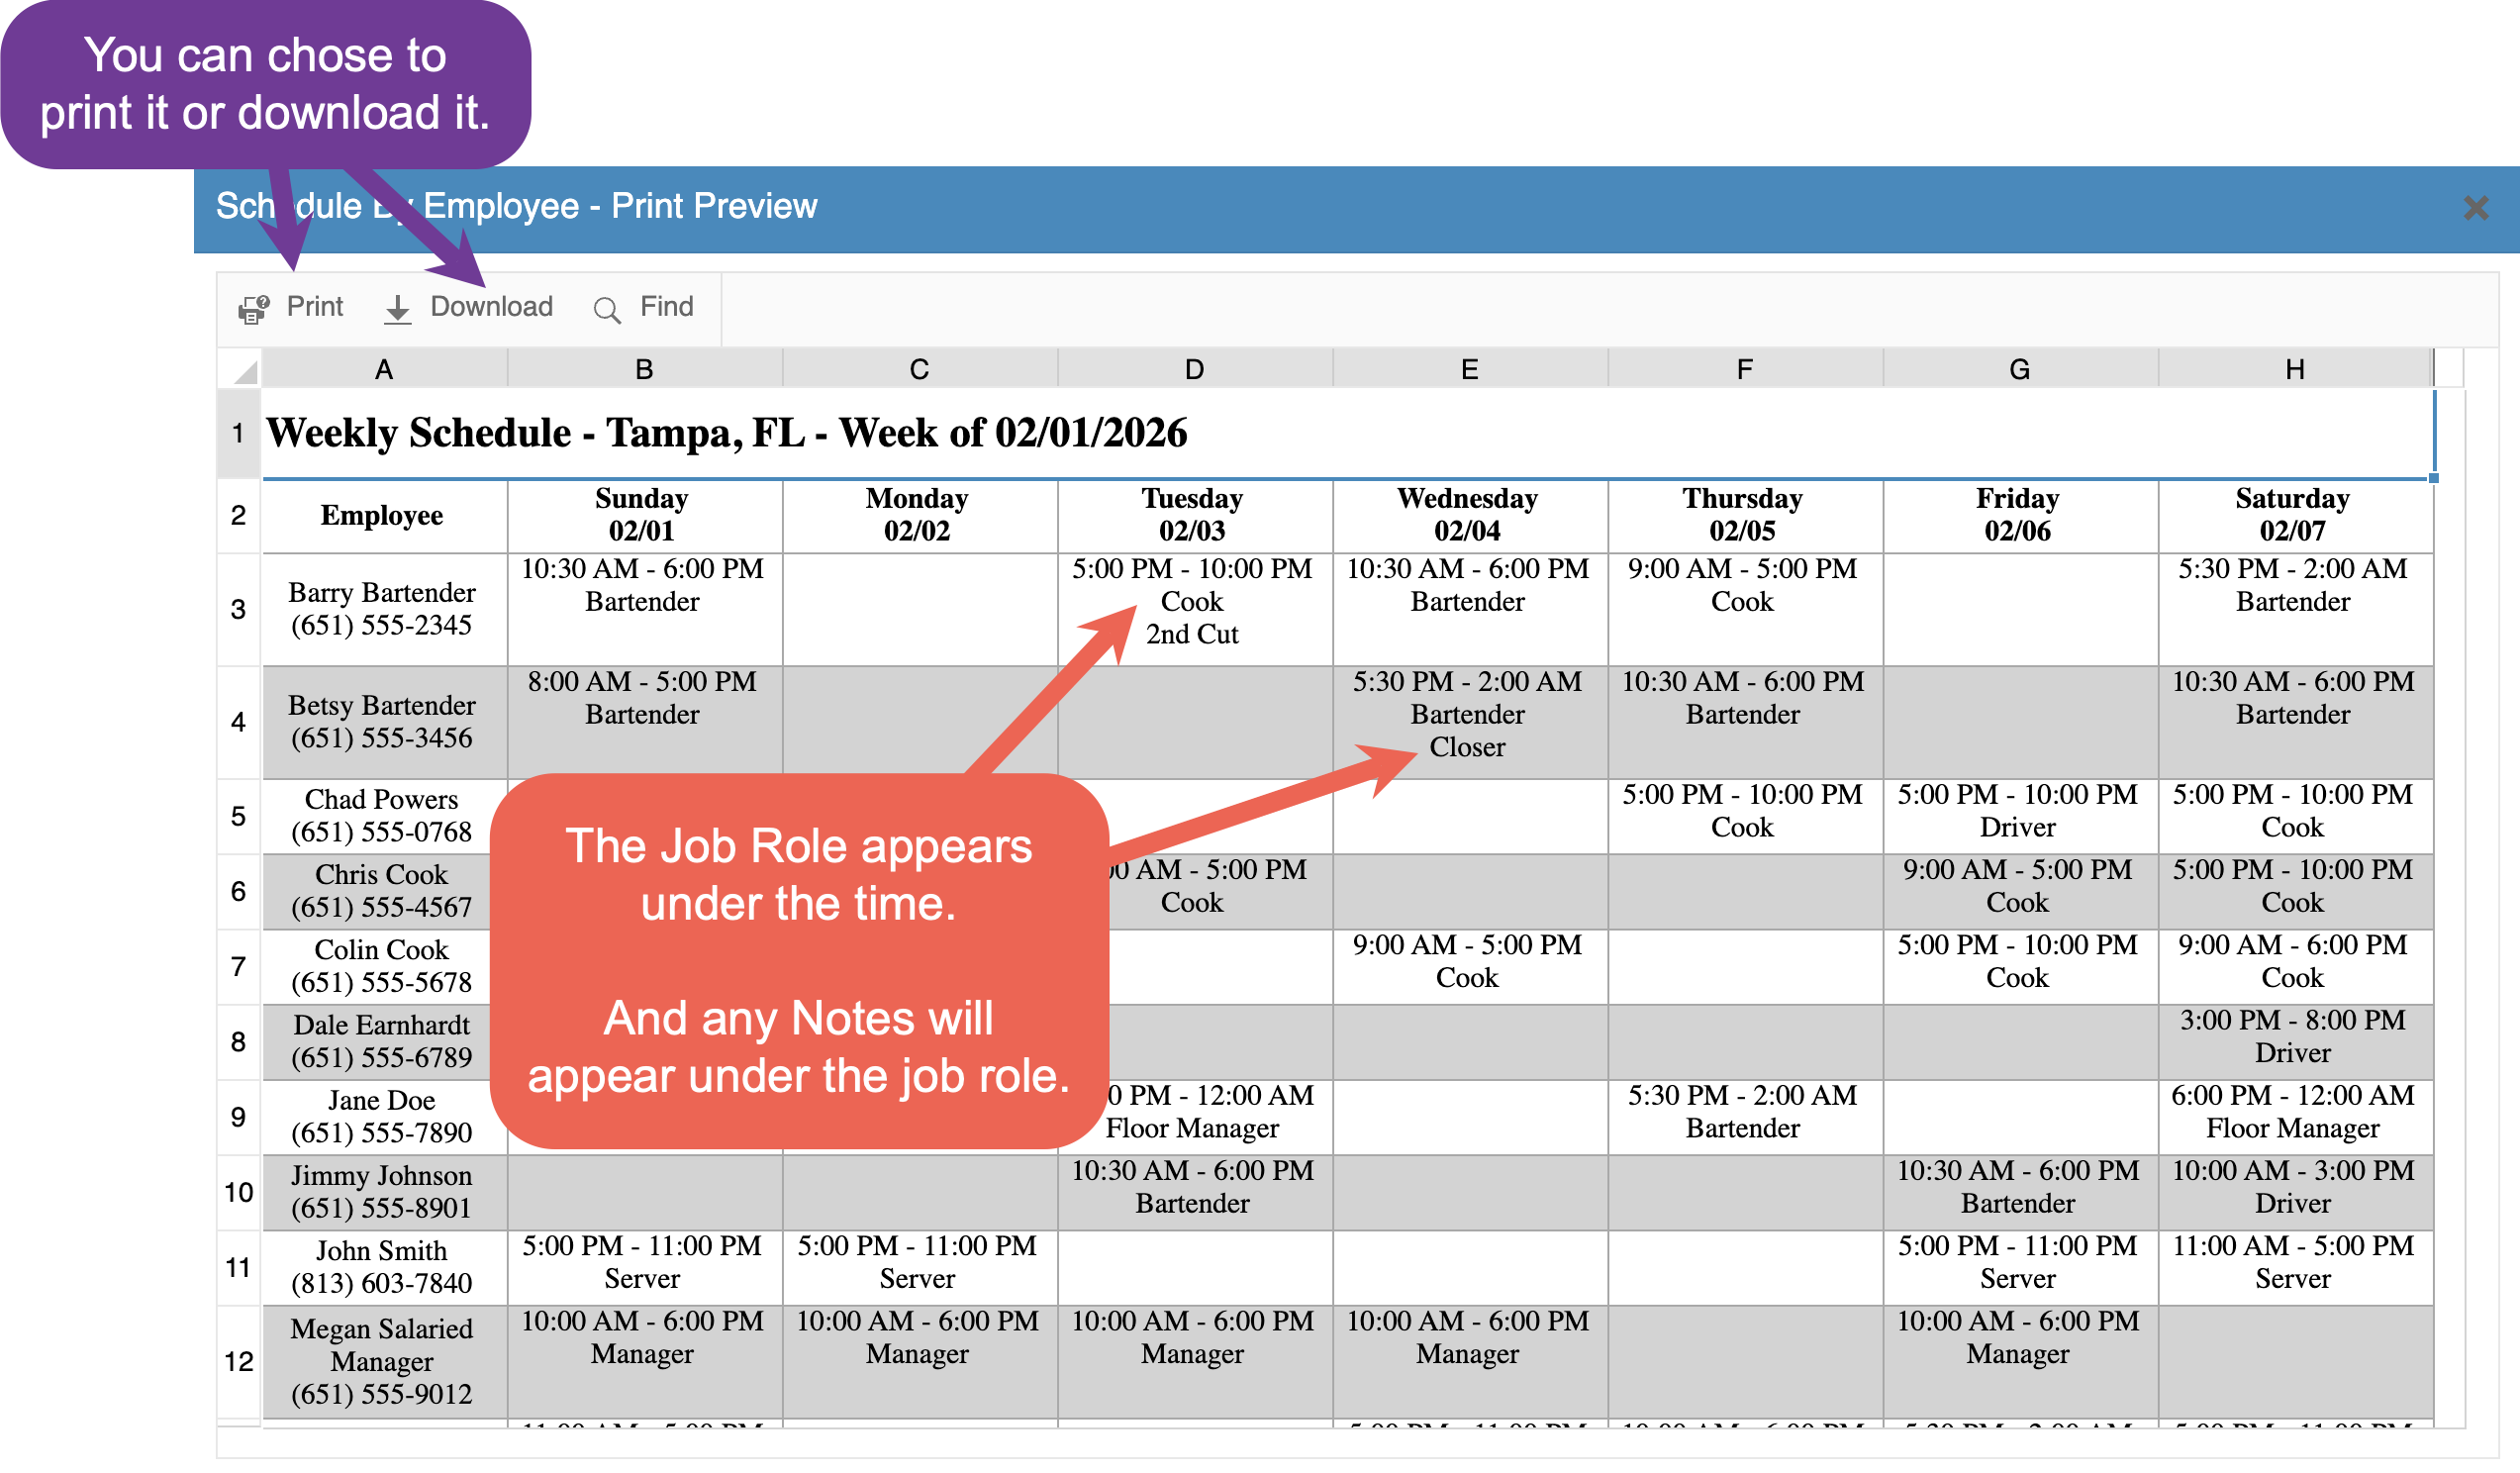
By Job RoleThe schedule is grouped into sections by job roleEmployees with multiple job roles will appear in each applicable sectionShadow shifts will also appear, allowing employees to view all of their scheduled shifts in one section and avoid missing a shift listed elsewhere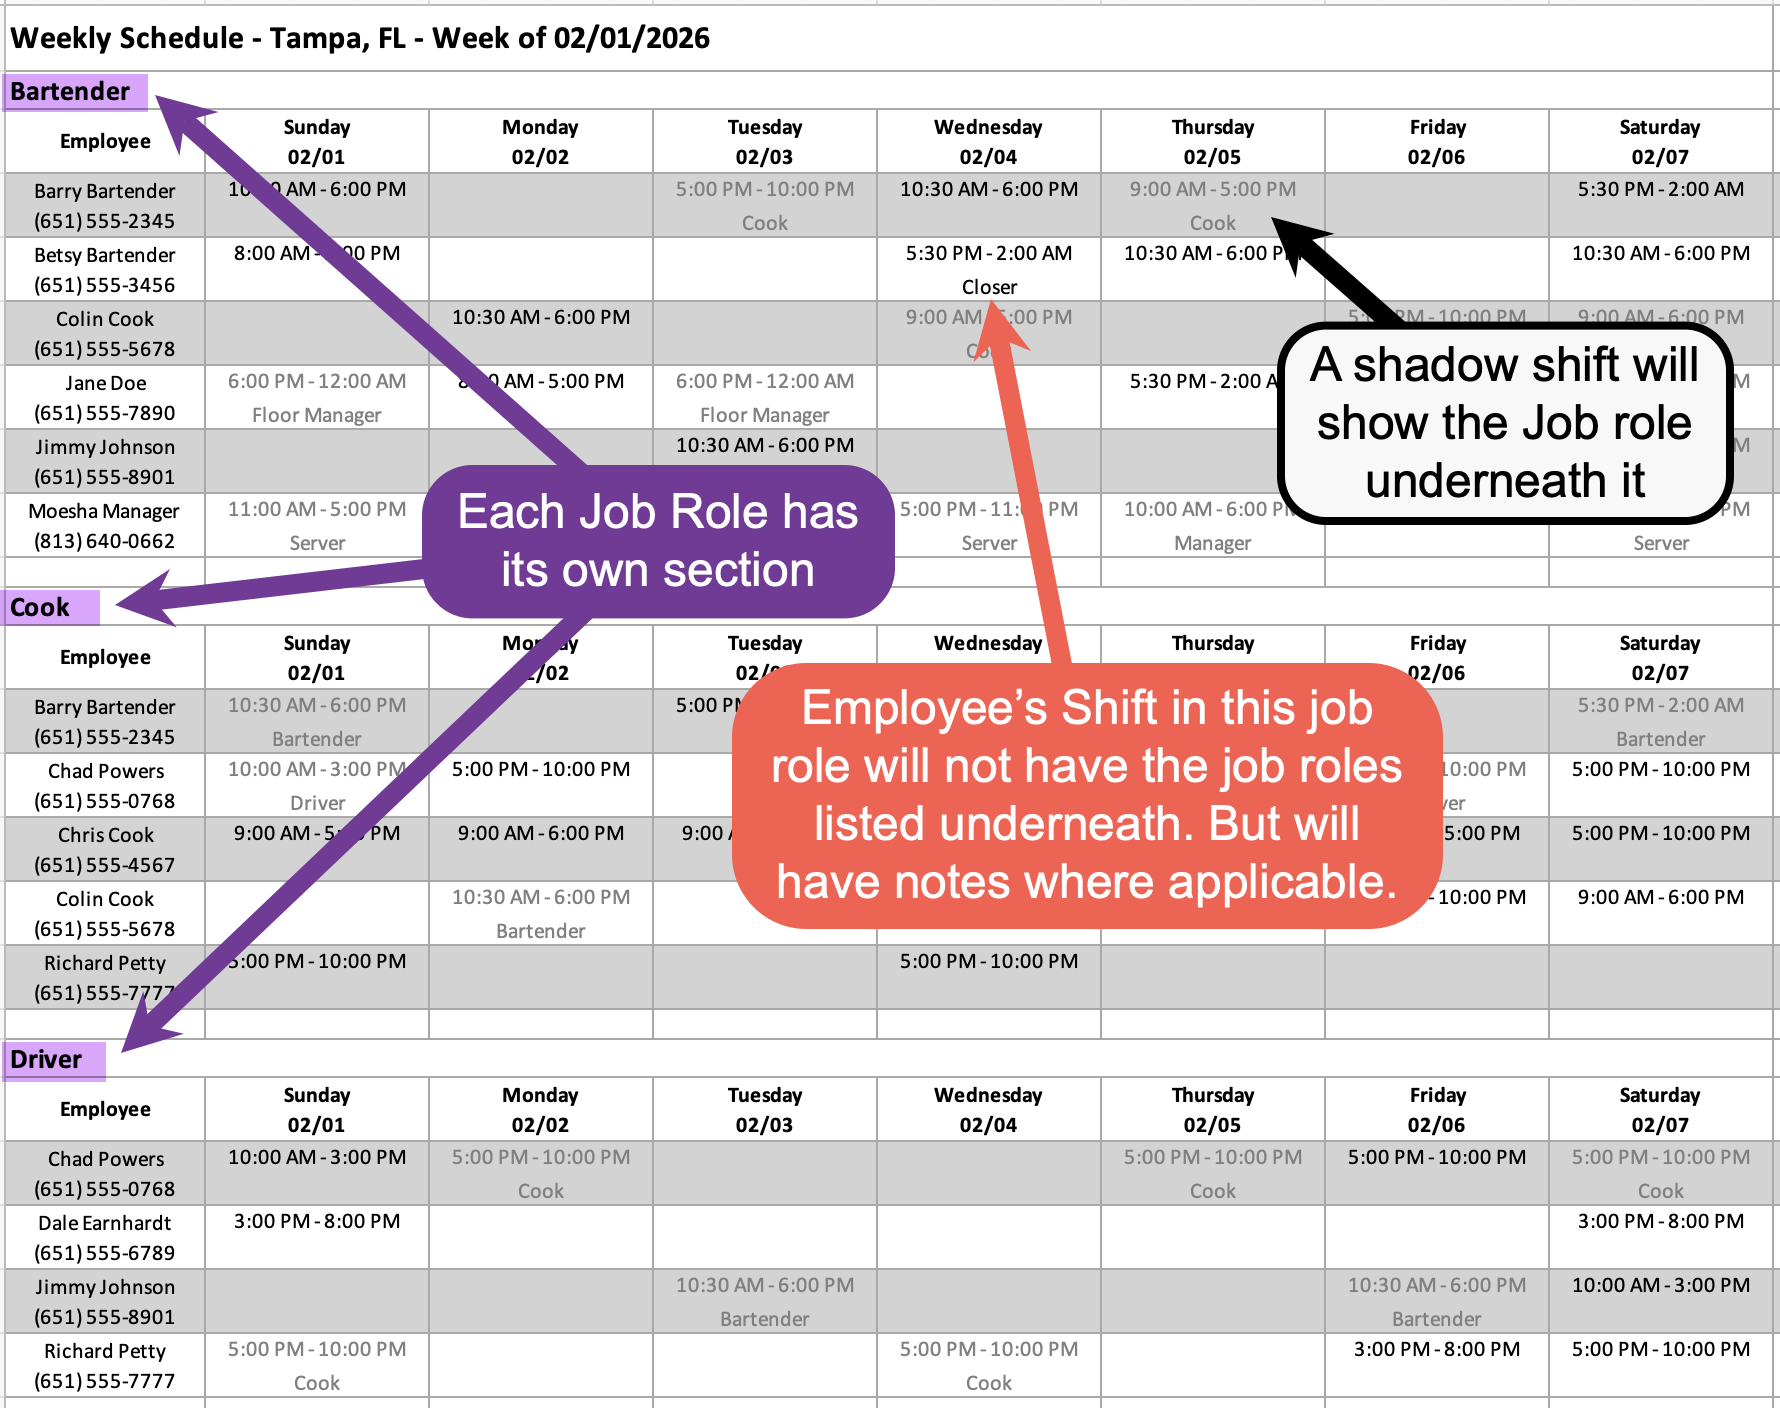
Time-Saving Scheduling Options
If you don’t want to build a schedule from scratch each week, you can use one of the options below to speed up the process.
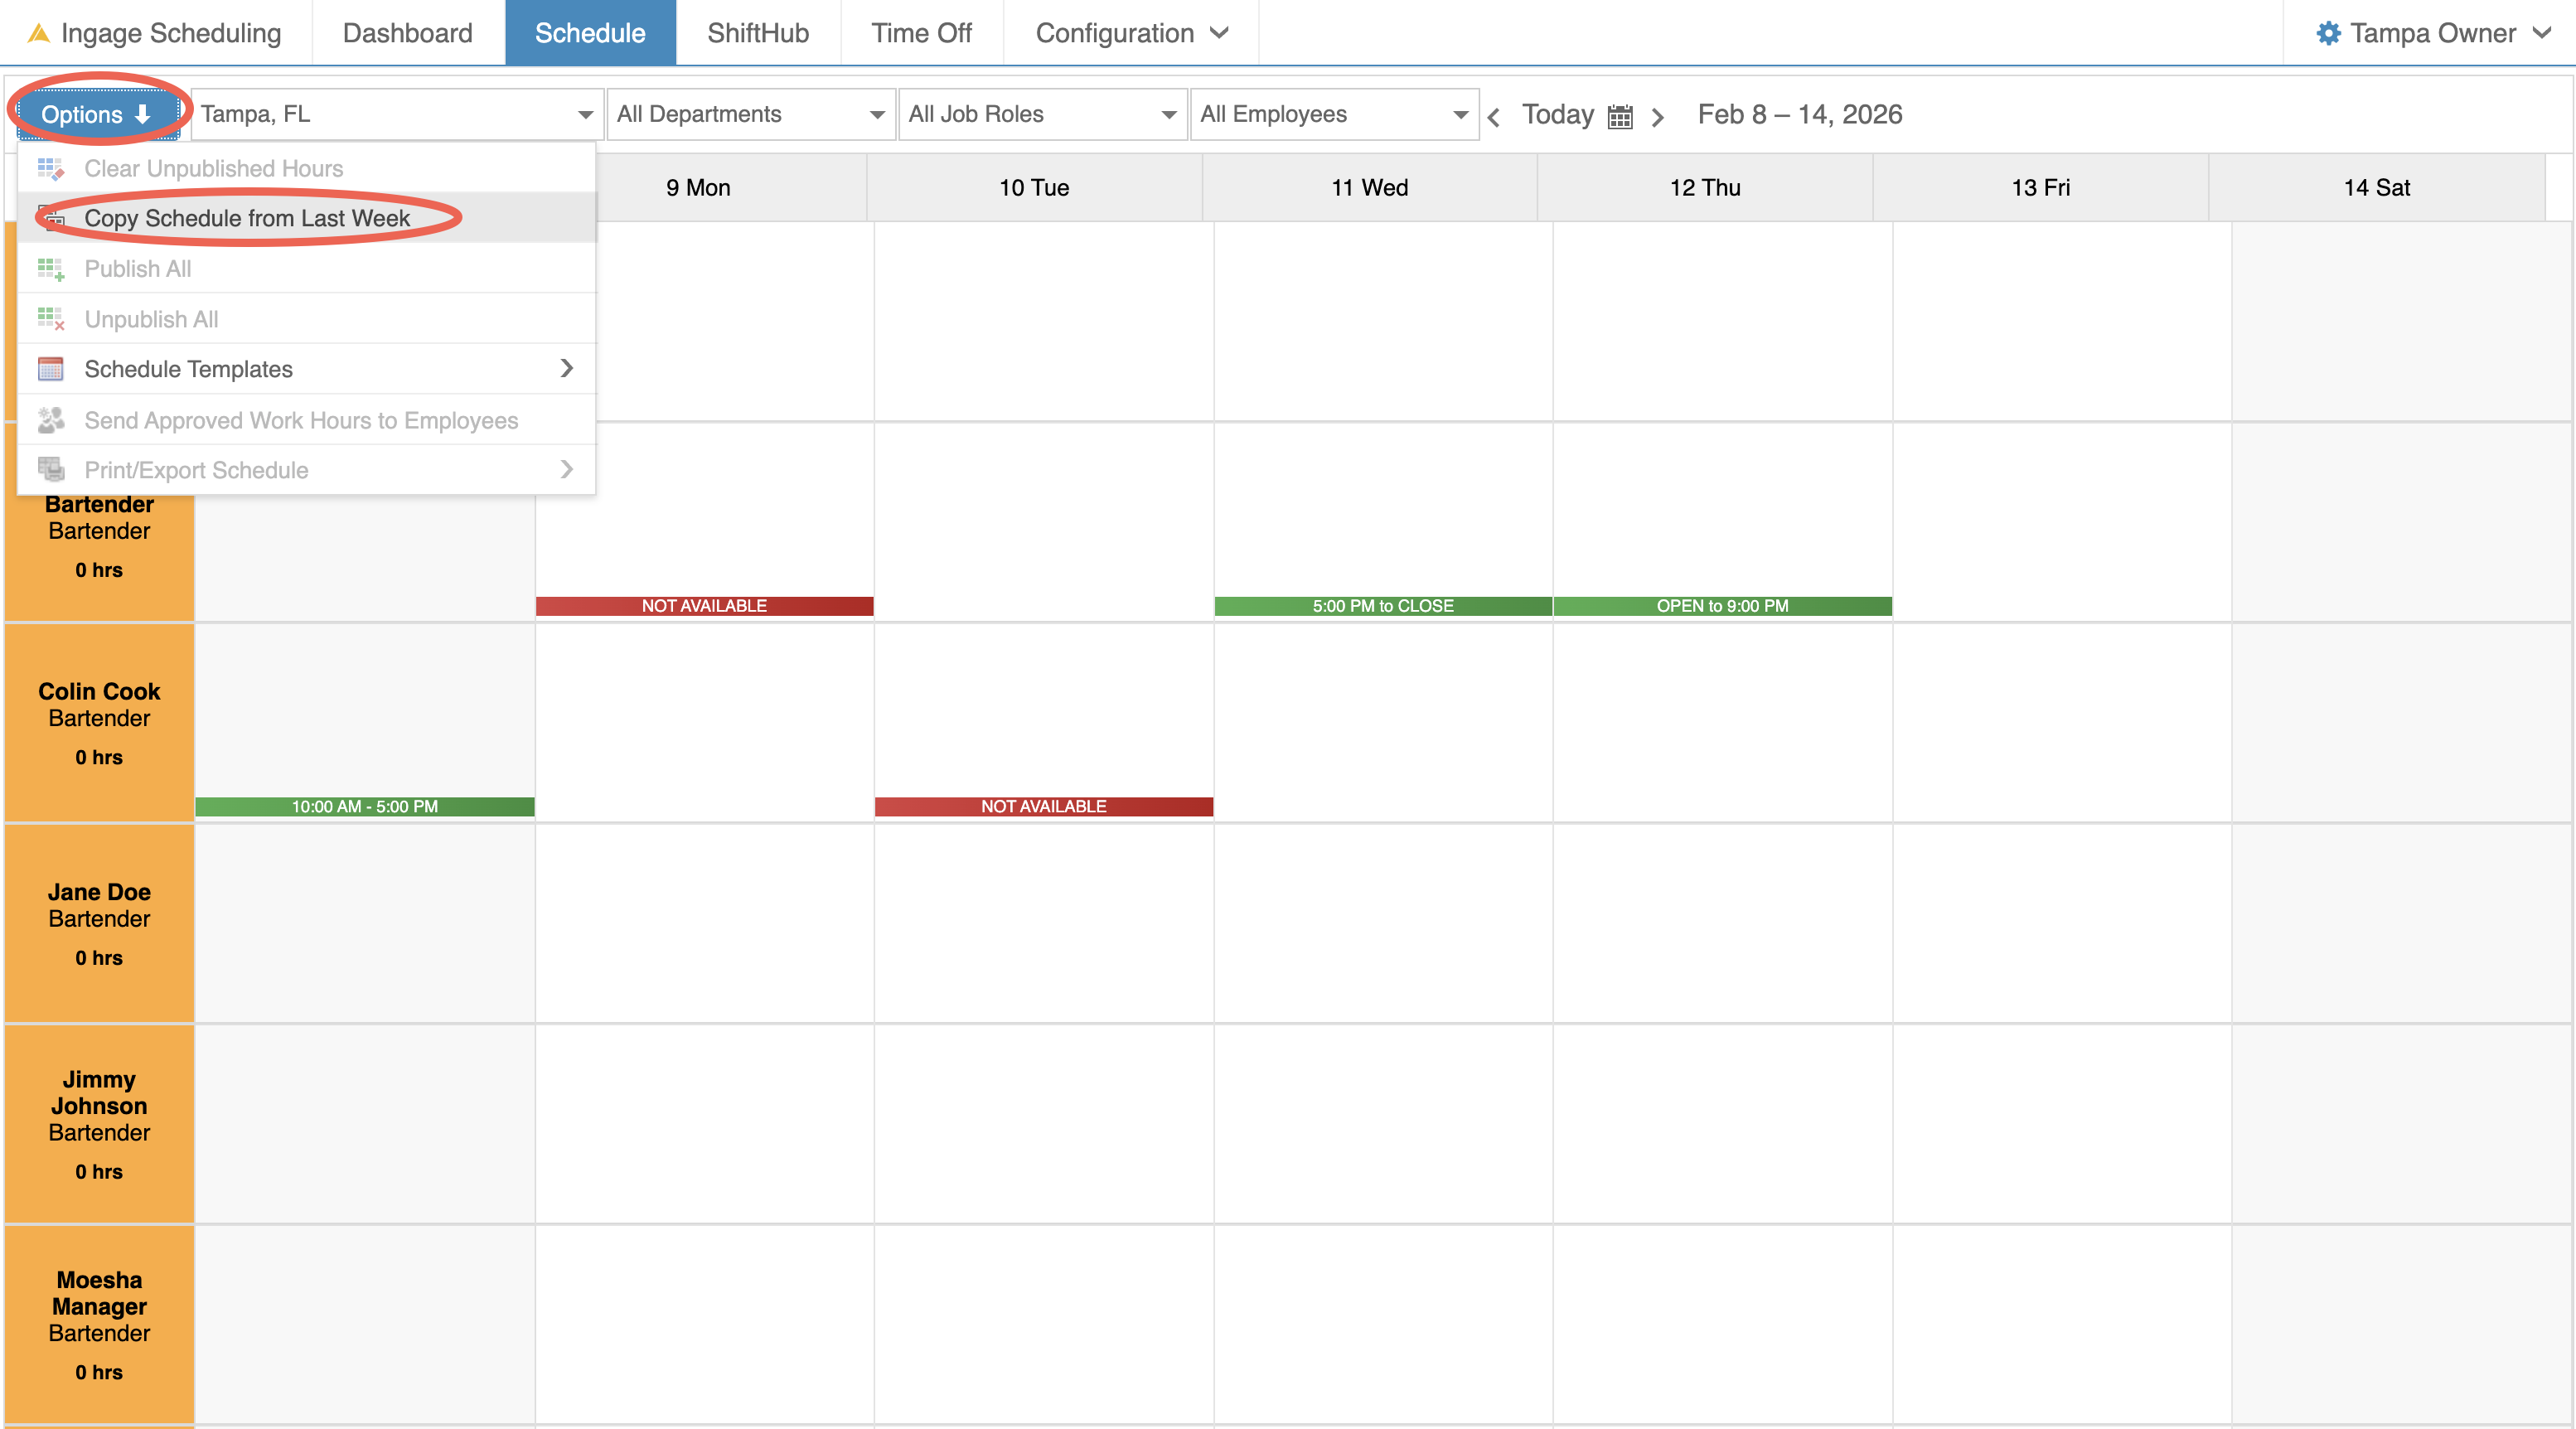
Copy Last Week’s Schedule
You can copy the previous week’s schedule into a blank week.
To copy last week’s schedule:
Click Options in the top-left cornerSelect "Copy Schedule from Last Week"
Important things to know:
This will copy all published shifts from the previous weekAvailability changes and time-off requests for the current week are not taken into accountBe sure to review and adjust the schedule after copying to account for any changes
Use a Schedule Template
Schedule Templates allow you to apply a pre-built schedule to the current week.
To apply a schedule template:
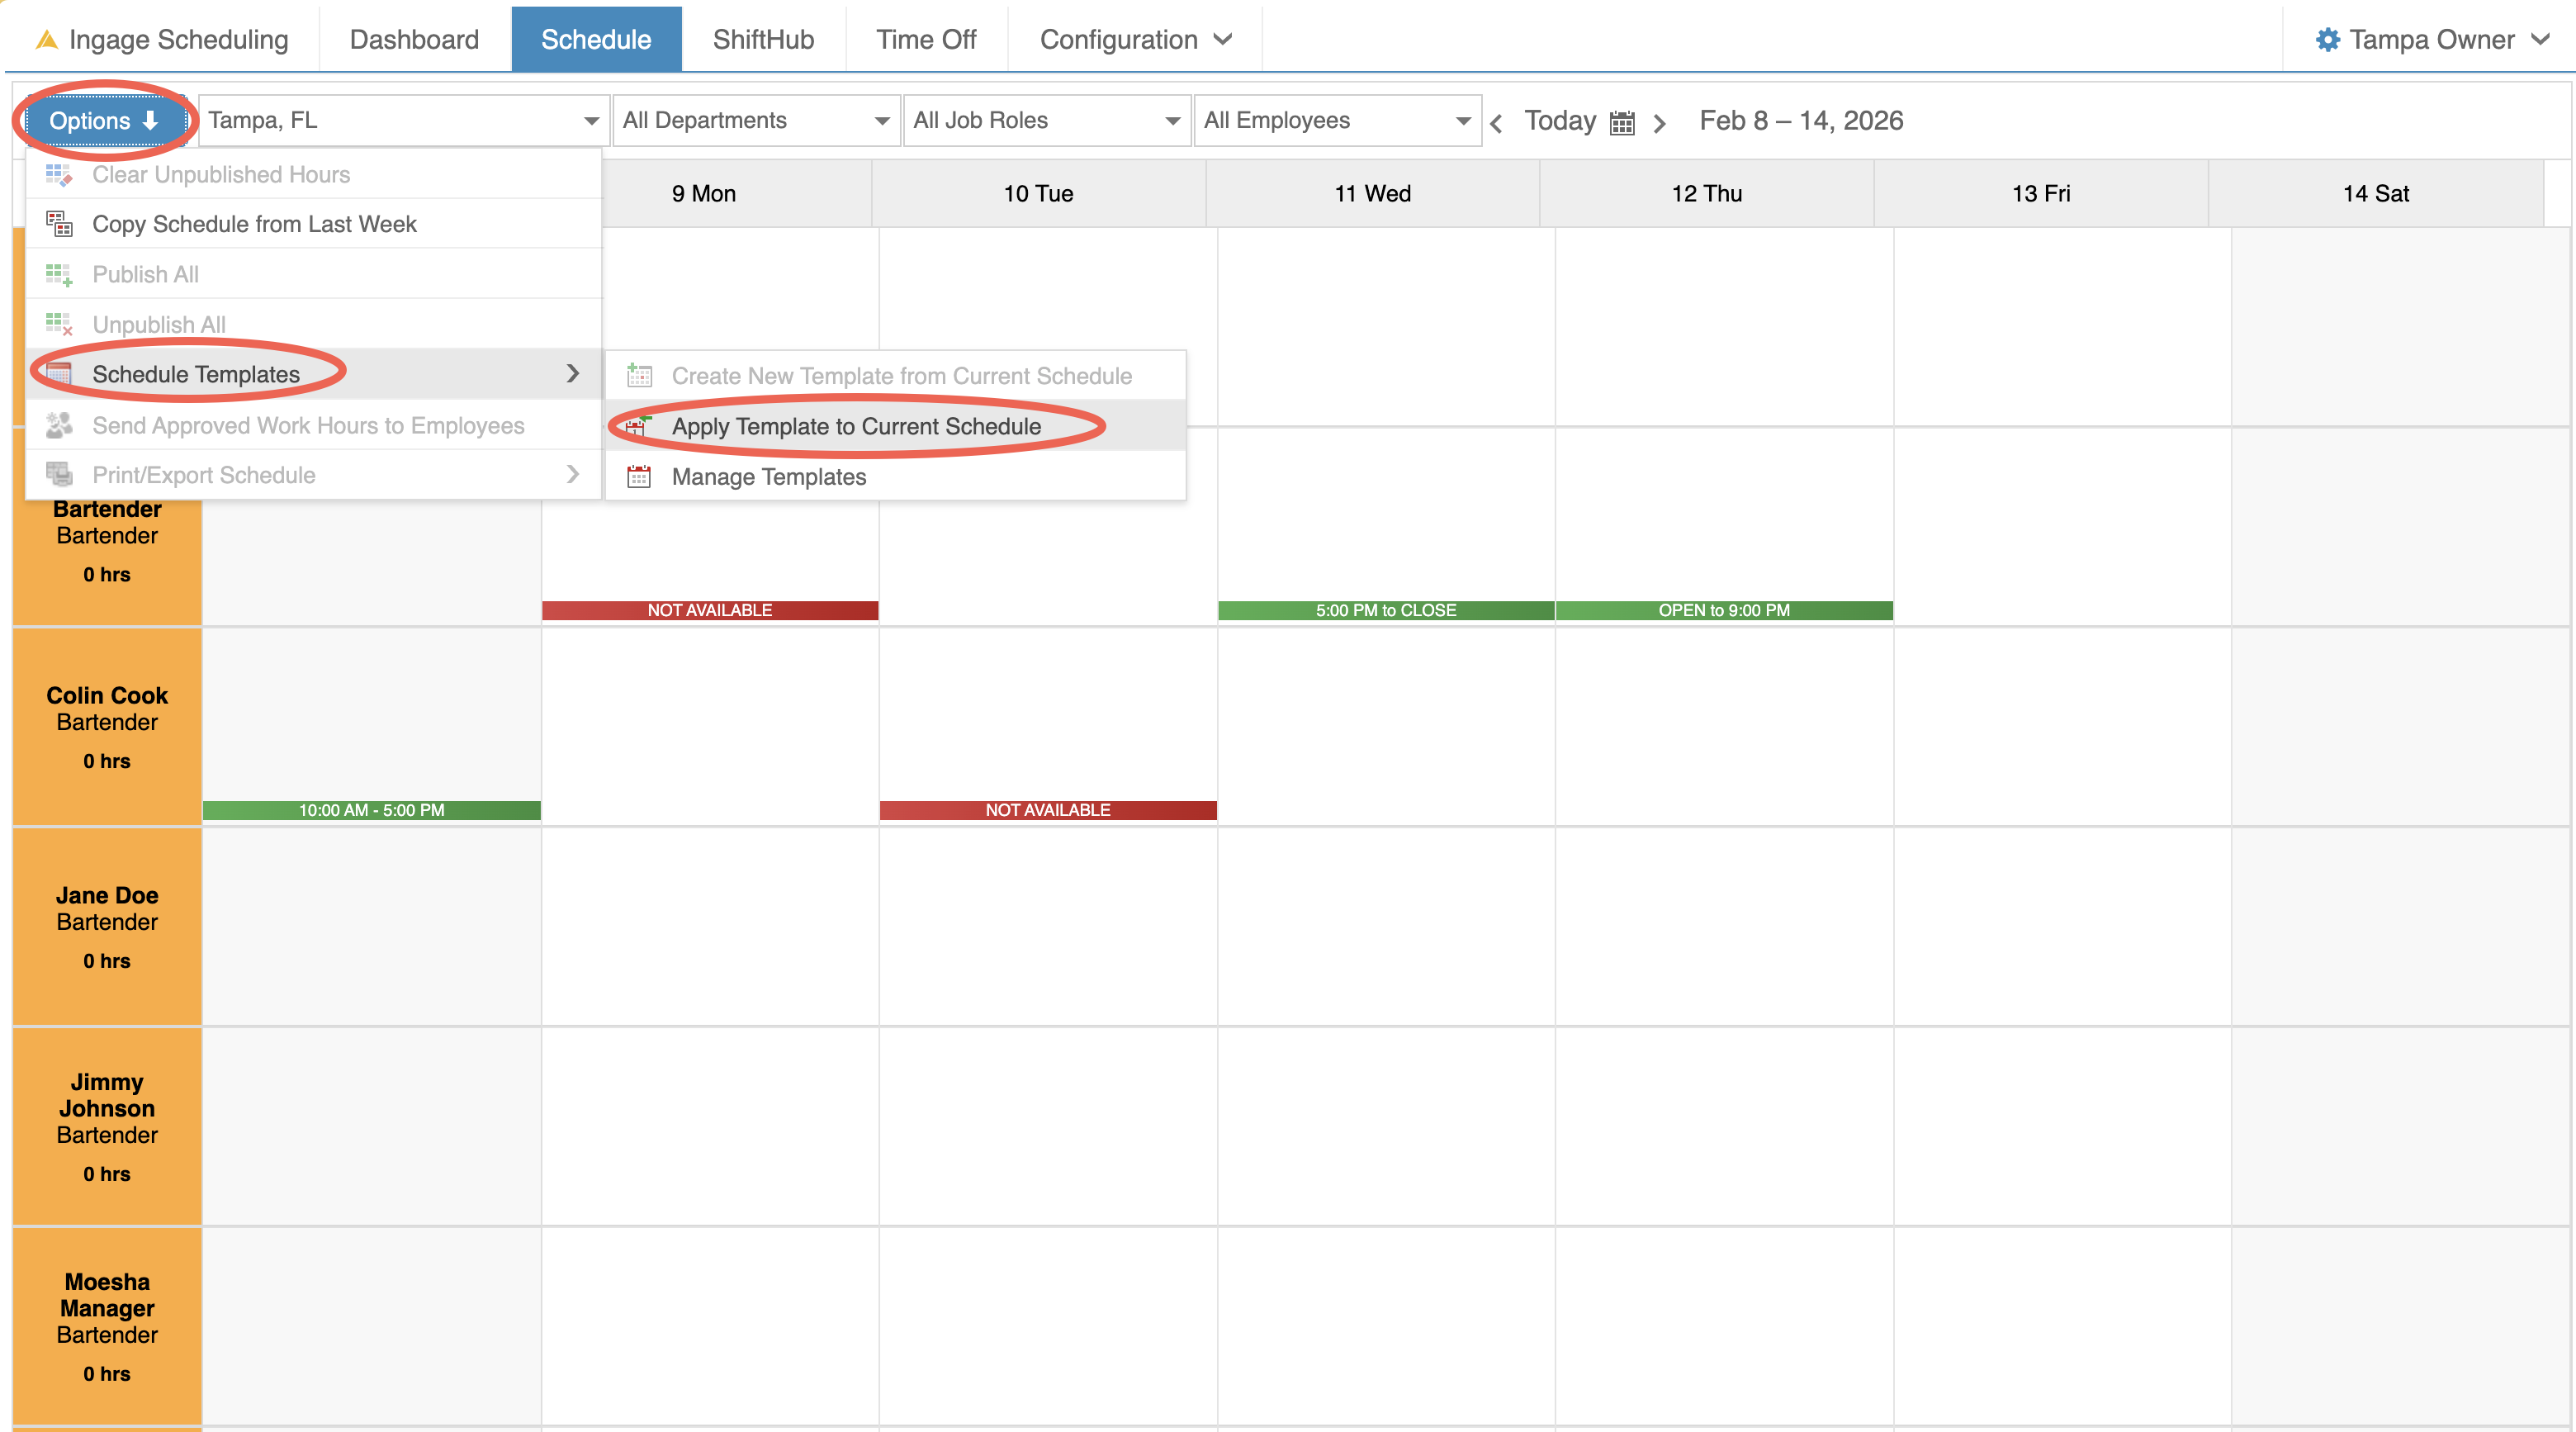
Click Options in the top-left cornerSelect "Schedule Templates"Choose "Apply Templates to Current Schedule"
Additional details:
The schedule does not need to be blankYou can have multiple templates for different job roles or scenariosYou’ll have the option to:Overwrite existing hoursSkip employees with approved time off
Click this link to learn more about creating Schedule Templates