
Building and publishing the schedule
The Schedule page is where you build each week's schedule, publish it so your team can see it, and send everyone their shifts. This guide covers the whole process, from an empty week to a printed schedule on the wall.
You need to be a Manager or Administrator at a location to change its schedule. Staff members see a read-only view with published shifts only.
Find your way around
Open Schedule from the menu at the top. The schedule shows one location at a time: the one picked at the top right, next to your name. To work on another location, pick it there.
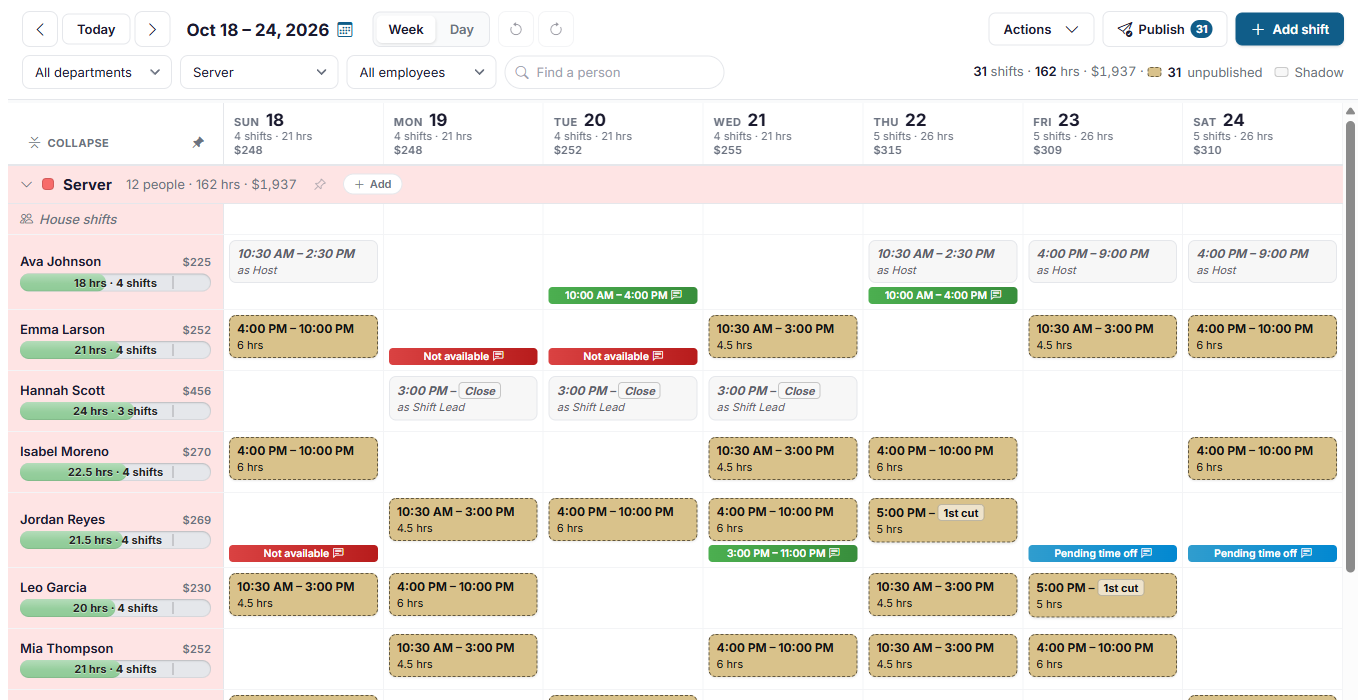
- Moving between weeks: use the arrows beside Today, or click the dates to open a calendar and pick any day to go to its week. The week you're looking at is highlighted, and clicking the month name lets you jump to another month or year. Week and Day switch between the whole week and a single day.
- The summary at the top right adds up what is on screen: shifts, hours and projected labor cost, then how many shifts are published and unpublished, each beside its color, so it doubles as the color key.
- Each day's heading shows that day's shifts, hours and labor cost.
- Filters: narrow the schedule to one department, one job role or one employee, or type in Find a person. Anything you do from the Actions menu, such as publishing, applies only to what the filters leave on screen.
How the schedule is laid out
The schedule is grouped by job role. Each job role has a row for every employee who works it at this location, and a House shifts row at the top for shifts that don't have anyone on them yet, unless house shifts are switched off (see House shifts and open shift pickup). Click a job role's heading to collapse or expand it, or click its pin to keep it at the top of your schedule.
Next to each employee's name you'll see:
- Their projected cost for the week, based on their pay rate or salary. Click any cost figure to see how it was worked out. An Administrator can switch the cost off, or leave salaried pay out of it, on the Settings page.
- A bar showing their hours this week across every job role they work. The bar is green while they are comfortably under the location's hours limit, turns orange once they pass the warning level, and turns red when they are in overtime. The limits are set for each location on the Locations page.
What the colors mean
| You see | It means |
|---|---|
| Tan shift with a dashed border | Unpublished. Only managers can see it. The employee can't see it yet. |
| Blue shift | Published. The employee can see it in the app and on the website. |
| Envelope icon on a shift | The employee has been sent this shift. |
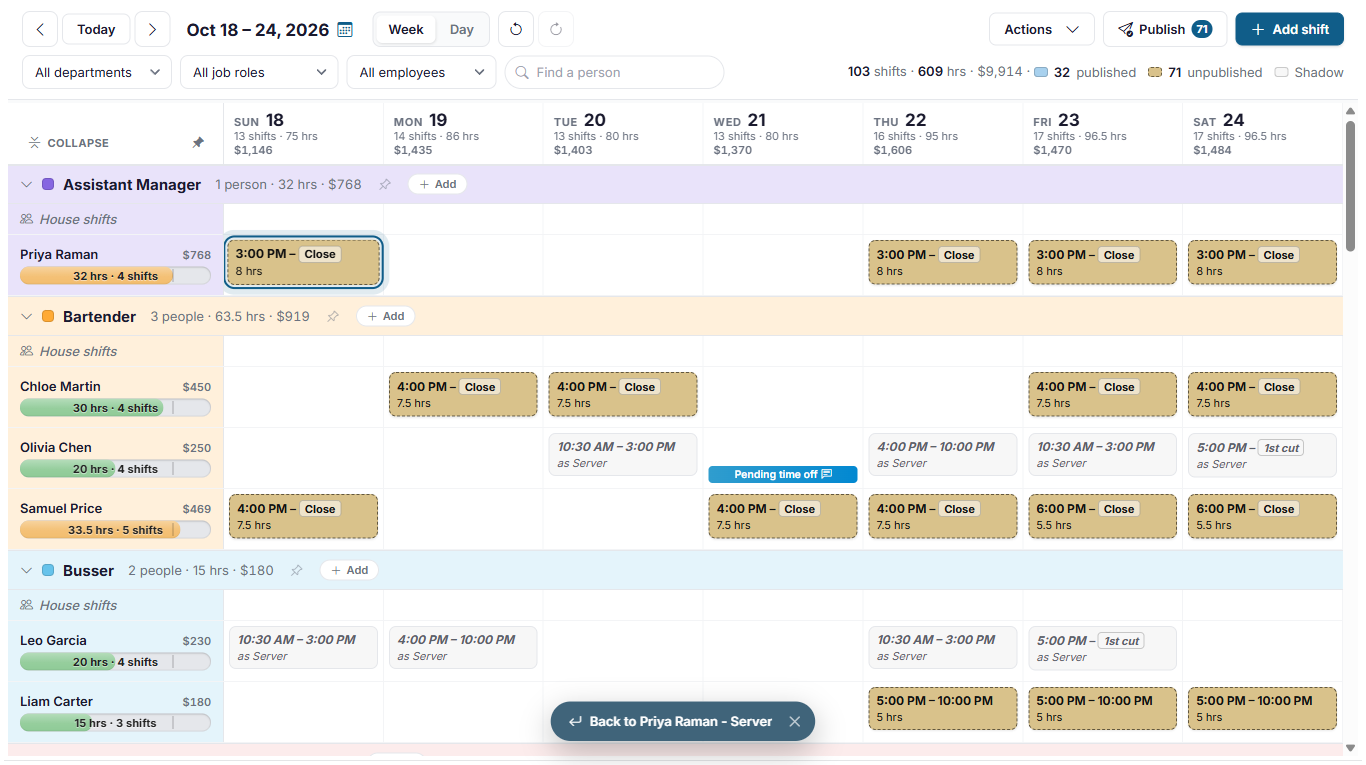
| Gray shift in italics, "as Host" | A shadow shift: the same employee is already working in another job role at that time. It's there so you don't double-book them. Click it to go to the real shift (see below). |
| Red bar, Not available | The employee's weekly availability says they can't work that day. |
| Green bar with times | The employee is only available during those hours that day. |
| Blue bar, Pending time off | A time off request is waiting for a manager to review it. If the employee calls another location home, that location reviews it, and clicking the day tells you which one (see Time off from other locations in Reviewing time off requests). |
| Red bar, Time off all day | Approved time off for the whole day. |
| Orange bar, Time off with times | Approved time off for part of the day. |
| Amber label with a star under the date, like Columbus Day | A holiday, or one of the days restaurants get busy, so you can plan for it. Administrators can switch these off on the Settings page (see Company settings). |

A small speech-bubble icon on a bar means the employee left a note. Click the day to read it. You can also click published, unpublished or Shadow in the summary at the top right for a reminder of what each one means.
Go to a shadow's real shift, and back
Click a shadow shift and choose Show the shift. The schedule scrolls to the employee's real shift, under the job role they're working, and outlines it so it's easy to spot.
Check availability and time off before you start adding shifts. The schedule shows them so you can plan around them, but it won't stop you from scheduling somebody who has asked for the day off.
Add a shift
Click an empty day in an employee's row. A menu opens with New shift… and the location's shift shortcuts for that job role. Click a shortcut to add that shift immediately, or click New shift… to fill in the details yourself.
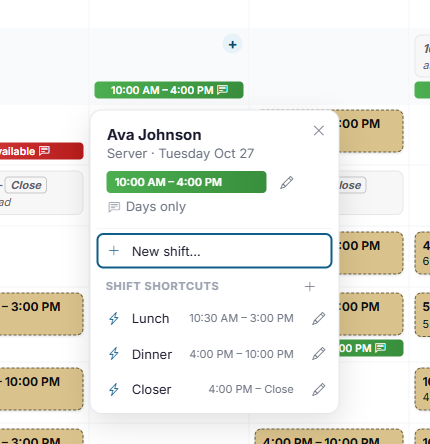
You can change things from this menu without leaving the schedule:
- Availability: the top of the menu shows the employee's availability for that day, or No availability set. Click the pencil beside it to change it. It changes that day of the week, every week, not just this date: set the hours they can work, switch on Off all day, or add a note.
- Shift shortcuts: click + beside the heading to add a shortcut for that job role, or the pencil beside a shortcut to change or remove it. See Shift shortcuts.
You can also click + Add shift at the top of the page, or + Add beside a job role's name, and choose the employee in the form.
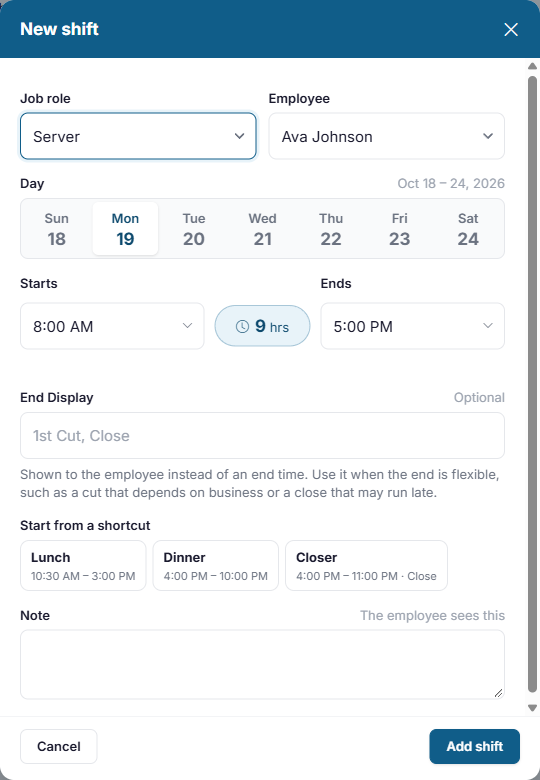
- Job role and Employee: filled in from the row you clicked. The employee list shows everyone who works this job role here. Anyone already working at that time is grayed out, with the shift they're working, because nobody can be in two places at once. That includes shifts at your other locations, which say where, for example at Lakeside. Choose House shift - nobody yet to add a shift that someone can pick up later.
- Day: any day of the week on screen.
- Starts and Ends: type a time or choose one from the list. Typing 4p, 4:30p or 16:30 all work. The length of the shift is shown between the two times.
- End Display (optional): what the employee sees instead of the end time, such as Close or 1st cut. Use it when the end is flexible: a cut that depends on how busy it is, or a close that may run late. Hours and labor cost are still worked out from the end time.
- Start from a shortcut: fills in the times and End Display from one of your shift shortcuts. The shortcut you picked stays highlighted until you change the start or end time yourself. When you edit a shift, the shortcut it matches is highlighted.
- Note (optional): anything the employee needs to know, such as their section. They see it with their shift, in the app and on the printed schedule.
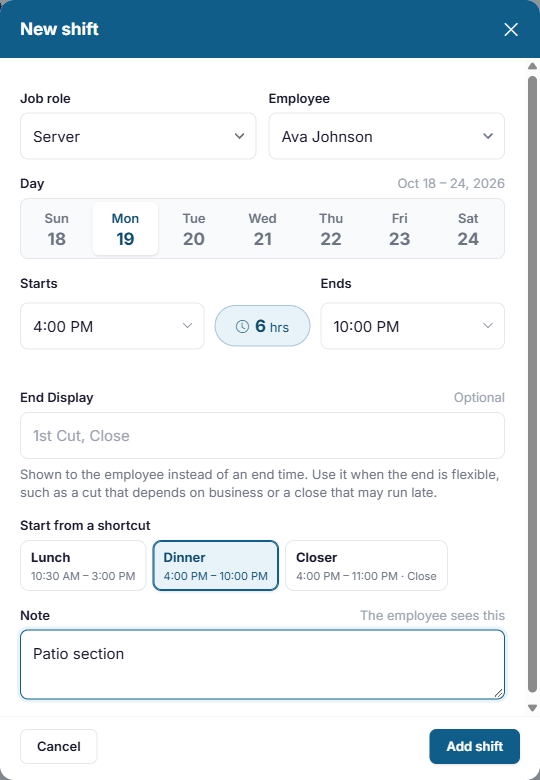
Click Add shift. The new shift appears in tan: it is saved, but nobody can see it until you publish it.
Sail Scheduling checks every location, not just the one on screen: it won't let you schedule someone at two locations at the same time.
Change, move and copy shifts
Click a shift to see its details and what you can do with it.
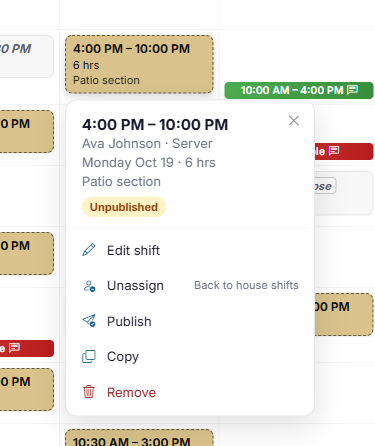
- Edit shift opens the form again. Double-clicking a shift does the same.
- Unassign takes the employee off and moves the shift to the job role's House shifts row. It's only offered while house shifts are switched on.
- Publish publishes just this one shift.
- Copy copies the shift. Then click an empty day on any row, in this week or another, and choose Paste.
- Remove deletes the shift. You can also select a shift and press the Delete key.
Drag and drop
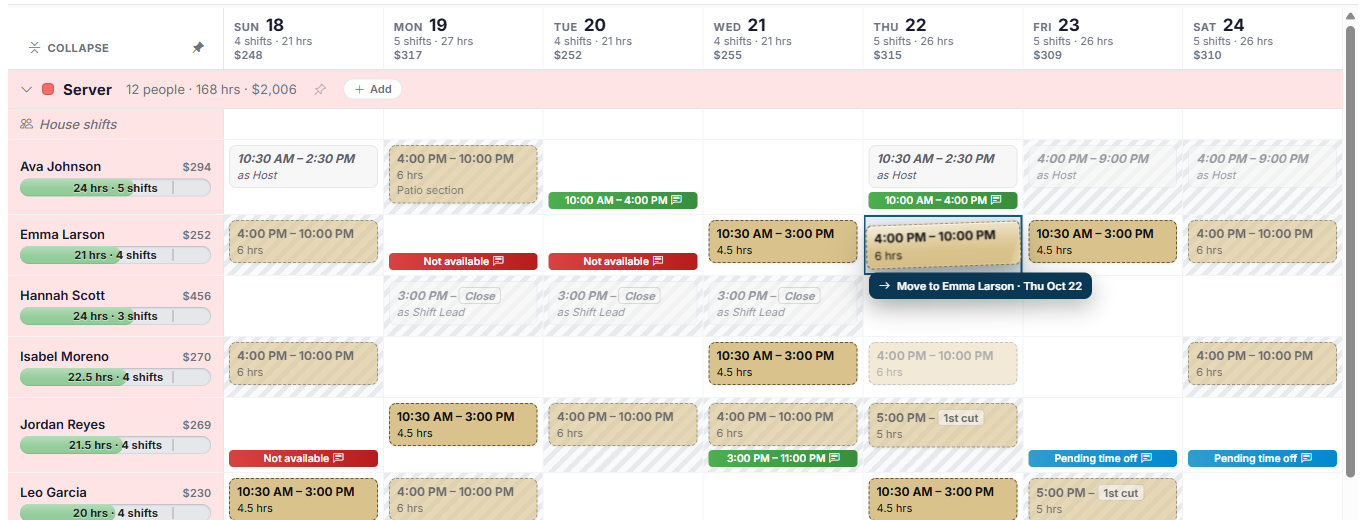
Drag a shift to move it to another day, to another employee, or to another job role that the same employee works. Hold Ctrl (or Alt) as you let go to drop a copy instead. While you drag, days where the shift can't go are shaded, and a label under the shift tells you what will happen when you let go, or why it can't.
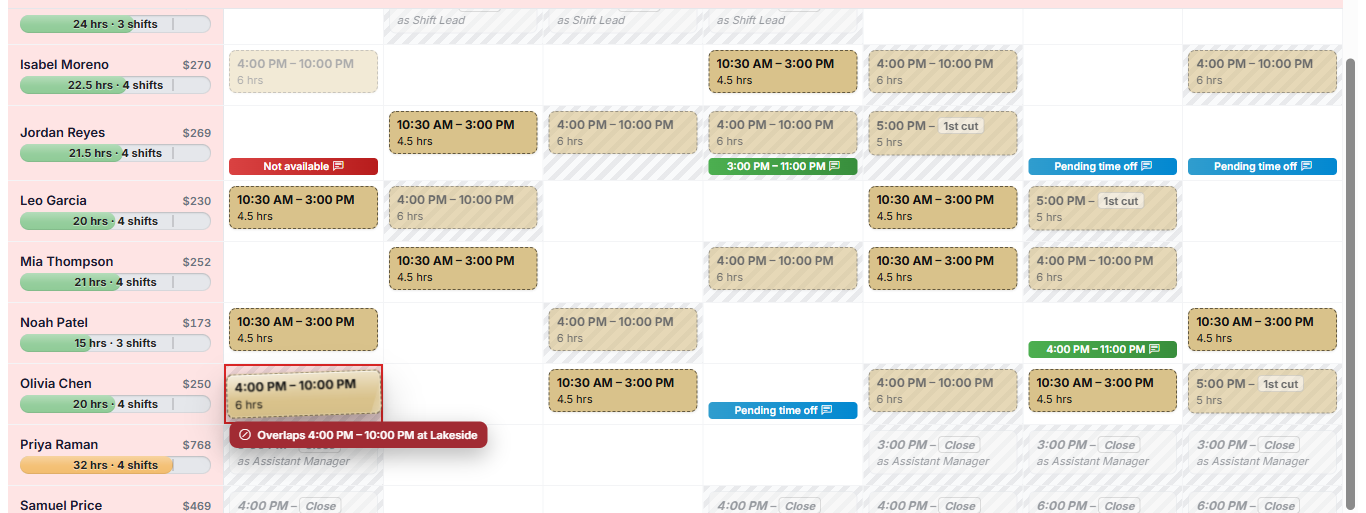
That check includes the employee's shifts at your other locations. If they're already working somewhere else at that time, the day turns red and the label says where.
On a phone or tablet, press and hold a shift until it lifts, then drag it.
Undo and redo
Made a mistake? The two curved arrows beside Week and Day undo and redo your last changes, including publishing, copying and applying a template. You can also press Ctrl+Z and Ctrl+Y (Cmd+Z and Shift+Cmd+Z on a Mac).
Keyboard and trackpad shortcuts
On a computer, the left and right arrow keys go to the previous or next week, or the previous or next day in Day view, just like the arrows at the top. Press T to go to today. They don't do anything while you're typing in a box or have a window or menu open.
You can also swipe sideways on a trackpad, or scroll sideways with a mouse, to move a week (or a day in Day view), the same way you swipe on a phone. If the schedule is wider than your window, it scrolls across first, and the next swipe changes the week.
When someone else is working on the schedule
Several managers can work on the same week at once. Your screen catches up with their changes by itself, within half a minute, or as soon as you come back to the tab, and a note at the bottom says The schedule was updated with changes made by somebody else. It waits while you're in the middle of something, such as a shift you have open.
If someone else changes a shift while you have it open, saving yours doesn't replace their changes. You're told the shift was changed by somebody else: close the window and open the shift again to see it as it is now.
Fill a week quickly
You don't have to build every week from scratch. The Actions menu has three shortcuts under Build this week, and a way to start over at the bottom. Each item has a line saying what it does, or, when you can't use it yet, why.
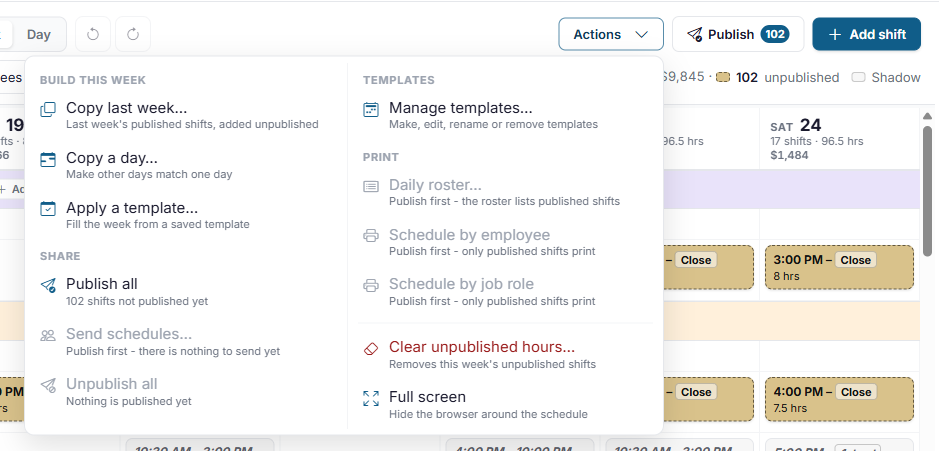
- Copy last week copies last week's published shifts into this week.
- Copy a day copies one day's shifts onto any other days of this week. You can also hover over a day's heading and click its copy button.
- Apply a template adds the shifts from a schedule template you've saved. See Schedule templates.
- Clear unpublished hours (in red, at the bottom) removes every unpublished shift in the week, so you can start over. Published shifts are left alone.
Everything these shortcuts add is unpublished, so you can check it first. Afterward, a summary tells you what was added and what was skipped, and why, for example because an employee is no longer at this location or is already working at that time. Look it over before you publish.
Copy last week doesn't check time off. It can put an employee on a day they have approved time off. Check the time off bars after copying. Applying a template and copying a day can skip approved time off for you.
Publish the schedule
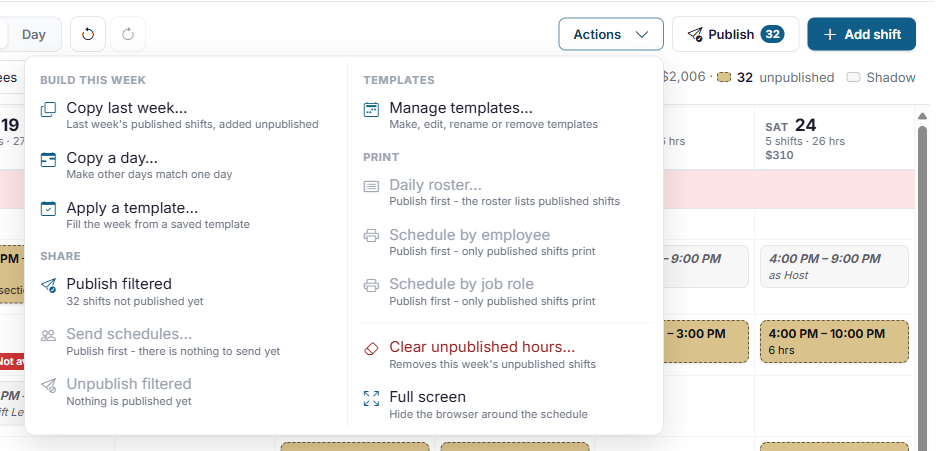
Nobody can see a shift until it is published. When the week is ready, click Publish next to Add shift. Its number is how many shifts are waiting to be published; once everything is published, the button goes away. Publish all in the Actions menu does the same thing.

To publish only part of the week, use the filters first. For example, filter to the Server job role to publish just the servers' shifts. With a filter on, Publish counts and publishes only the shifts the filters leave on screen, and the menu says Publish filtered.
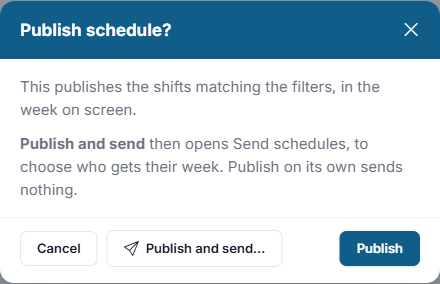
A window asks you to confirm, with two ways to go:
- Publish publishes the shifts and nothing else.
- Publish and send… publishes them, then opens Send schedules straight away, so you can check who gets their week and send it (see Send the schedule to your team below). Nothing is sent until you click Send there.
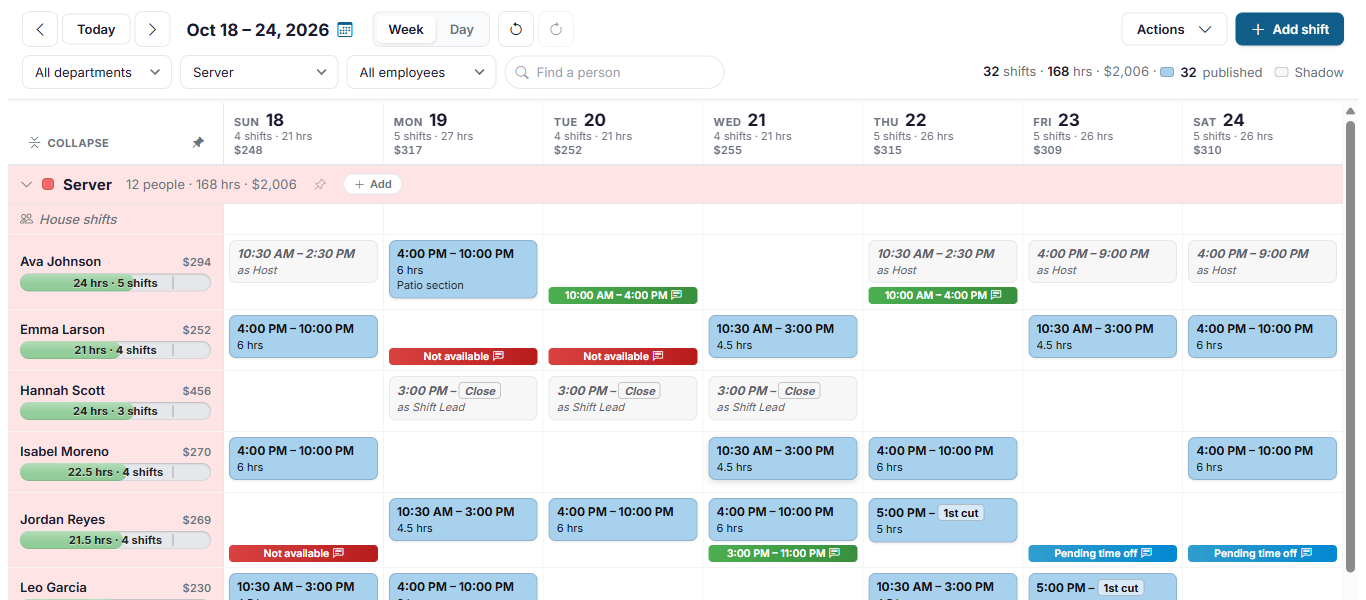
Published shifts turn blue, and employees can see them in the app and on the website right away.
Publishing doesn't notify anyone. Employees are only emailed, texted or sent a push notification when you send the schedule (see below), either straight after publishing with Publish and send… or later from Actions. That way you can publish, make final changes, and send once you're happy with it.
Changing a published shift
A published shift has fewer options: Details, Unassign, Unpublish and Copy.
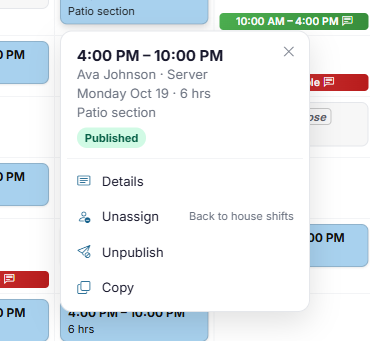
To change its times or remove it, Unpublish it first, make your change, then publish it again. To give a published shift to a different employee, let them trade it through ShiftHub, or unpublish it and change it yourself. Actions also has Unpublish all (or Unpublish filtered) for the whole week.
Send the schedule to your team
When you're ready for everyone to hear about their shifts, open Actions and choose Send schedules, or choose Publish and send… when you publish.
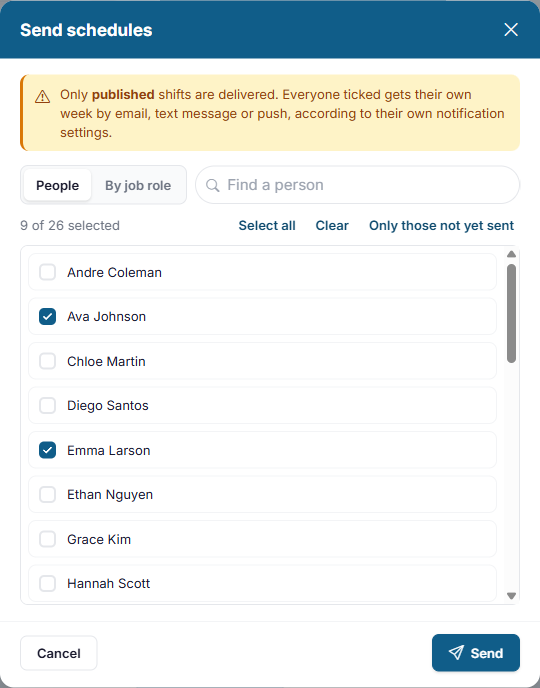
- Everyone with a published shift this week who hasn't been sent it yet is already ticked. Change the ticks if you need to: Select all, Clear and Only those not yet sent help you pick, and By job role lists people under their job roles.
- Click Send.
Each employee gets their own week by email, text message or push notification, depending on their notification settings. Only published shifts are sent. Afterward, an envelope icon appears on each shift that was sent.
Print the schedule
The Print section of the Actions menu has three printouts. Each one shows published shifts only.
- Schedule by employee: everyone in alphabetical order, with the job role under each shift.
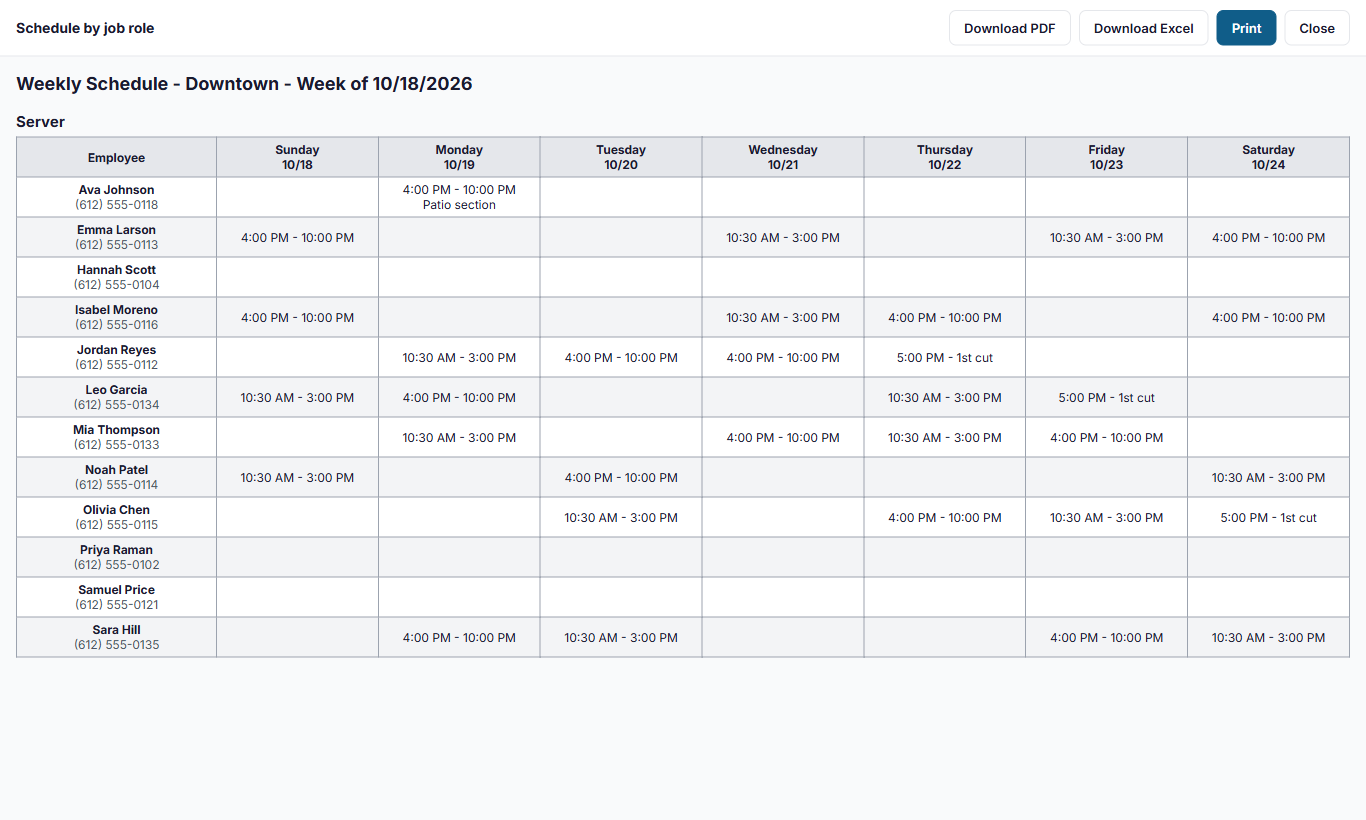
- Schedule by job role: grouped the same way as the schedule. Someone who works two job roles appears in both, with their other shifts shown grayed out so they don't miss one.
- Daily roster: one day's shifts on a single page, grouped by the location's day parts (such as Lunch and Dinner). See The daily roster.
The weekly printouts open in a new tab, with buttons to Download PDF, Download Excel and Print. The filters apply, so you can print one department's schedule on its own.
On a phone
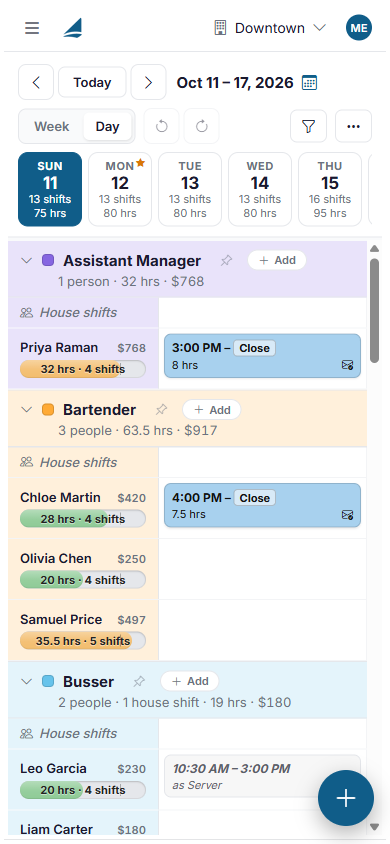
On a phone, the schedule opens in Day view with a strip of days across the top. Swipe left or right to move between days, tap the funnel button to filter it, and tap the round + button to add a shift. The … button is the Actions menu. A small star in the corner of a day means it's a holiday; tap the day to go to it.
No Comments