
How to Configure a Kitchen Video in Backoffice
This document will walk you thru setting up a kitchen video system
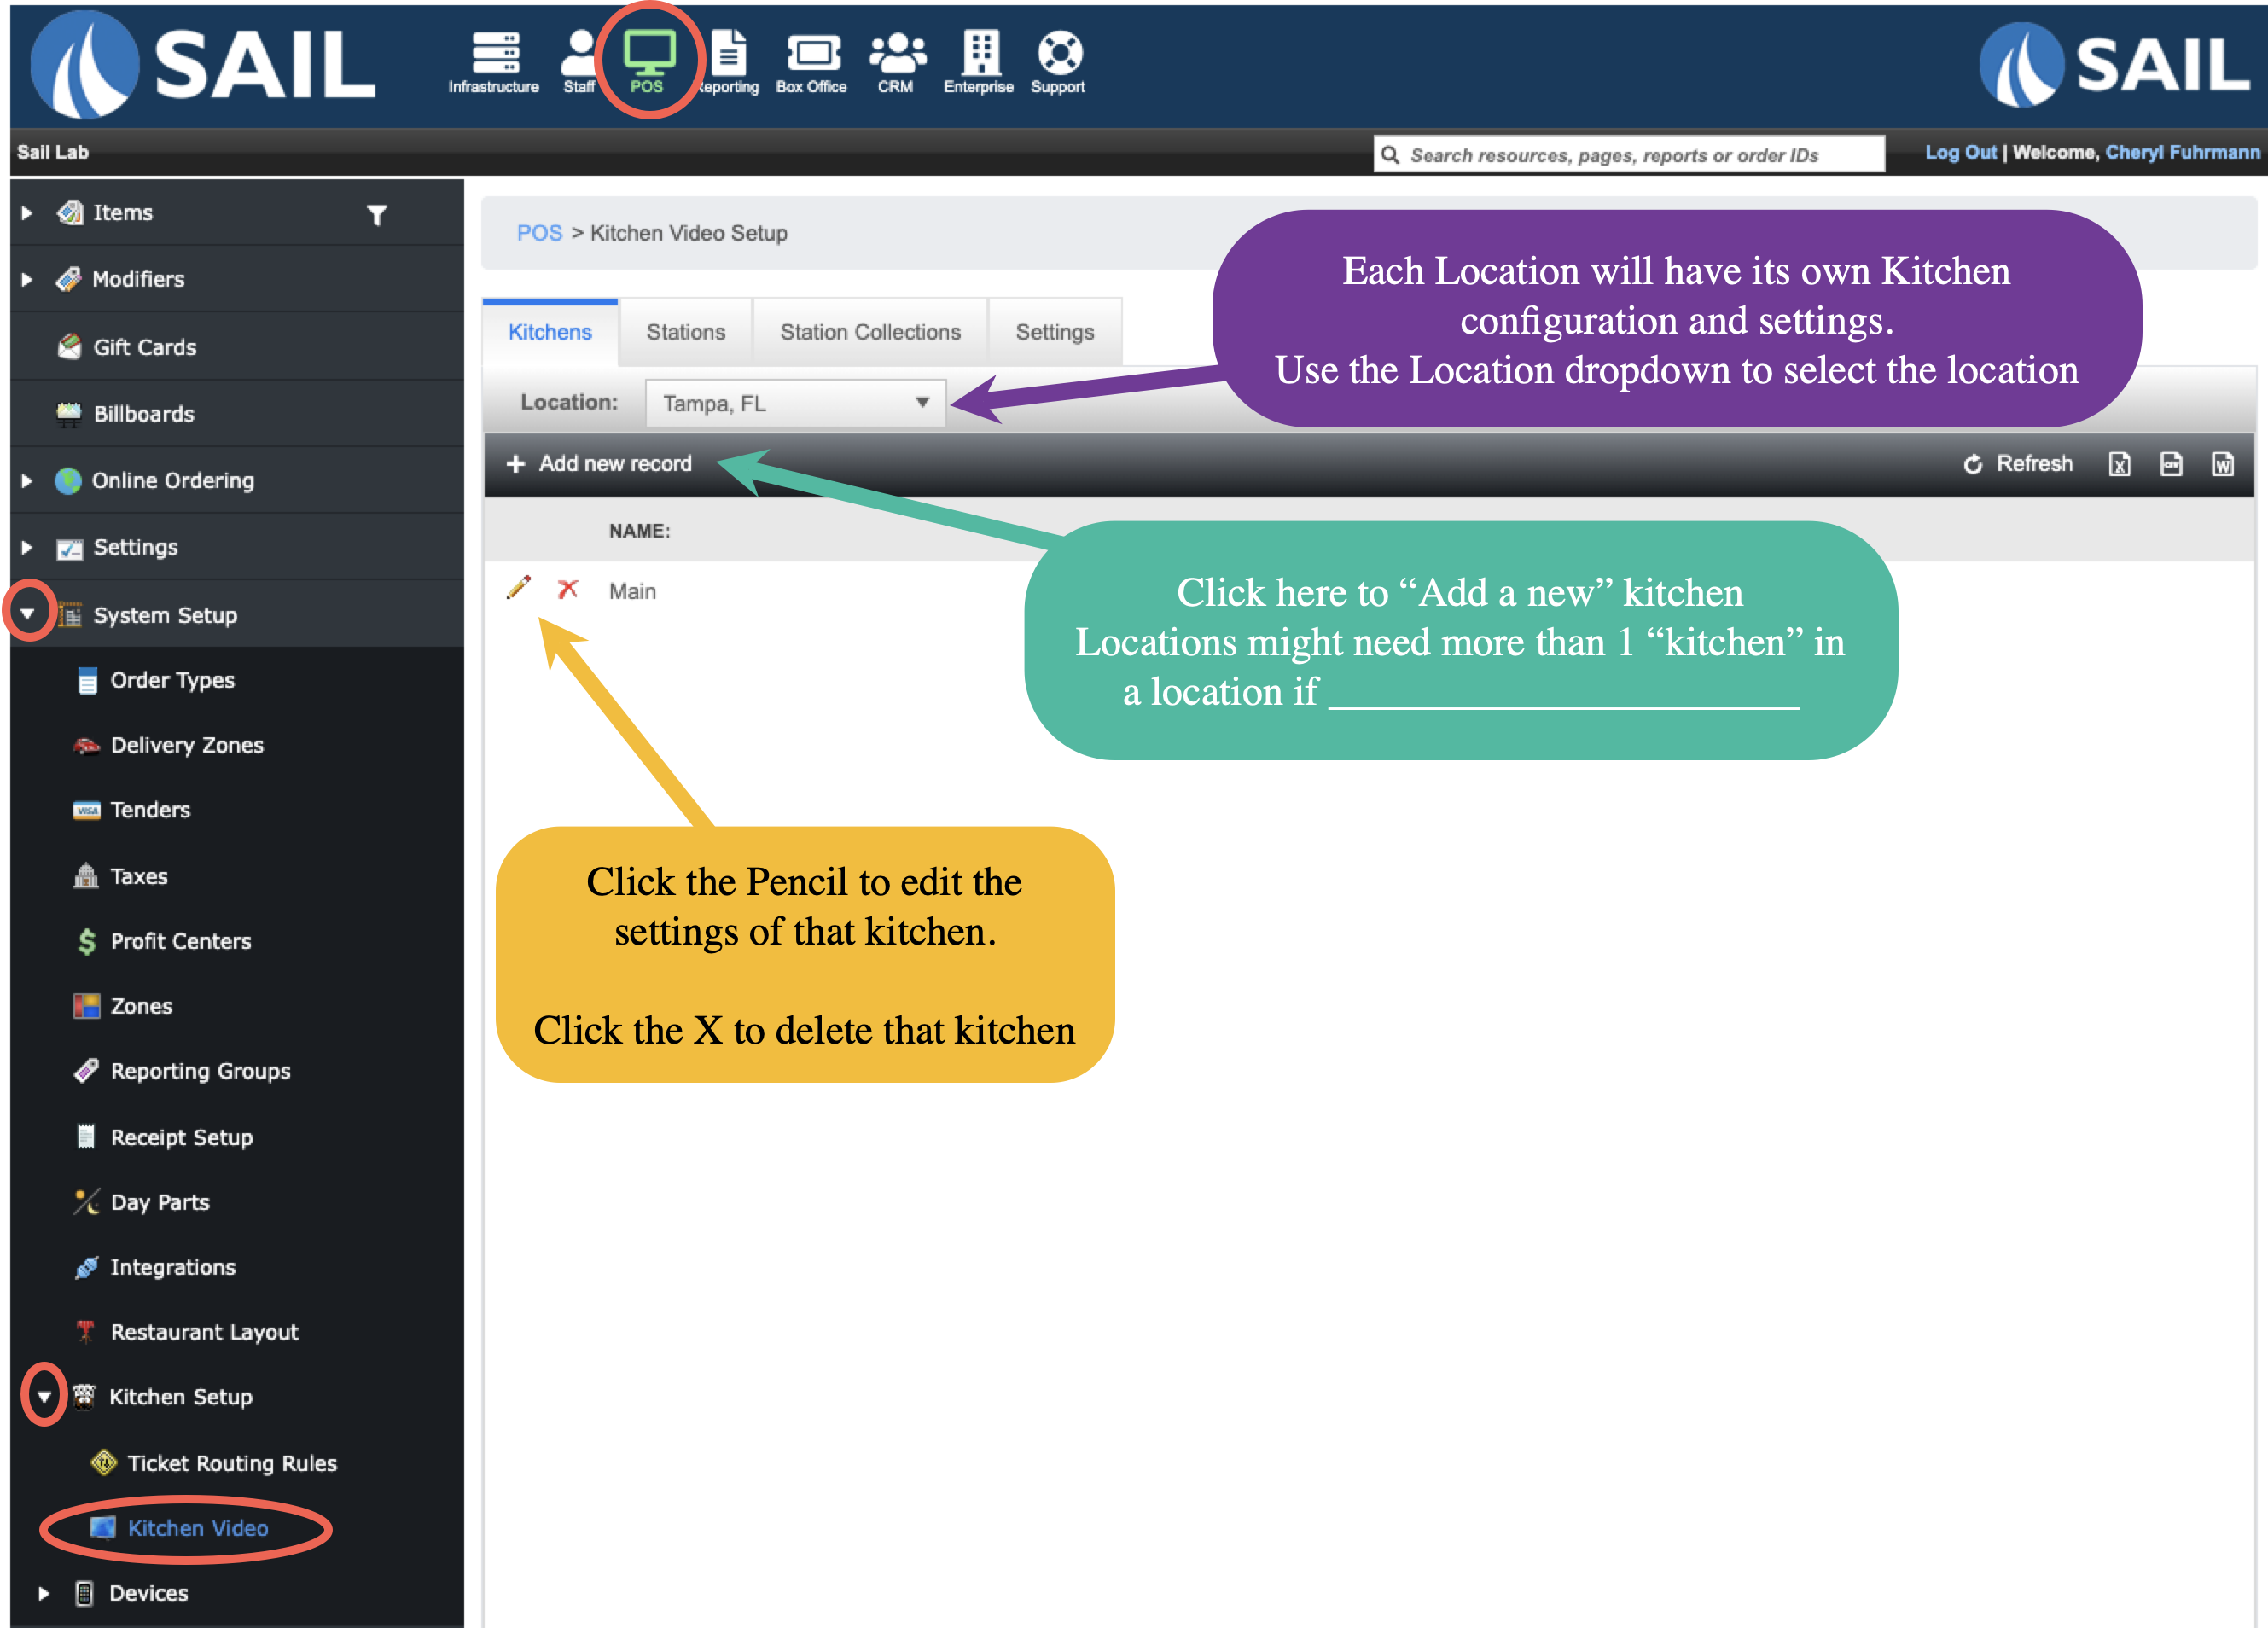
To Find Kitchen Video configuration
Backoffice --> System Setup --> Kitchen Setup --> Kitchen Video
- If you are a multi store location, each location will have its own Kitchen configuration. So you can use the location dropdown to switch between the different locations
- Add new record allows you to add as many different "Kitchens" as the location needs
- A kitchen contains a set of stations
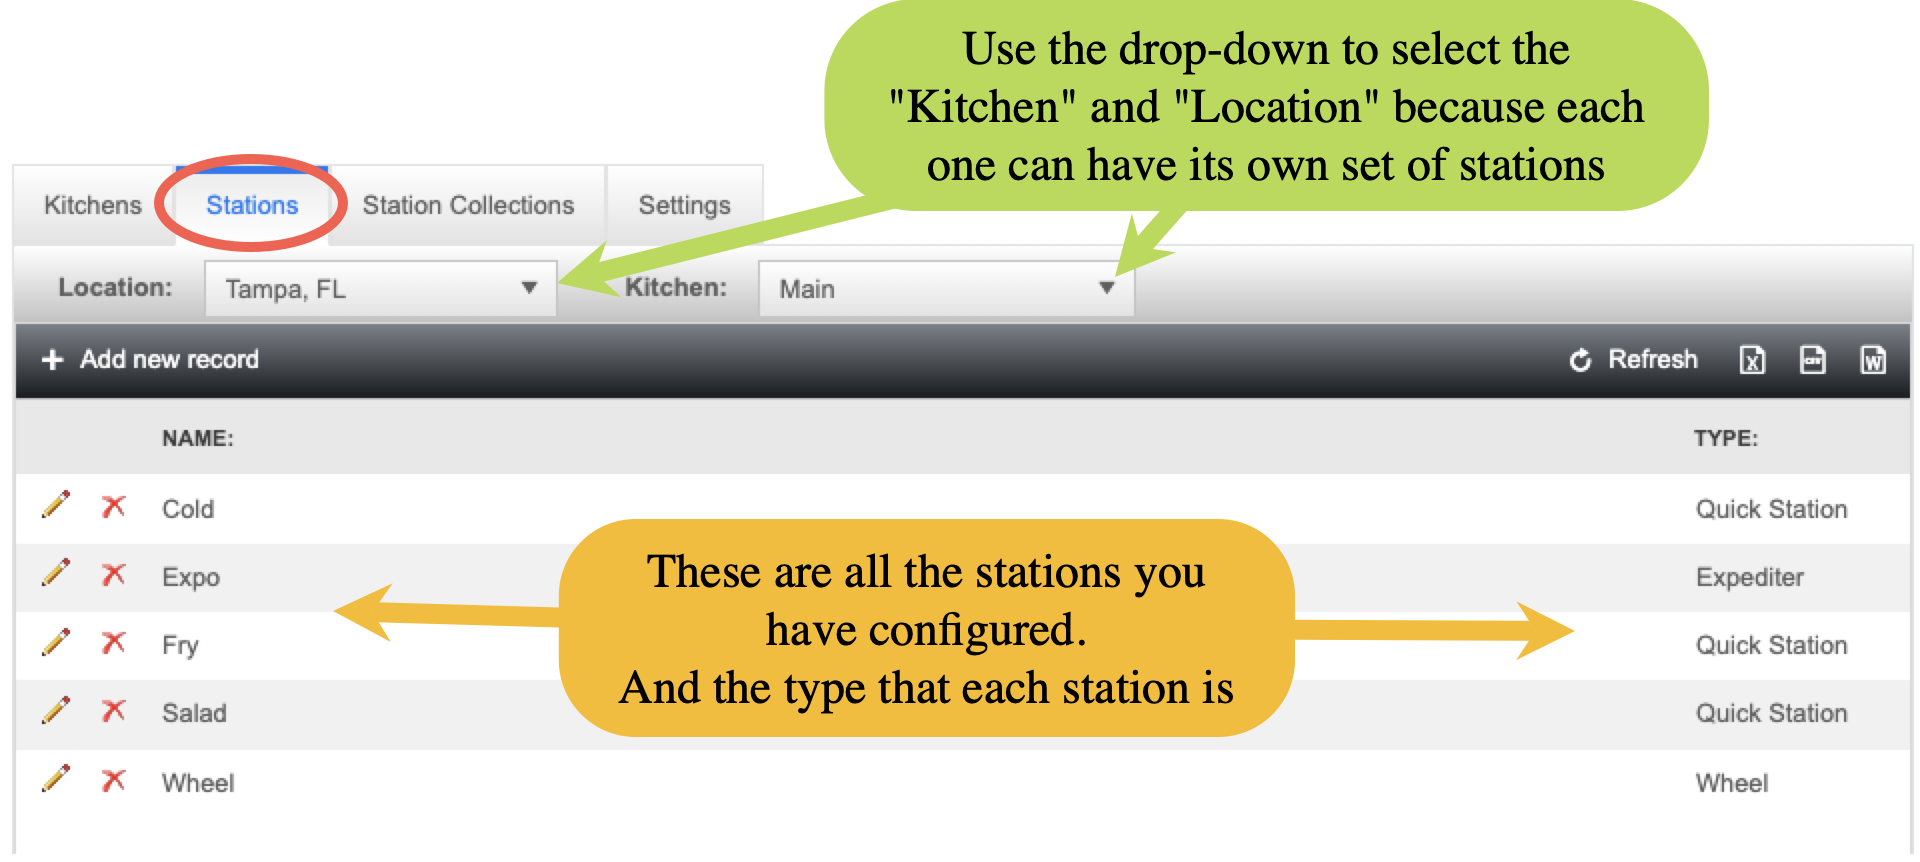
- Each location will display the Kitchen names, a pencil to edit, and an X to delete it
Step 1 - Add a Kitchen
When you click on "Add new record" you will get a screen to Name it and configure the settings for this kitchen
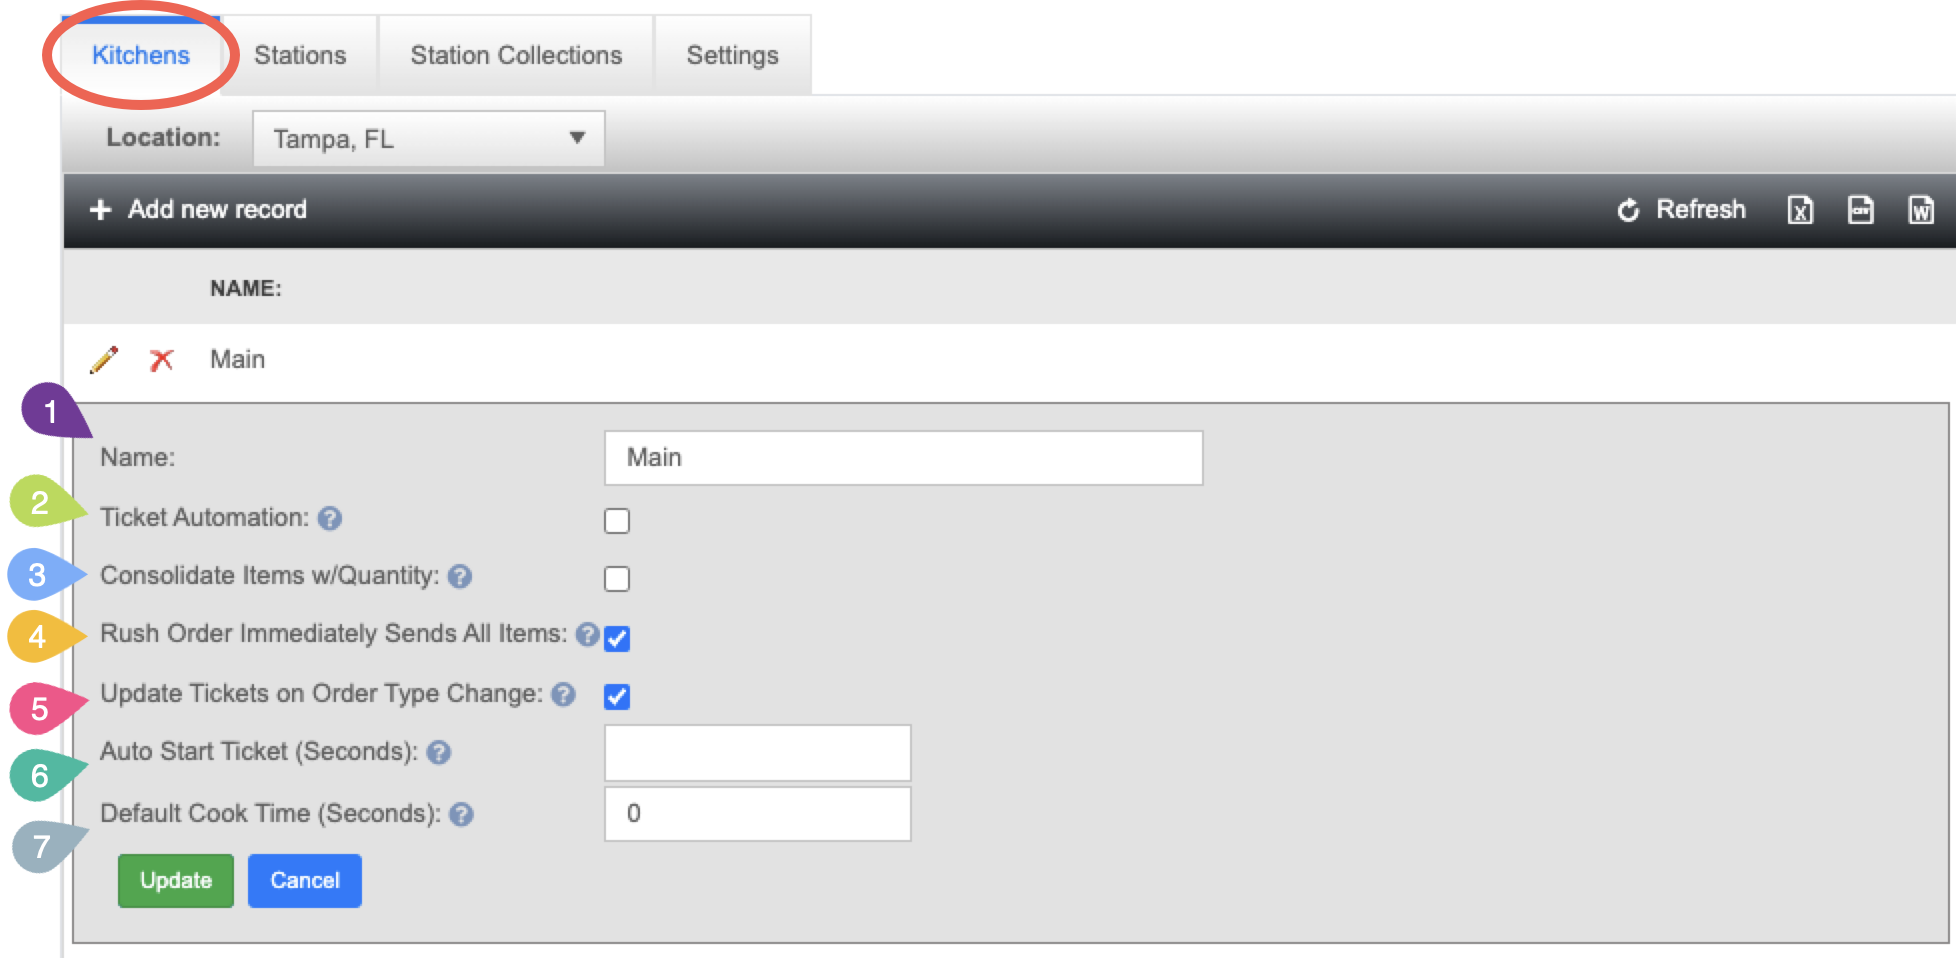
Kitchen Settings
- Name: Name the Kitchen. If there is more than 1 you might want to name it with the location (ex: Kitchen & Bar)
- Ticket Automation: Do you want items to automatically send to the stations in the kitchen? or would you like a person to be responsible for sending them to each station? (To learn more, click the link)
- Checked: Items will automatically send to kitchen stations based on their cook time
- Not Checked: Items will need to be manually sent to each station
- Consolidate Items with Quantity: Do you want Quantity items to come in as a single or multiple items?
- Checked: items rung in with a quantity at the terminal will be sent to the kitchen as a single line item with the quantity in front.
- Example: Ringing in 6 cheese curds will appear as one line item (e.g., “6 Cheese Curds”), allowing them to be fired and finished together.
- Note: Items are only consolidated if entered as a single item with a quantity. Separate entries will not consolidate automatically.
- Not Checked: Items entered with a quantity at the terminal will appear as separate line items on the KVS screens. This allows the kitchen to fire and finish each item individually.
- Example: Ringing in 12 pizzas will show as 12 separate items, so the kitchen can fire 8 now and wait on the remaining 4 if the oven is at capacity.
- Checked: items rung in with a quantity at the terminal will be sent to the kitchen as a single line item with the quantity in front.
- Rush Order Immediately Sends All Items: Do you want all items on the ticket to be sent immediately when rushed, or still follow cook times?
- Checked: Rushing an order will immediately send all items to all kitchen stations, regardless of cook time. This may result in shorter cook time items being ready well before longer ones.
- Not Checked: Rushed orders are prioritized and move to the top of the KVS screen, but still respect cook times. This ensures all items are timed to finish together and can be served at the same time.
- Update Tickets on Order Type Change:
- Checked: When the order type is changed (e.g., from Dine-In to To-Go), all existing tickets on the KVS will automatically update to reflect the new type. This is helpful if the order was entered incorrectly or the customer changes their mind.
- Not Checked: Changing the order type after items have been sent to the kitchen does not update the original ticket’s display on the KVS. Only new items added after the change will reflect the new order type.
- Example: Ring in an order for a table who is eating in. a few minutes later they ask for an item to be rang in to go. You can change the order type on the table to To-Go and ring in the new item. then only that item will say To-Go on the KVS. The original ticket will stay Dine-In.
- Auto Start Ticket (Seconds): If a time is entered here, the ticket will automatically begin after the set amount of time - even if the first item hasn't been manually started (fired). Think of this as a safeguard to keep orders moving in case the first station is delayed or forgets to fire the item.
- Default cook Time (Seconds): Specify a default cook time to be applied to items that do not have a cook time specified. So if you create a new menu item, and forget to add the cook time, this default cook time will be entered.
Additional Settings Tab - Warning color settings
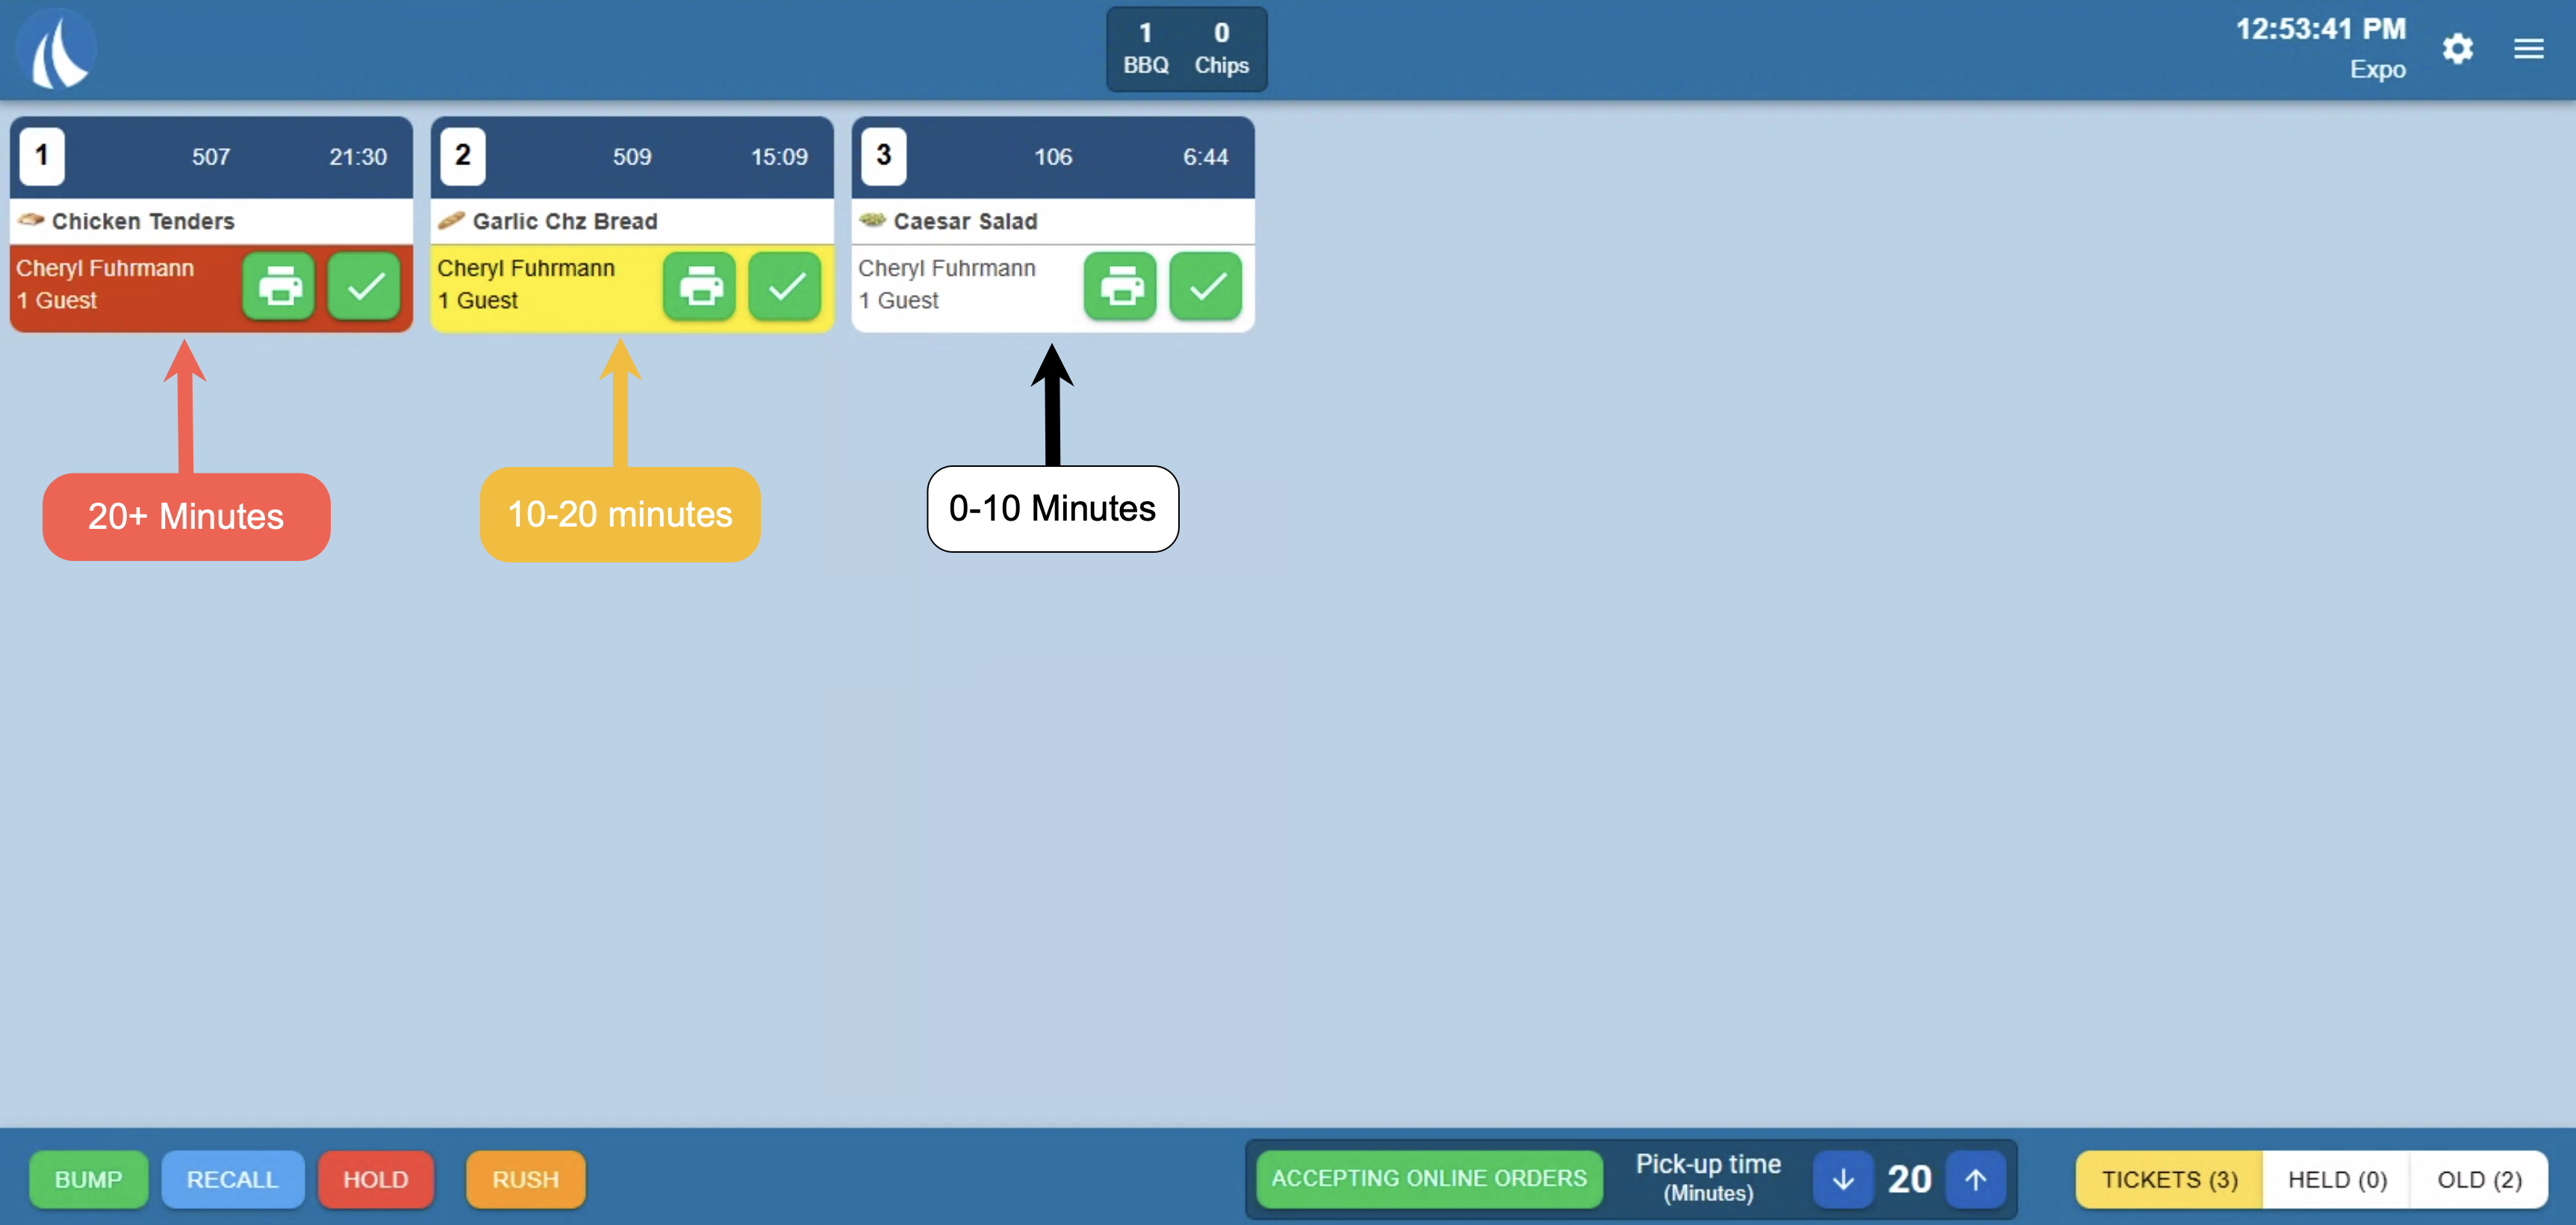
- Be able to adjust the minutes that the warning time colors to change to Yellow and Red

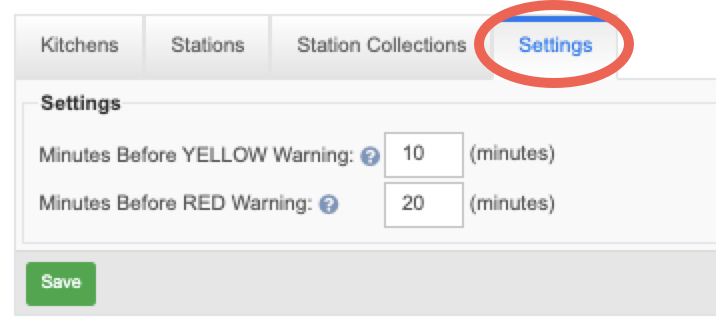
Here is what they look like on the KVS screens:
Step 2 - Add stations
How to add a new station
- Each kitchen MUST HAVE only 1 Expo and only 1 Wheel screen defined
- Note: It is allowed to have multiple physical displays linked to expo or wheel, but, from a routing perspective we only allow one expo/wheel.
- Each kitchen can have as many "Quick Stations" as it needs
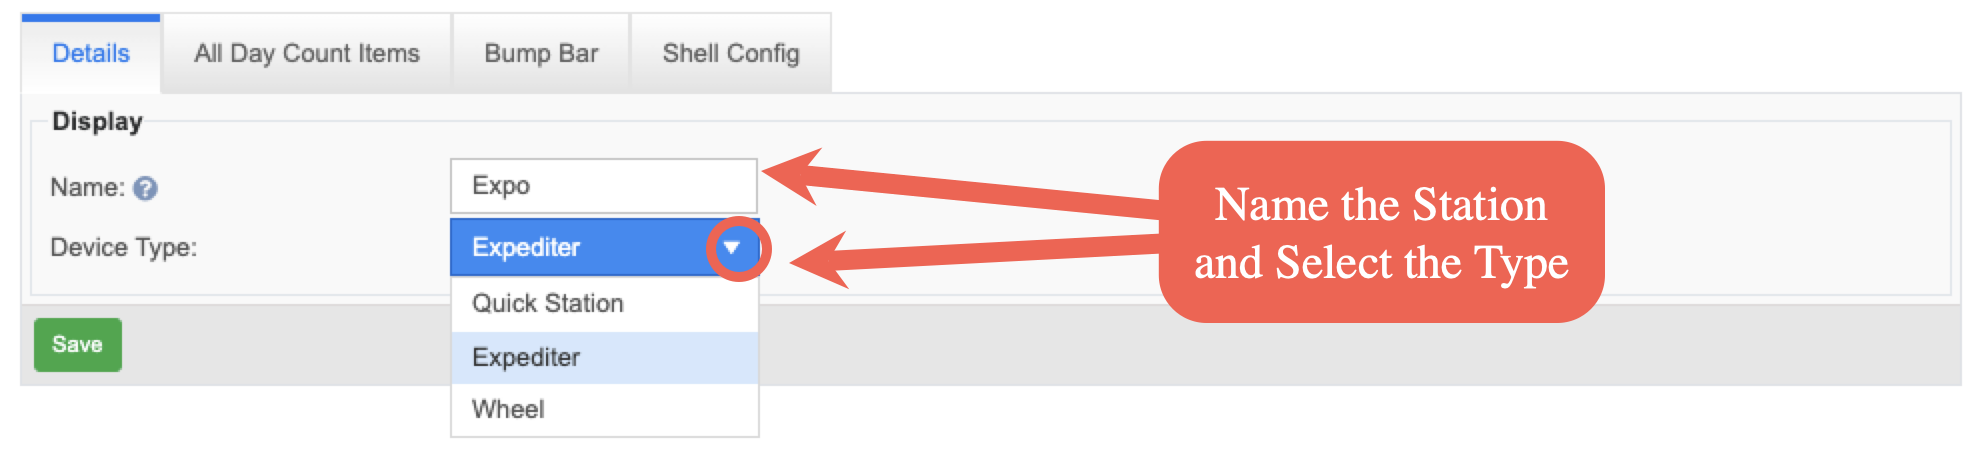
When you click "+ Add new record" you will see 4 different tabs to help you configure each station
Details Tab
Here is where you will name the station and select which device type it will be
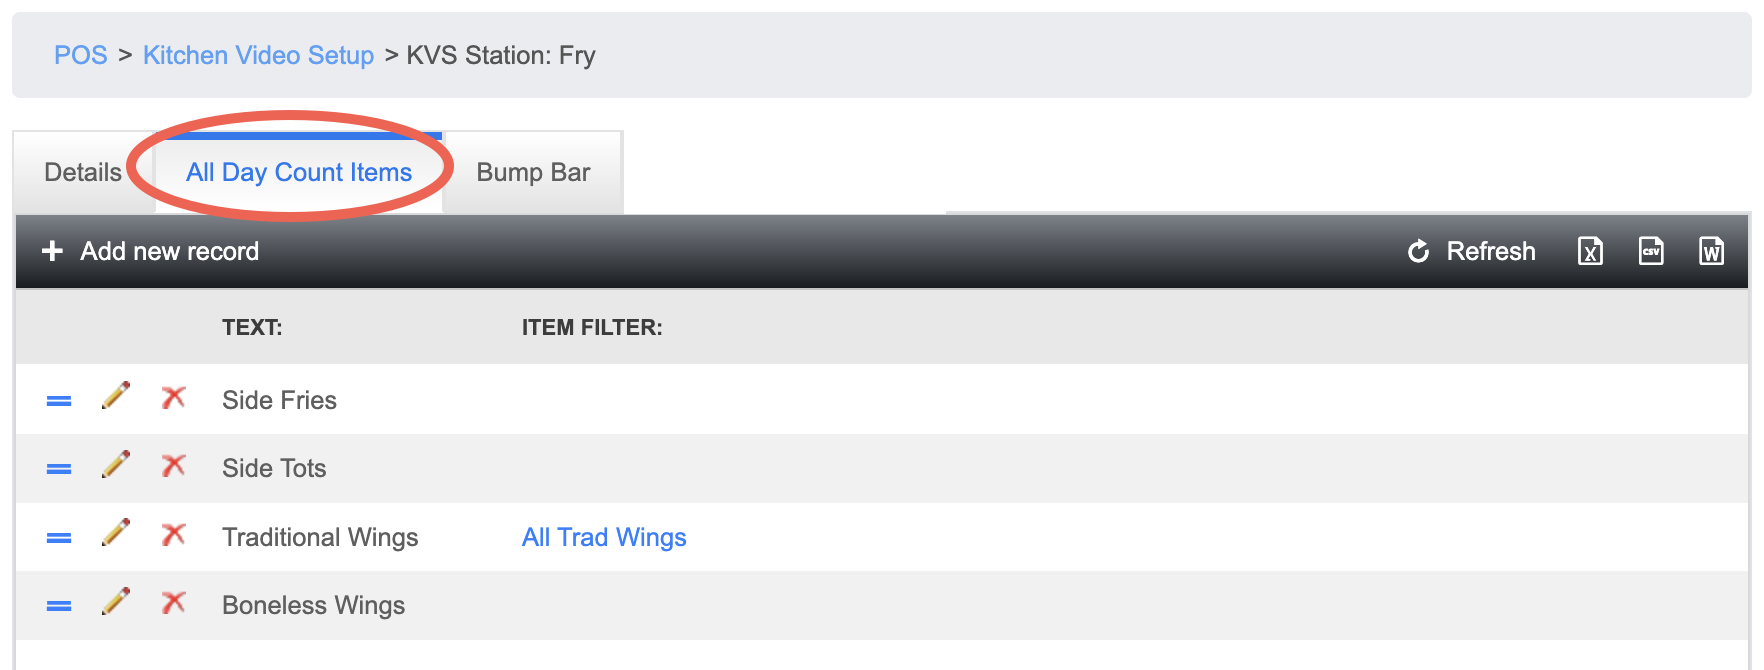
All Day Count Items (Optional)
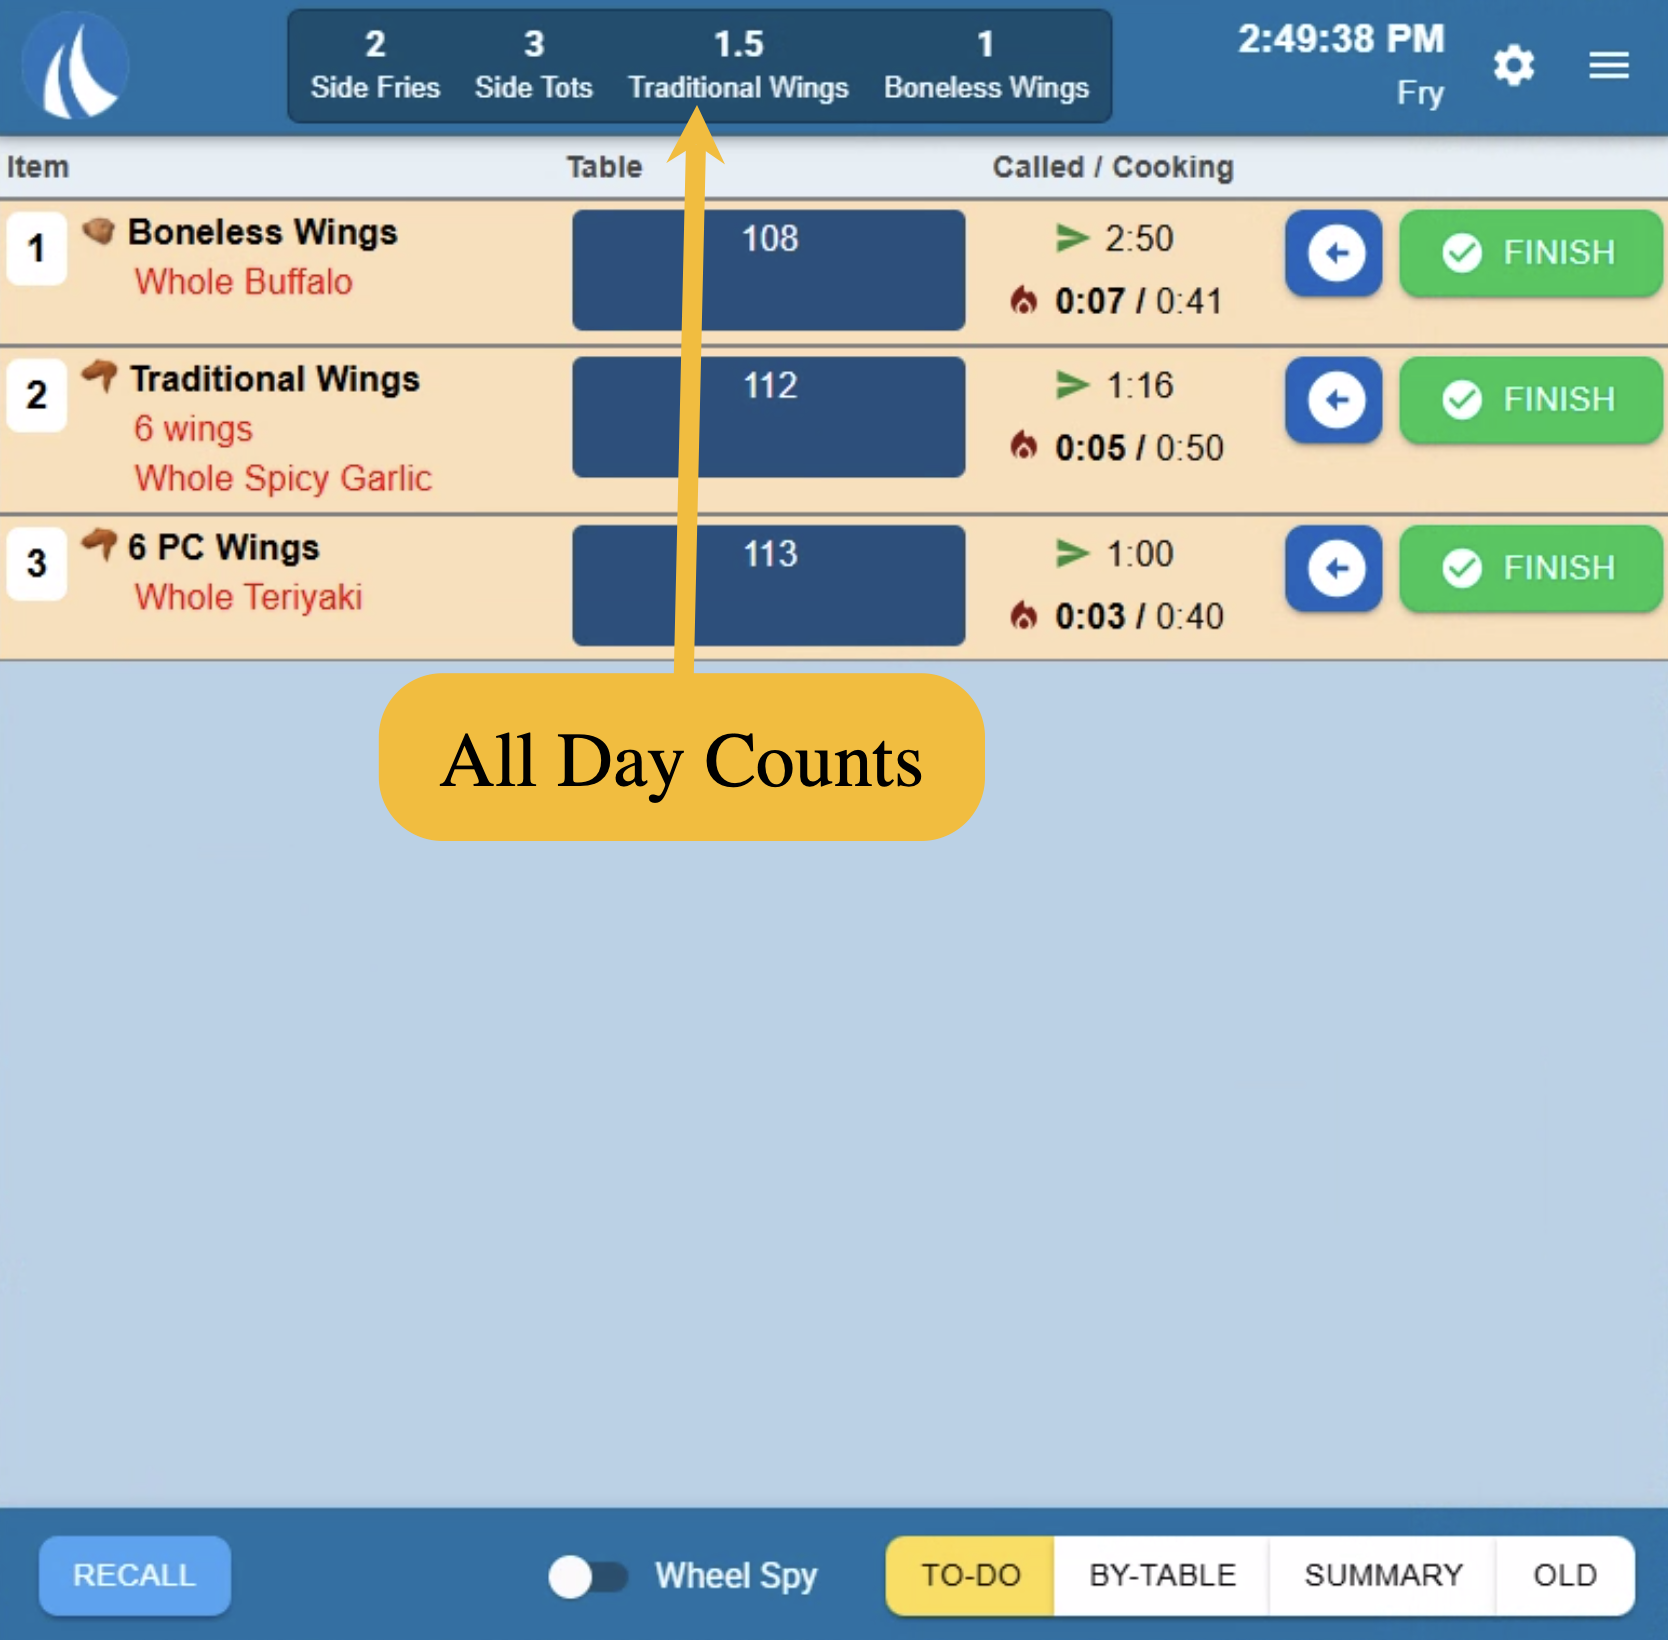
Here is where you can set All Day Counts (ADC) to show up on the top of each KVS screen
- All Day counts can be single items or a group of items
- Example uses:
- Help the Expo know how many of each sauce needs to be taken out and portioned while they wait
- Help the fry cooks know how many fries need to be put in the fryer
- Help the the grill cook know how many burger patties need to be on the flattop
Here is what they look like on a KVS screen
When you click "+ Add new record" you can configure each ADC
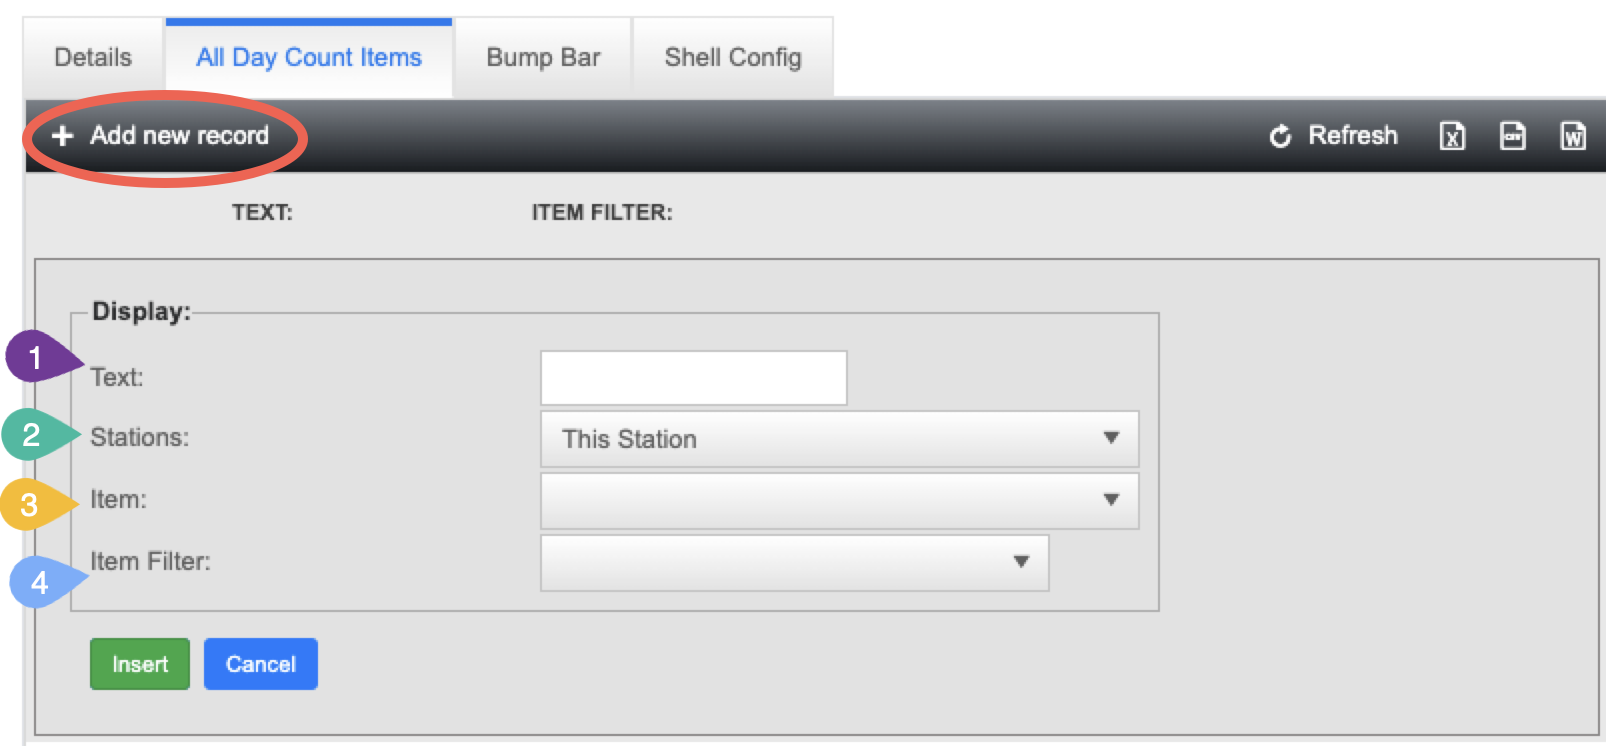
- Text: This is the text that will appear on the KVS station
- If you plan on having a lot of ADC, you may want to put a short or abbreviated name
- If you plan on having a lot of ADC, you may want to put a short or abbreviated name
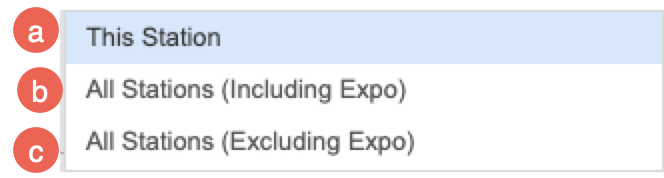
- Stations: this allows you to configure which stations will count in your ADC

- This Station - The ADC will only go up if the item is on that station
- Example: On the Fry station there is an ADC for Wings, Wings need to be on that station for the number to go up. If the wings have not been sent to the station yet the ADC will not count it.
- All Stations (Including Expo) - The ADC will go up as soon as the item is rang in because it's pulling from all stations including the expo screen.
- Example: A burger with fries is rang in, right away the ADC on the fry station goes up because there are fries with the burger, so the fry cook knows to put fries down. They need to look at that number as "How many fries does the expo person need at any given time." That number will not go down until the expo has used the fries and bumped the ticket off.
- All Stations (Excluding Expo) - The ADC will go up as soon as the item has been sent to the station it needs to be cooked on.
- Example: A burger with fries is sent to the grill station, the ADC on the fry station goes up because there are fries with the burger, so the fry cook knows to put fries down. As soon as that burger is finished, the ADC on the fry station will go down.
- This Station - The ADC will only go up if the item is on that station
- Item: Use the "Item" drop down if you'd only like to select an individual item for the ADC
- Example: Just cheese curds
- Item Filter: Use the "Item Filter" dropdown to select a preconfigured item filter for multiple items
- Example: Selecting all the items that use Ranch, like cheese curds, ranch modifier, and breaded mushrooms.
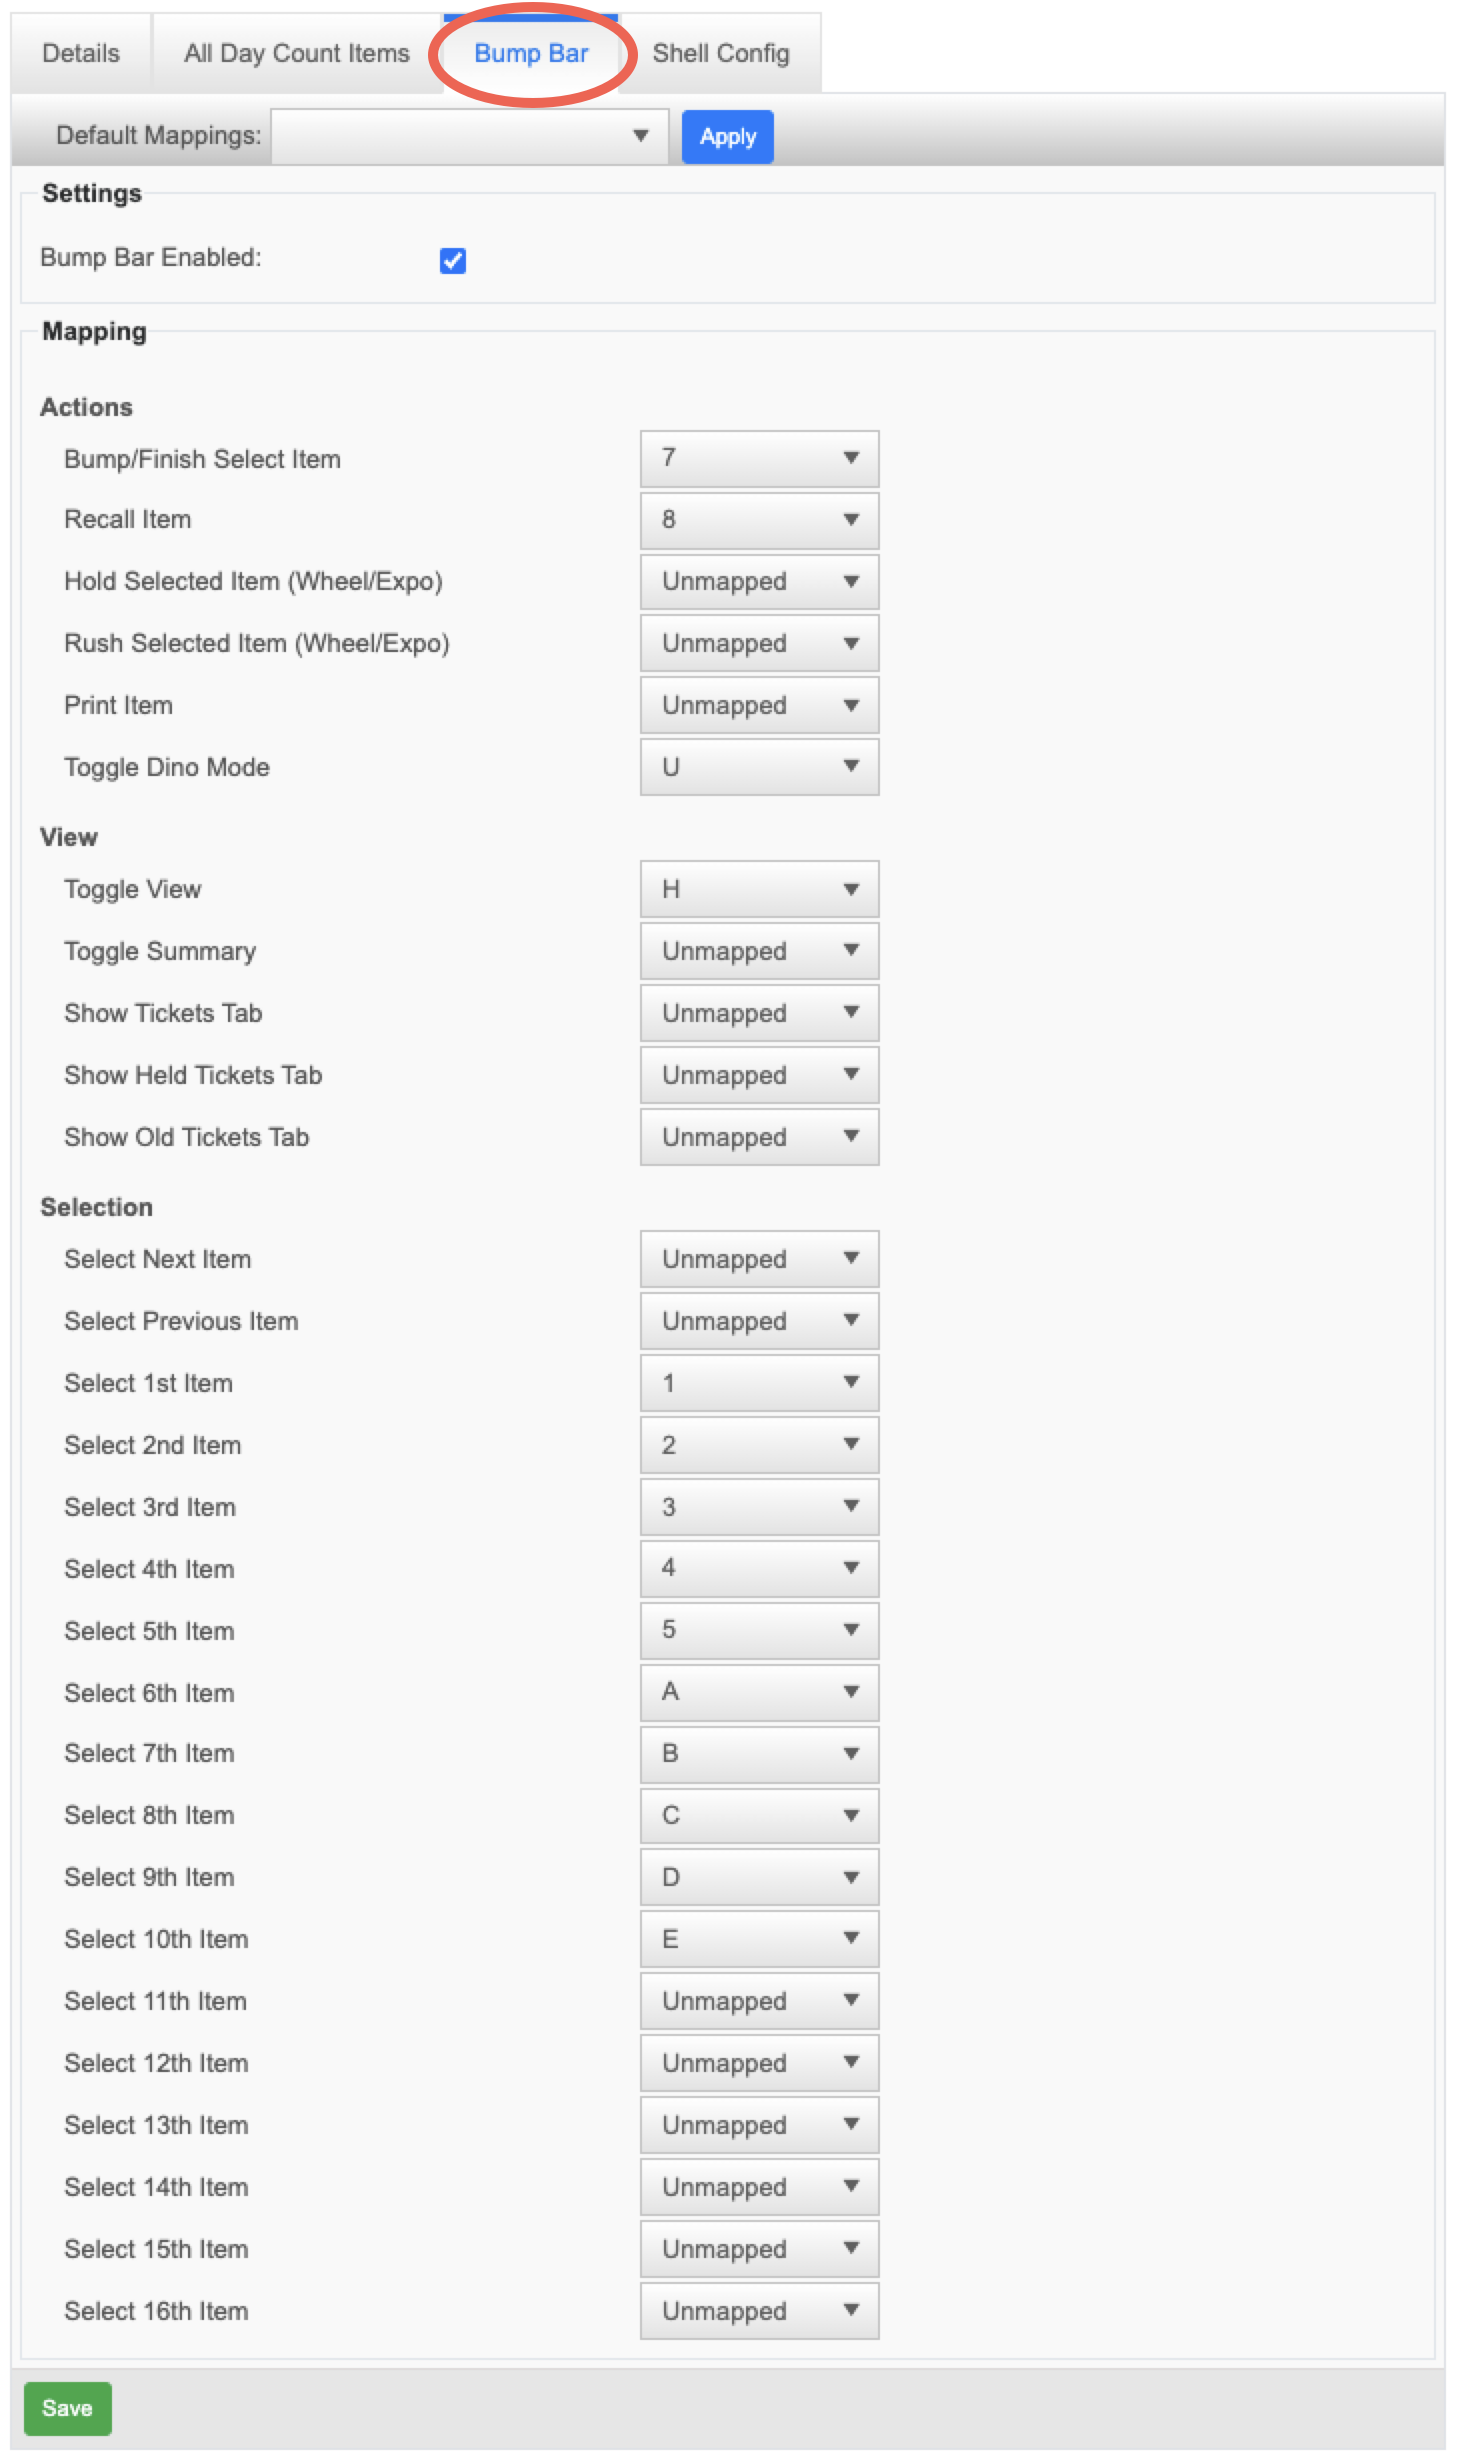
Bump Bar Tab (optional)
Here is where you can configure a bump bar to be used with that station.
Its important to note that your station does NOT NEED a bump bar. You only need to configure one if your station is not touch screen.
- Click the "Bump Bar Enabled" check box
- Then start mapping which actions you'd like to configure with each button on the bump bar.
- We do have "Default Mapping" available if you'd like to use them. Just reach out to Ingage Support
Station Collections Configuration (Optional)
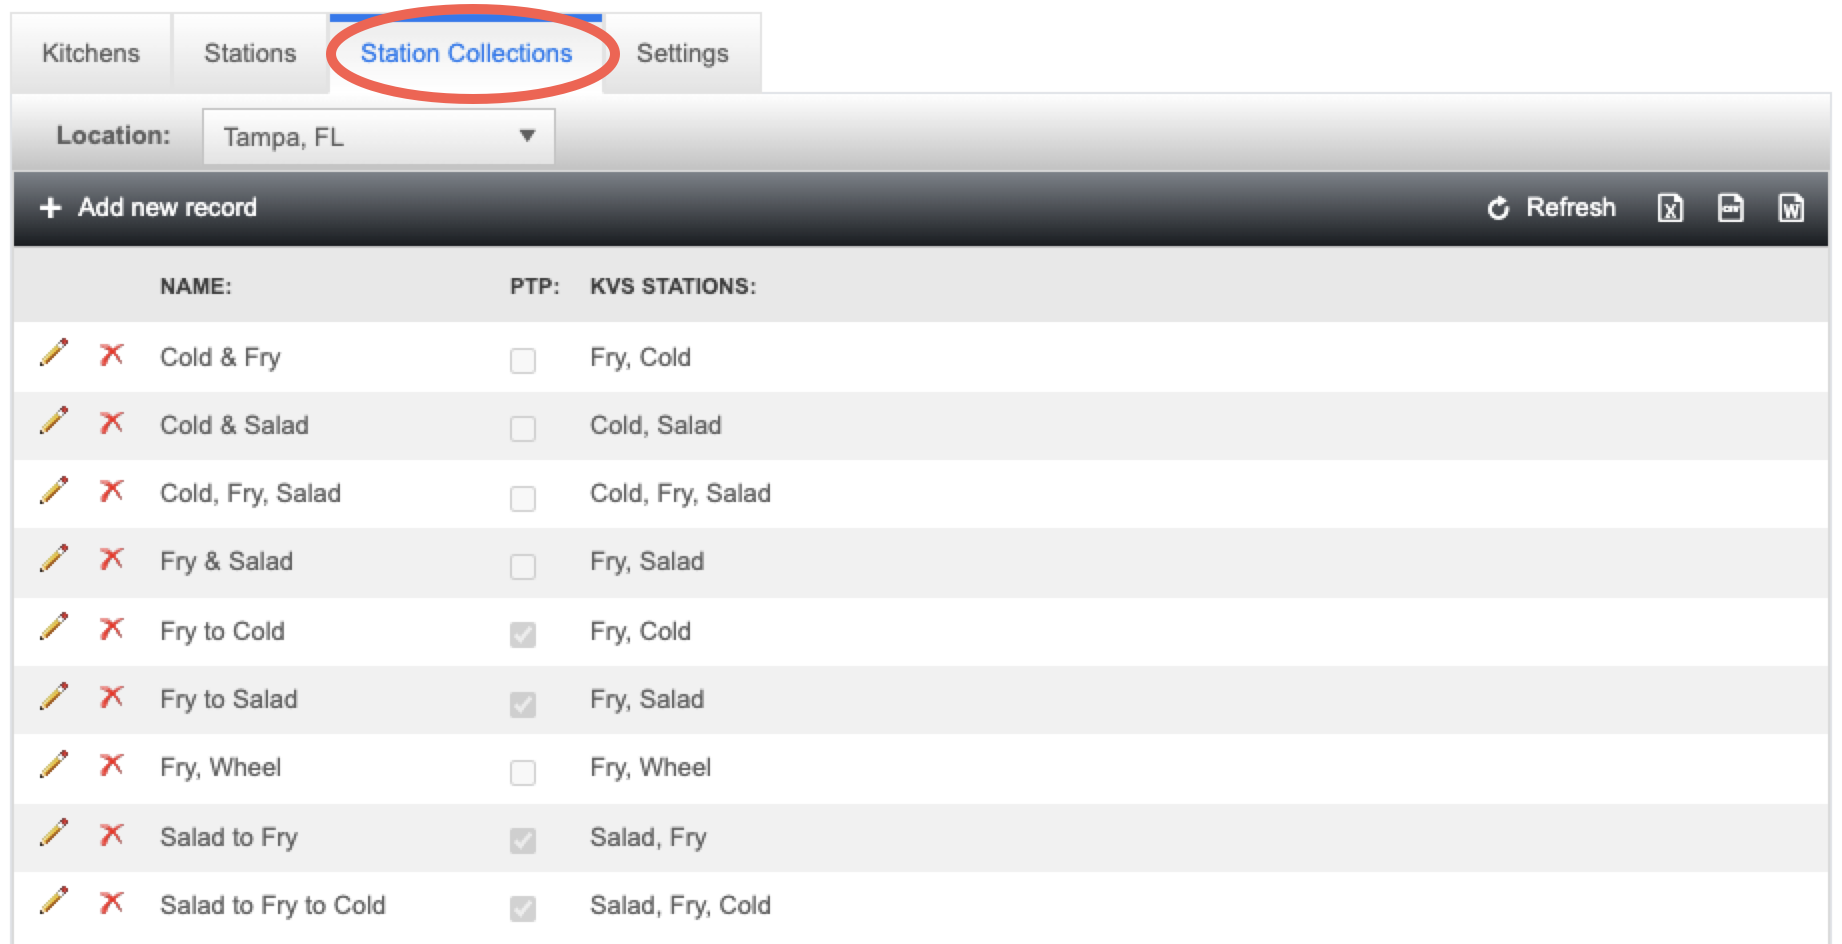
When you click "+ Add new record" you can configure which stations are going to be included in the collection
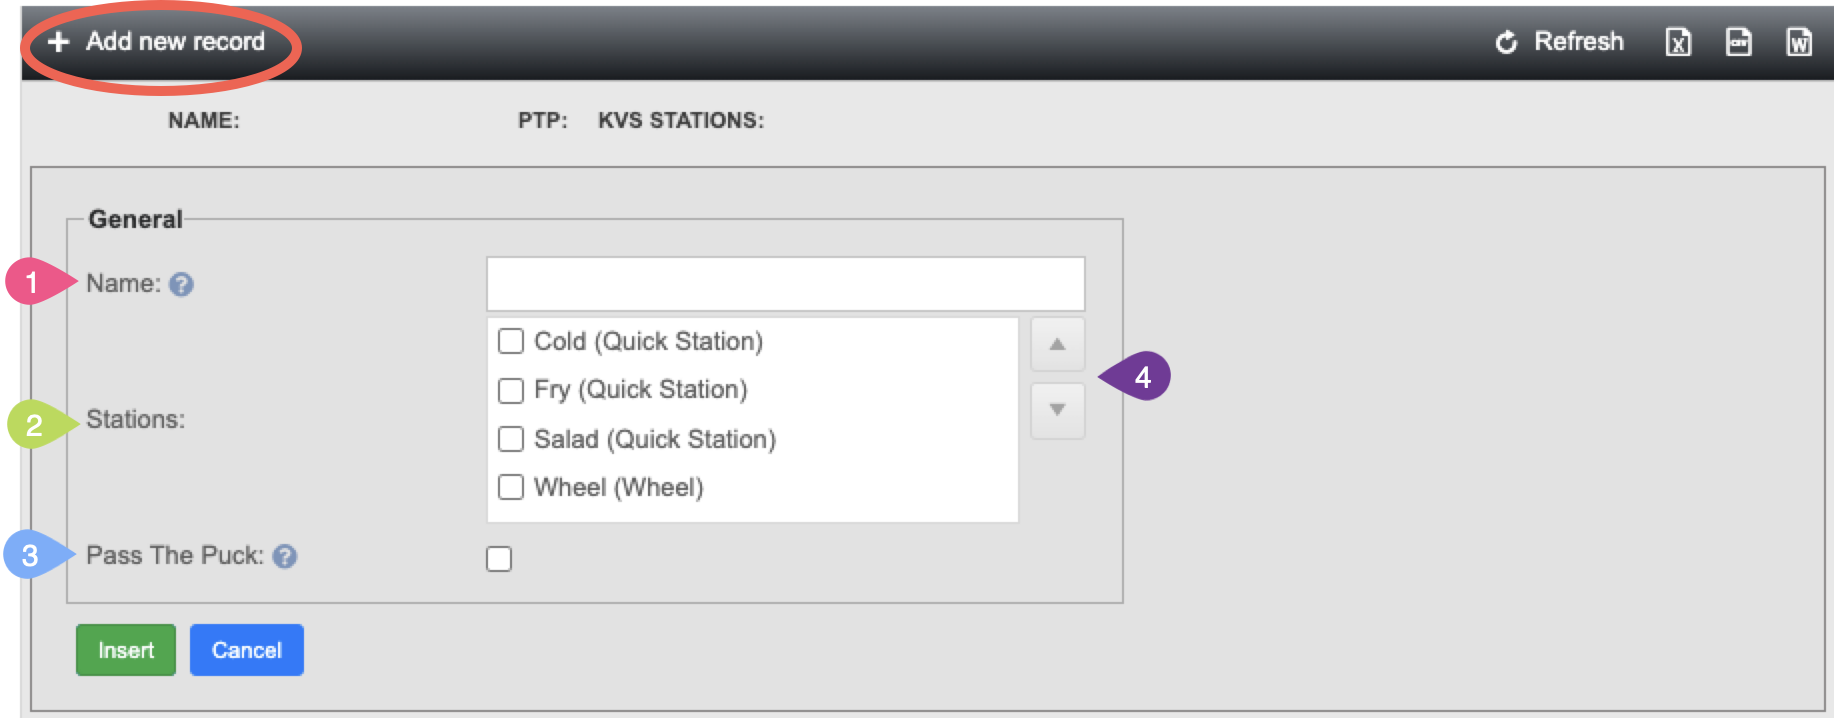
- Name: Name the collection something easy to remember.
- Stations: check the boxes next to the stations you'd like to add to the collection
- Pass The Puck:
- Arrows: If you are using "Pass the puck" use the arrows to set the order you'd like the menu items to start and finish at.
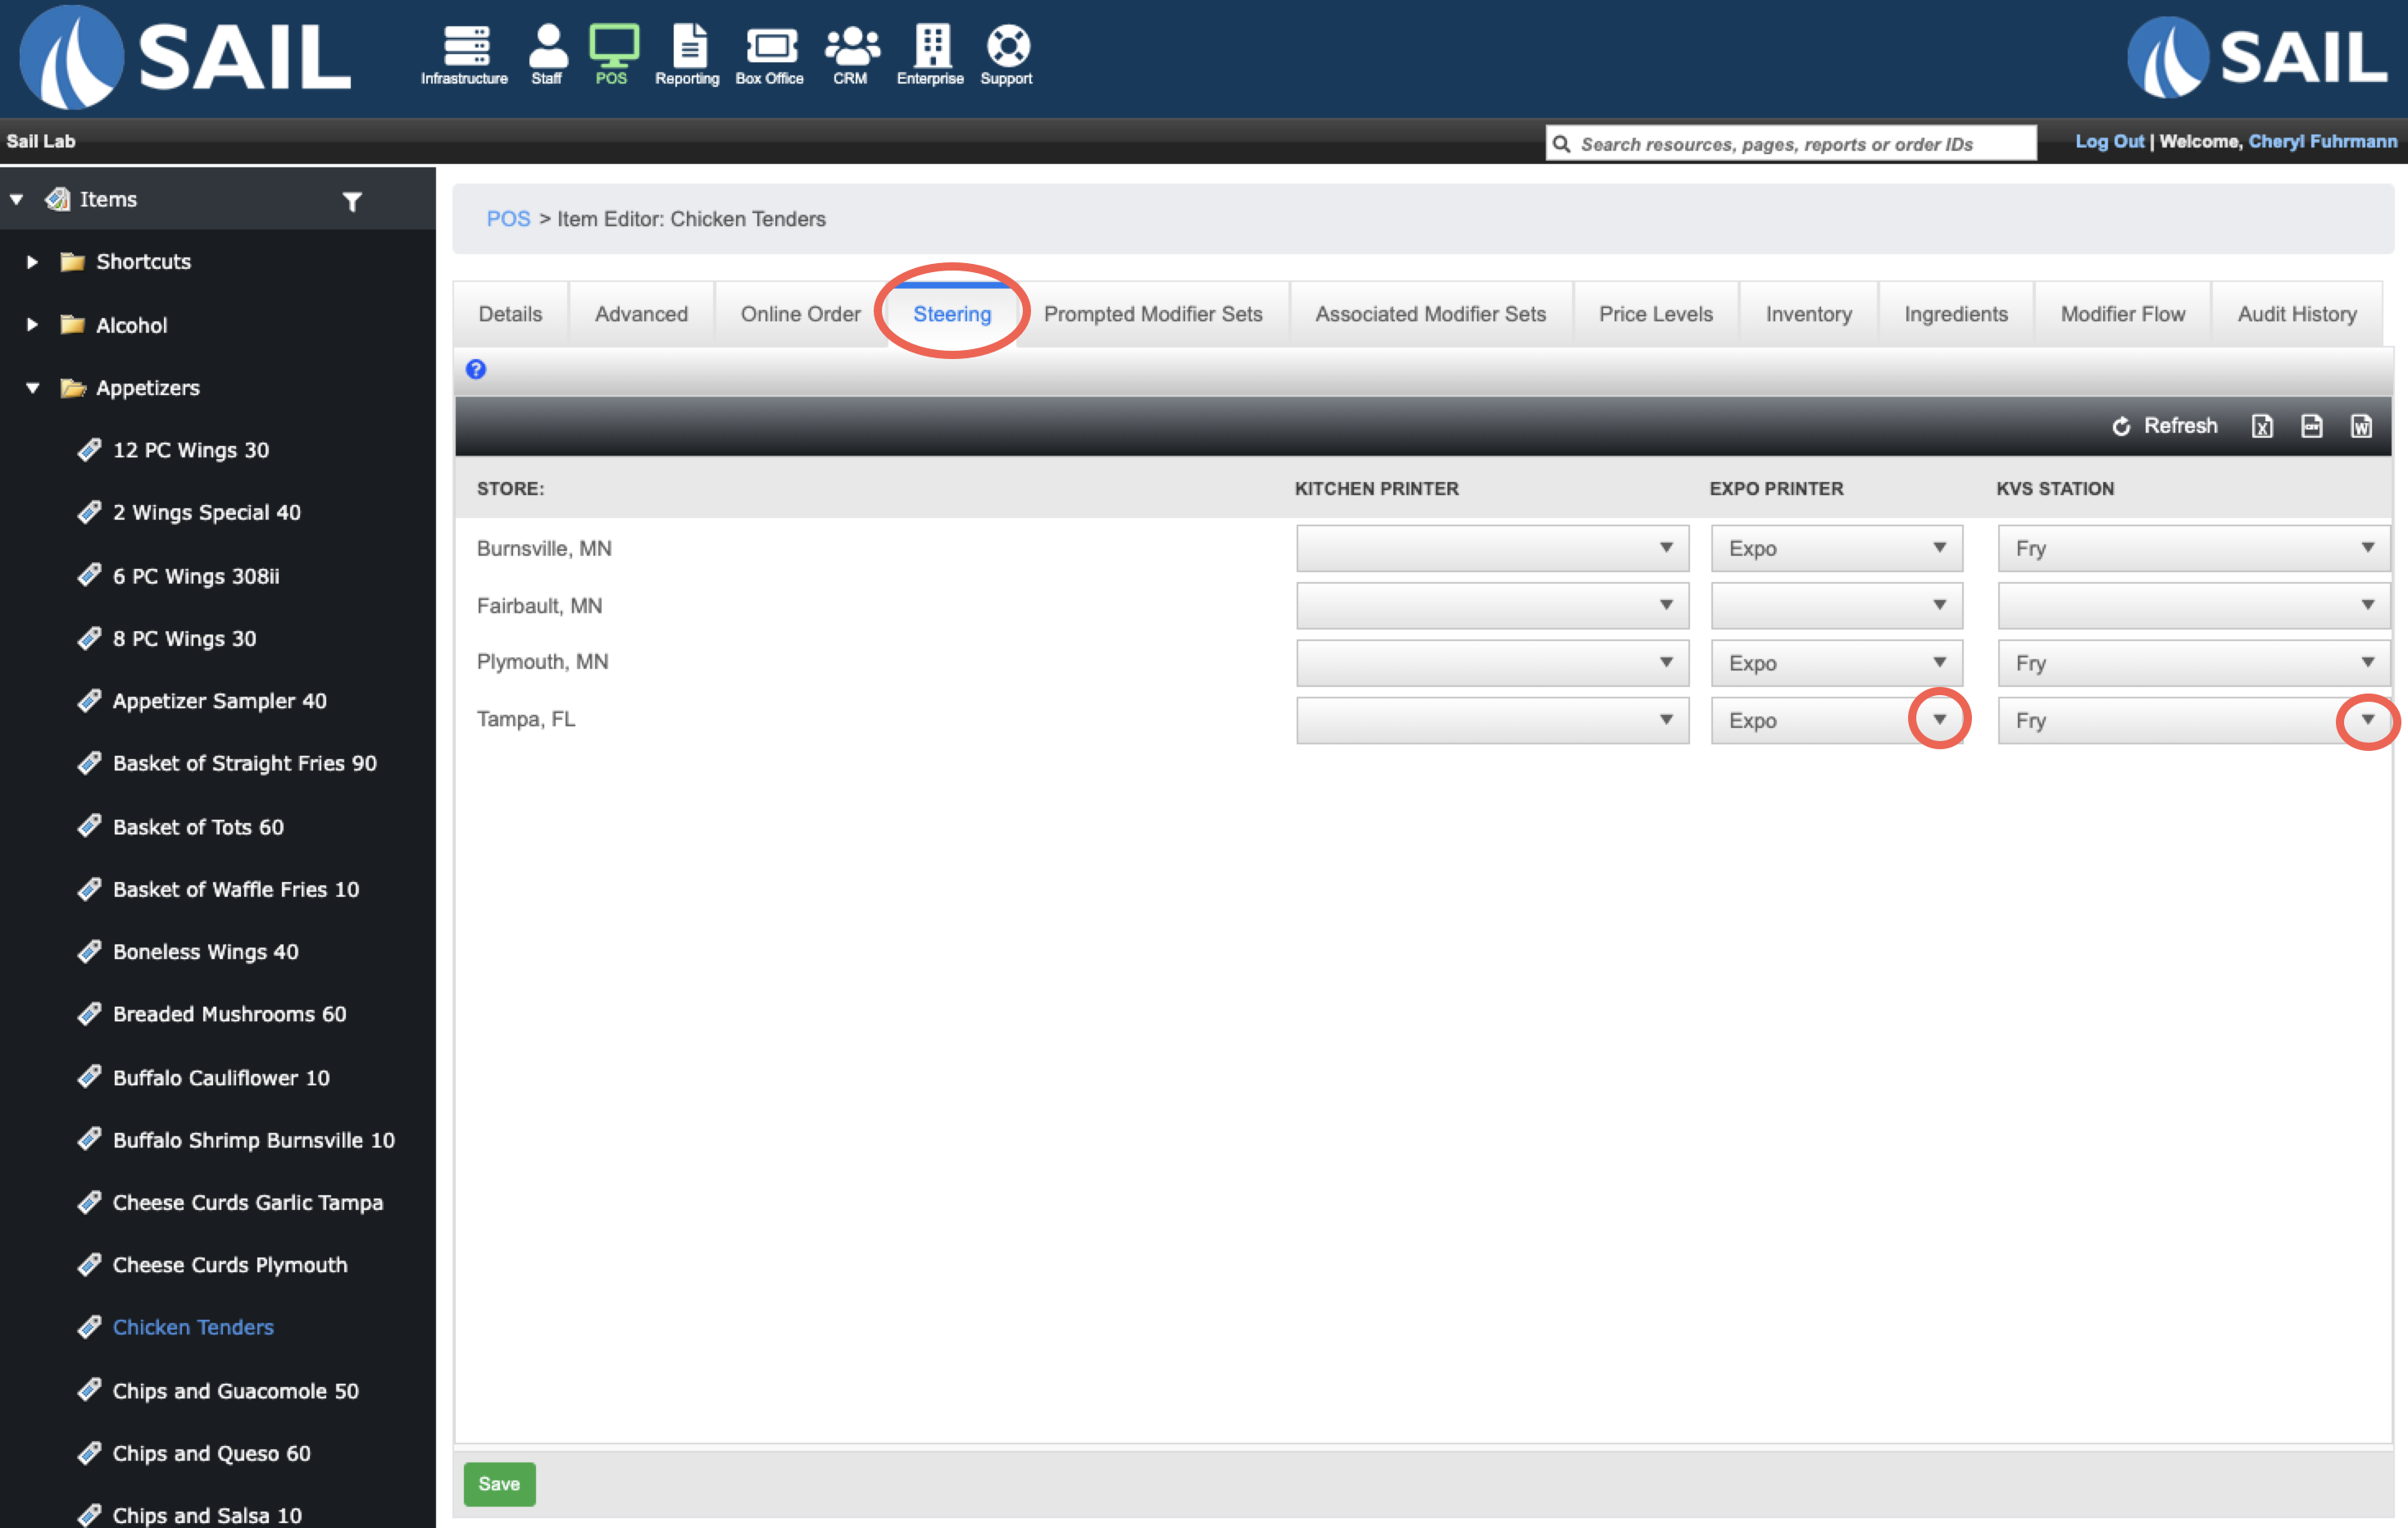
Step 3 - Set steering on the item
How to set steering on an item
- Find the item you'd like to set steering on
- Go to the Steering Tab
- Set your steering
- KVS Station - Use the dropdown to select which station or station collection you'd like this menu item to route to.

- It can only be set to one, so if you need it to go to multiple stations, you'll need to create a station collection as described above
- It can be different per location
- Expo Printer - Most kitchens are configured with an expo printer, So that when the food order is done, you have the option to print the ticket with it.
- It can be used for a server/runner to bring the ticket with them so they remember what table their going to and what food they're bringing out.
- It can be used for a To Go order, to staple it to a To Go bag
- Kitchen Printer - This is optional. You can have a kitchen printer configured at the KVS station, and turn suppress printing on or off when you like.
- When suppress printing is turned on, it will not print the ticket and it will only go to the KVS screen.
- When suppress printing is turned off, it will go to the KVS screen AND print out a physical ticket.
- This is sometimes used in the beginning when stores are still getting used to KVS, they have the ticket as a backup.
- KVS Station - Use the dropdown to select which station or station collection you'd like this menu item to route to.

KVS Settings on the Advanced Tab of an item
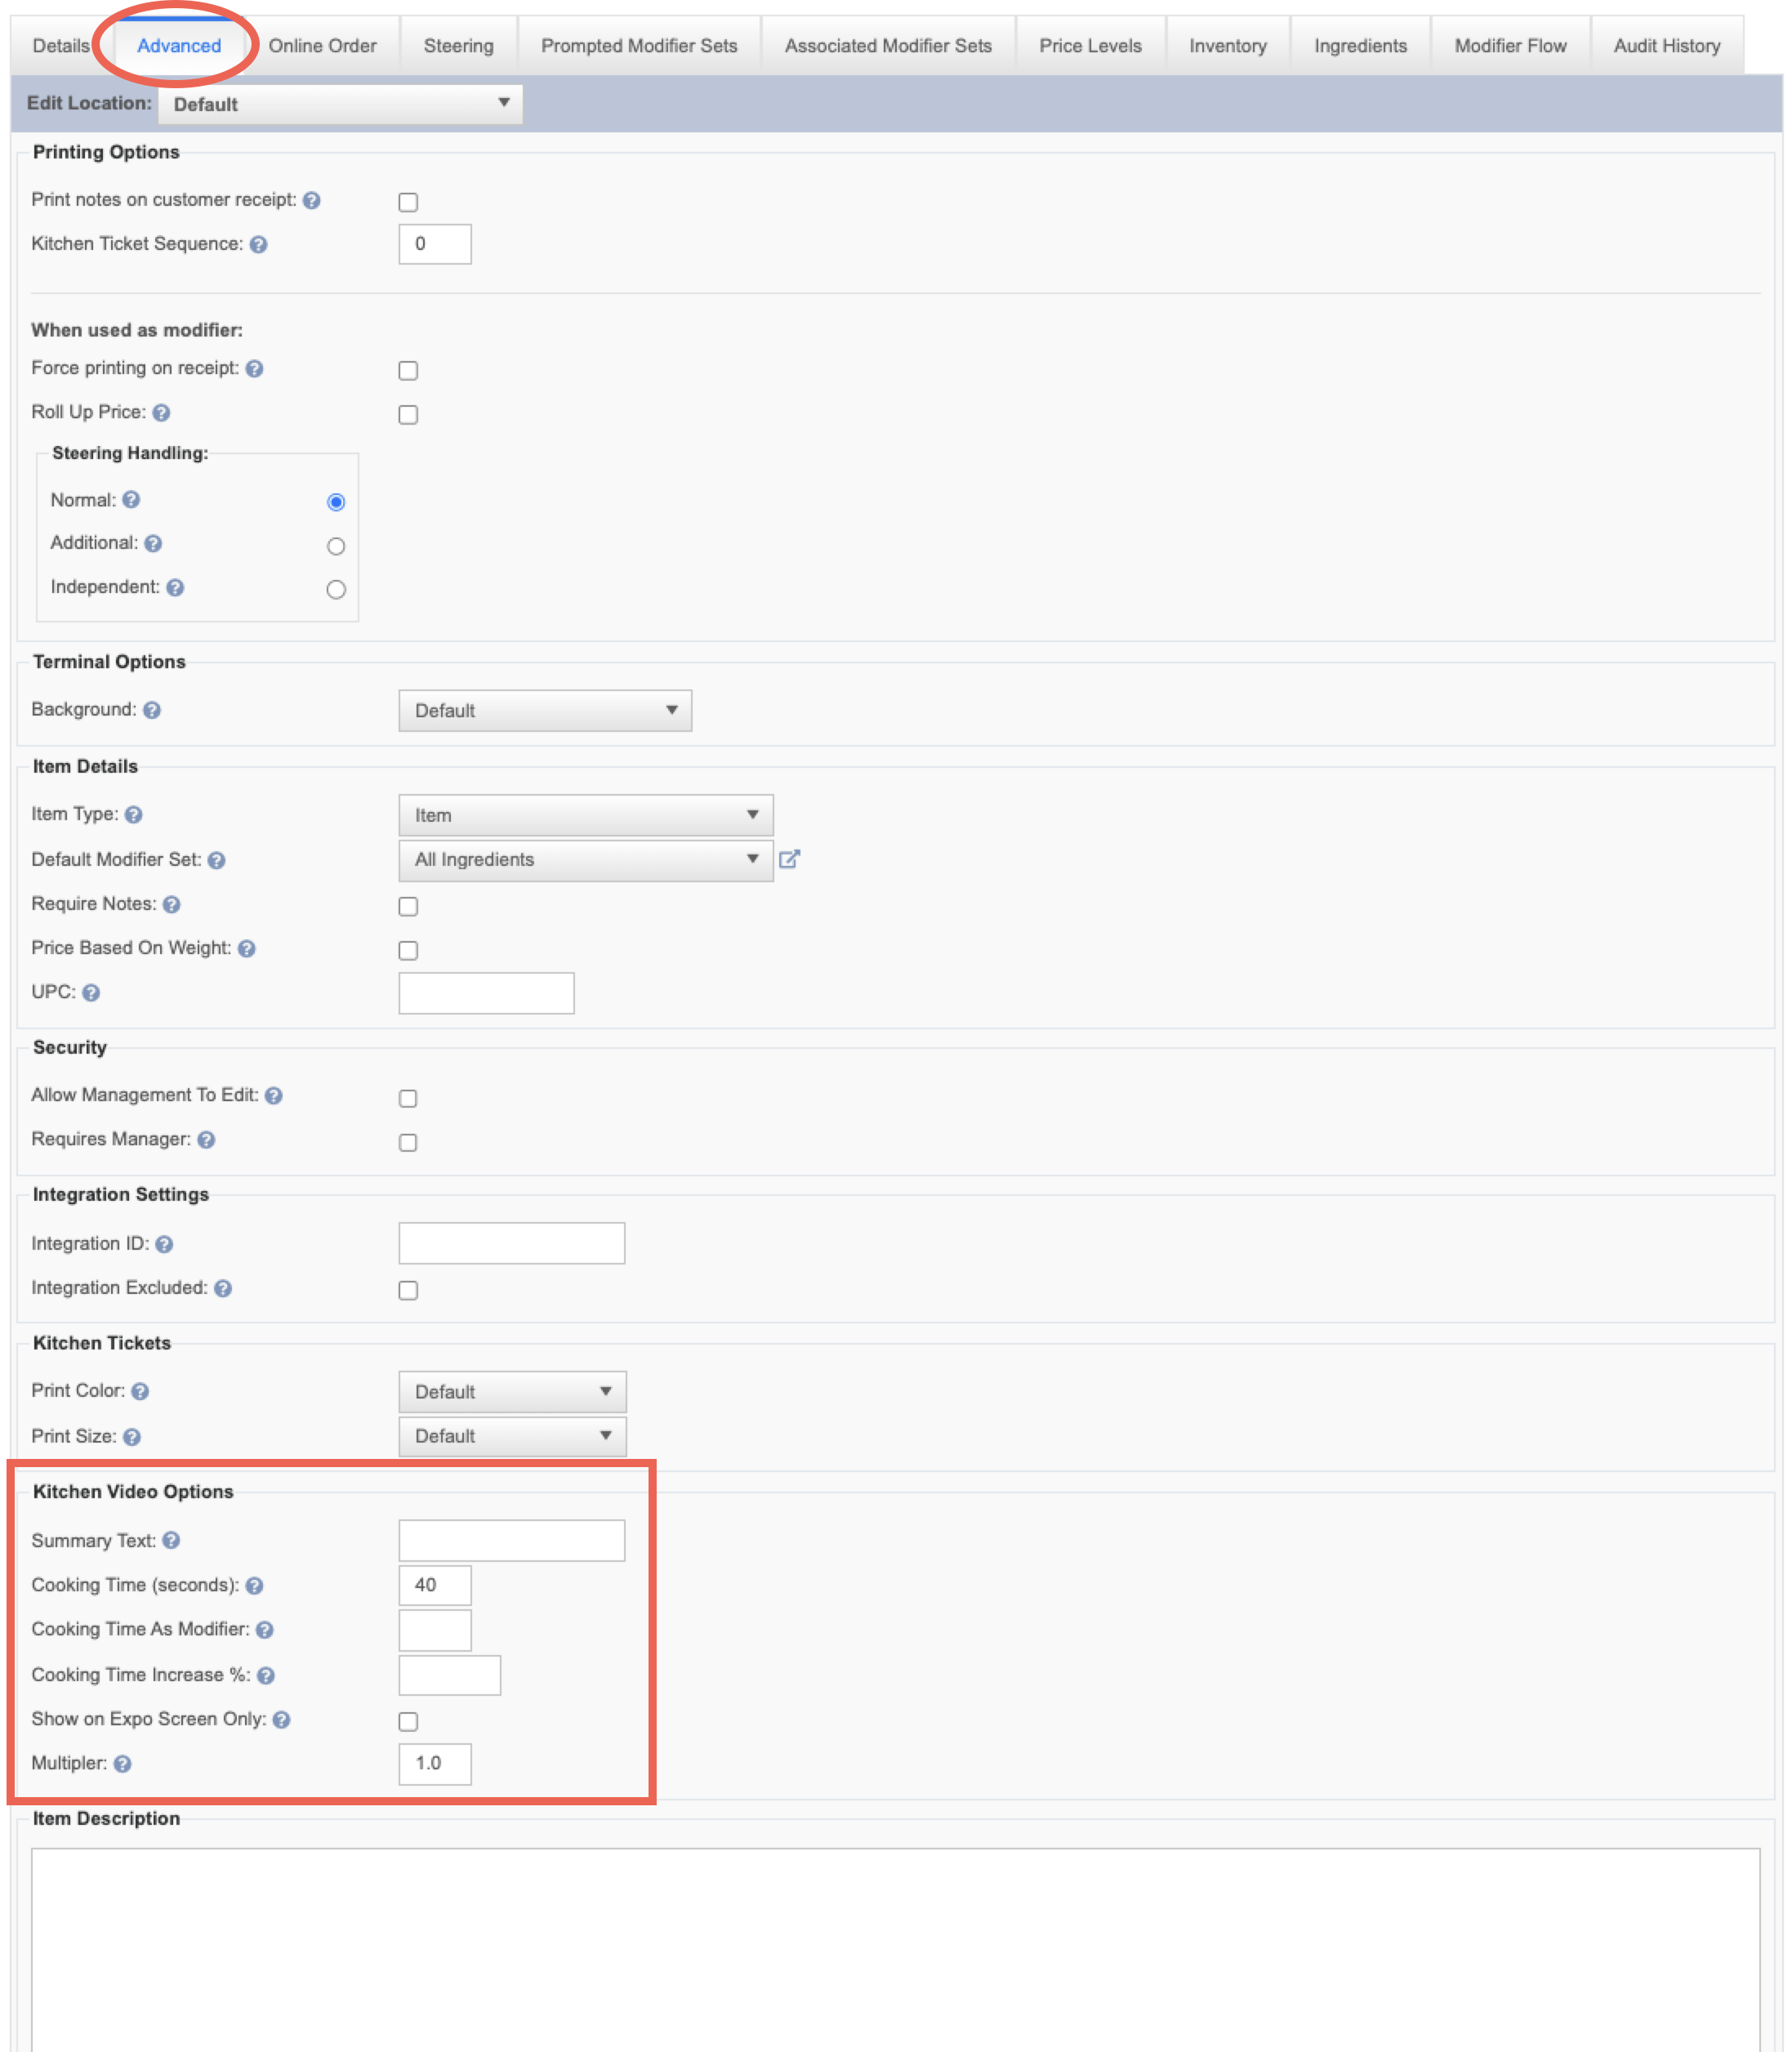
There are additional optional settings on the Advanced tab of each item

-
Summary Text: This field is used to group similar items together in the summary section of Kitchen Video. This is helpful for speeding up kitchen workflows by allowing staff to see total counts of similar items, even if they are different variations.
-
For example, say you have 3 hamburgers. A regular Hamburger, a Mushroom Swiss Burger, and a Bacon Cheeseburger. By setting the Summary Text for all three items to "Burger", they will appear grouped together on the summary screen in Kitchen Video. This allows the kitchen to see the total number of burgers ordered, regardless of type.
-
- Cooking Time (Seconds): Enter the estimated cook time for this item in seconds.
- This time is used to:
-
Prioritize the order of tickets (items with longer cook times are sent to the kitchen stations first)
-
Display estimated cook times on the Quick stations
-
-
For Modifiers: Cook time on a modifier will add to the cook time of the parent item.
-
Example:
-
A steak is set to cook in 600 seconds (10 minutes)
-
The "Well Done" modifier adds 180 seconds (3 minutes)
-
The total cook time becomes 780 seconds (13 minutes)
This helps the kitchen accurately time orders based on specific prep instructions.
-
-
- This time is used to:
- Cooking Time As Modifier: Use this setting when you DON'T want the full cook time of an item to be added to the parent item when it’s used as a modifier. Just enter the adjusted cook time in seconds specifically for when this item is used as a modifier. If left blank, the system will use the item's regular cook time by default.
- Example: You have French Fries with a standard cook time of 180 seconds (3 minutes). When fries are ordered on their own, the 3-minute cook time is correct. However, when French Fries are added as a side on a sandwich, you don’t want to delay the sandwich ticket—because both items can be cooked at the same time. So In this case, leave 180 seconds as the main Cook Time and Set Cooking Time as Modifier to 0 seconds. This tells the system not to add extra cook time to the sandwich when fries are added as a modifier.
- Cooking Time Increase %: This setting allows you to adjust the cook time of the parent item by a percentage
- Example: Most commonly used for cook temperatures. You’ll set a default cook time on the main item (e.g., a burger cooked medium), and then adjust the time up or down based on the selected modifier (e.g., rare, well done). You can apply the following percentages to reflect other cook temperatures:
- Well: 120% - 12mins
- Med Well: 110% - 11mins
- Med: 100% - 10mins (the default)
- Med Rare: 80% - 8mins
- Rare: 60% - 6mins
- Example: Most commonly used for cook temperatures. You’ll set a default cook time on the main item (e.g., a burger cooked medium), and then adjust the time up or down based on the selected modifier (e.g., rare, well done). You can apply the following percentages to reflect other cook temperatures:
- Show on Expo Screen Only: Select this checkbox if you want the item to appear only on the expo screen and not be sent to the kitchen display (wheel or quick stations).
- Example: The expo side gets soups, and the kitchen side does not. So you can check this box on the soups, and only the expo side will see it and it wont clutter up the cooks screen.
- Multiplier: Use the Multiplier field to adjust how this item contributes to the All Day Count in the Kitchen Video System (KVS). This helps reflect the actual quantity being prepped or needed, especially when items come in different portion sizes.
- Example: A basket of fries counts as 1 on the All day count. But a side of fries is half the amount. So you can enter .5 in as the multiplier. Then when a side of fries is rang in on a burger, it will only count a half order.
No Comments