
Release 2026.10.2 "Zinfandel Spritz"
Notes: This release consists of 6 Improvements. Use the page navigation section on the top left of this screen to jump between the features you'd like to read about.
**This release WILL require a handheld update to version 2026.10.2**
If you would like any additional information or help setting up any of these new features, please contact support at:
Support@ingageit.com or call (612) 861-5277
Improvements
1. New Table Layout Editor on the terminal
- Managers can now build the whole floor plan right on the terminal — tables, sections and the room around them. Go to Functions --> Management Tools --> Edit Layout to open the editor.
- Add Table opens a picker with every table shape and seat count, so you can add one table or several at once with their numbers, guest count and order type.
- Add Shape lets you draw the room itself — walls, dividers, bars, patios and labels — using boxes, ovals, lines and text in 20 colors. Shapes always sit underneath the tables, so they never get in the way of a server tapping a table.
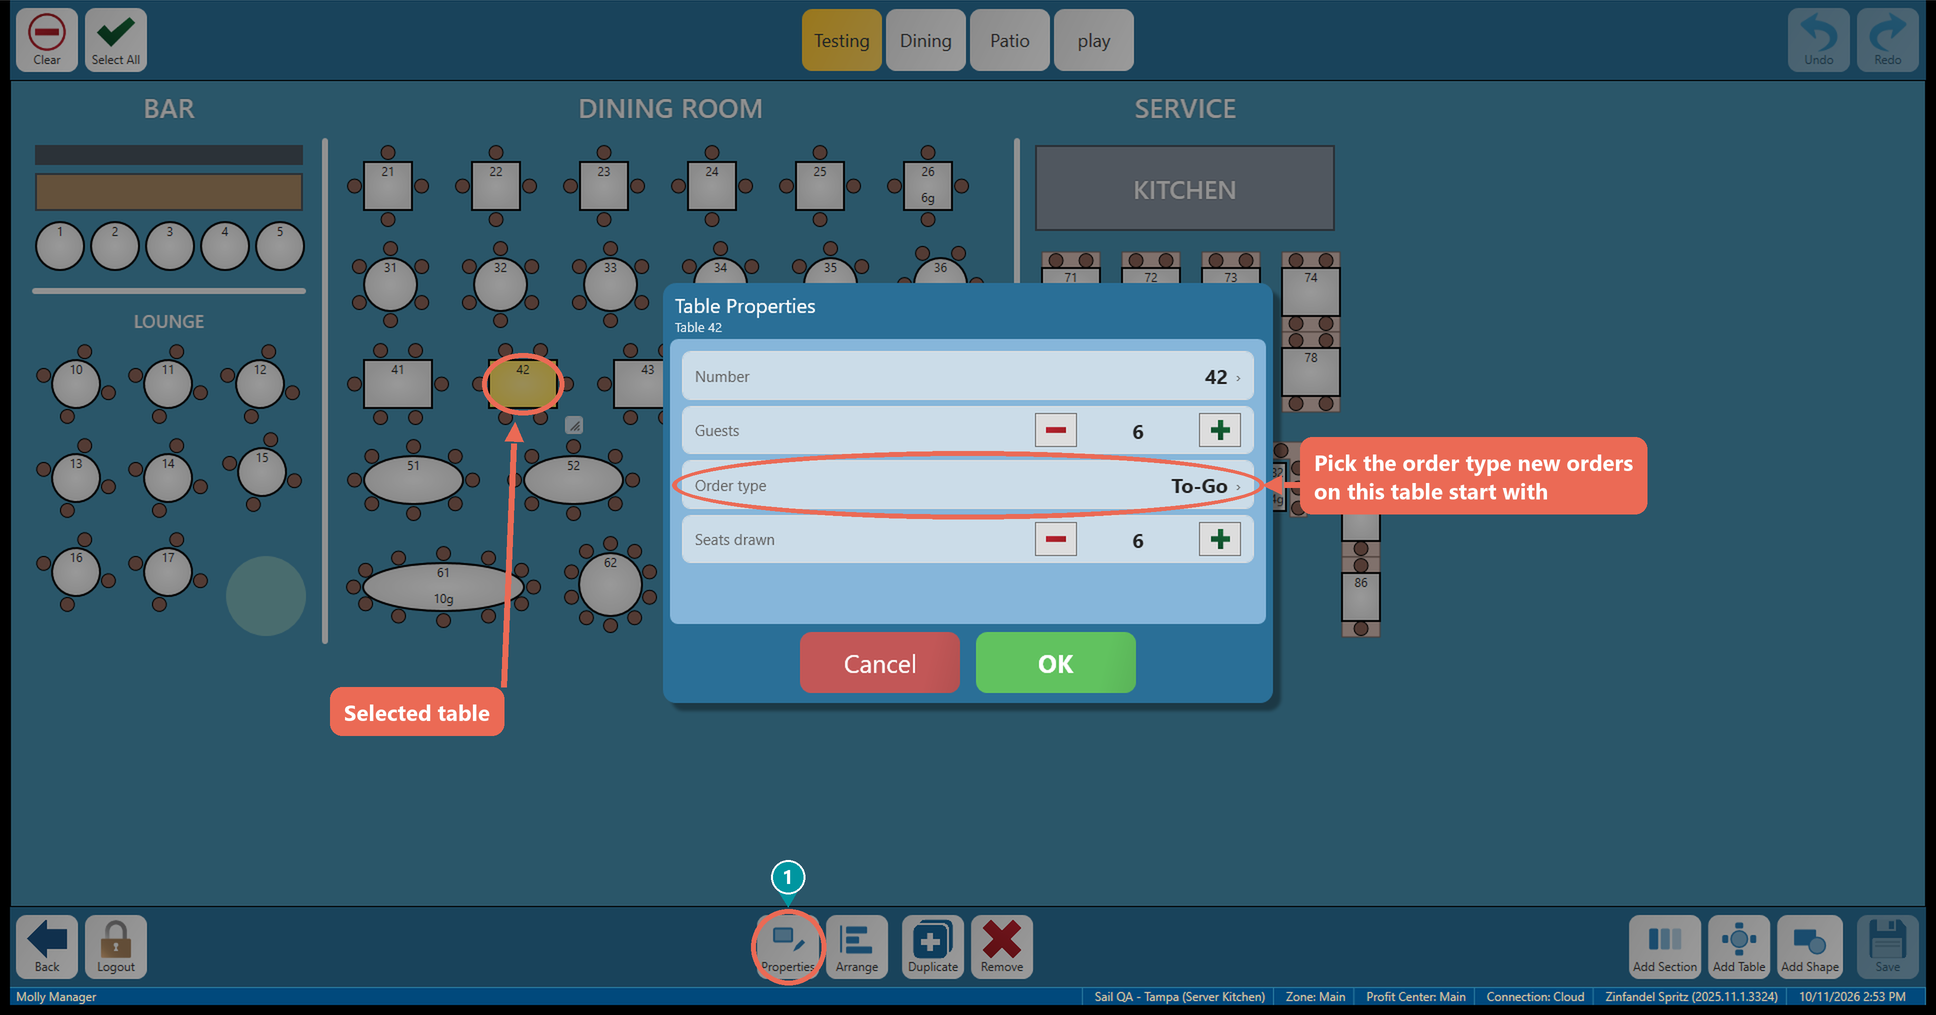
- Properties tool: Tap a table (or several) and tap Properties (1) to set its number, guest count, the seats drawn and its Order type. You can now set a specific order type for each table — for example, set your pickup counter tables to To-Go — and every new order started on that table opens with that order type. Leave it on Default to use your location's usual order type. While you edit, each table shows its order type right on it.
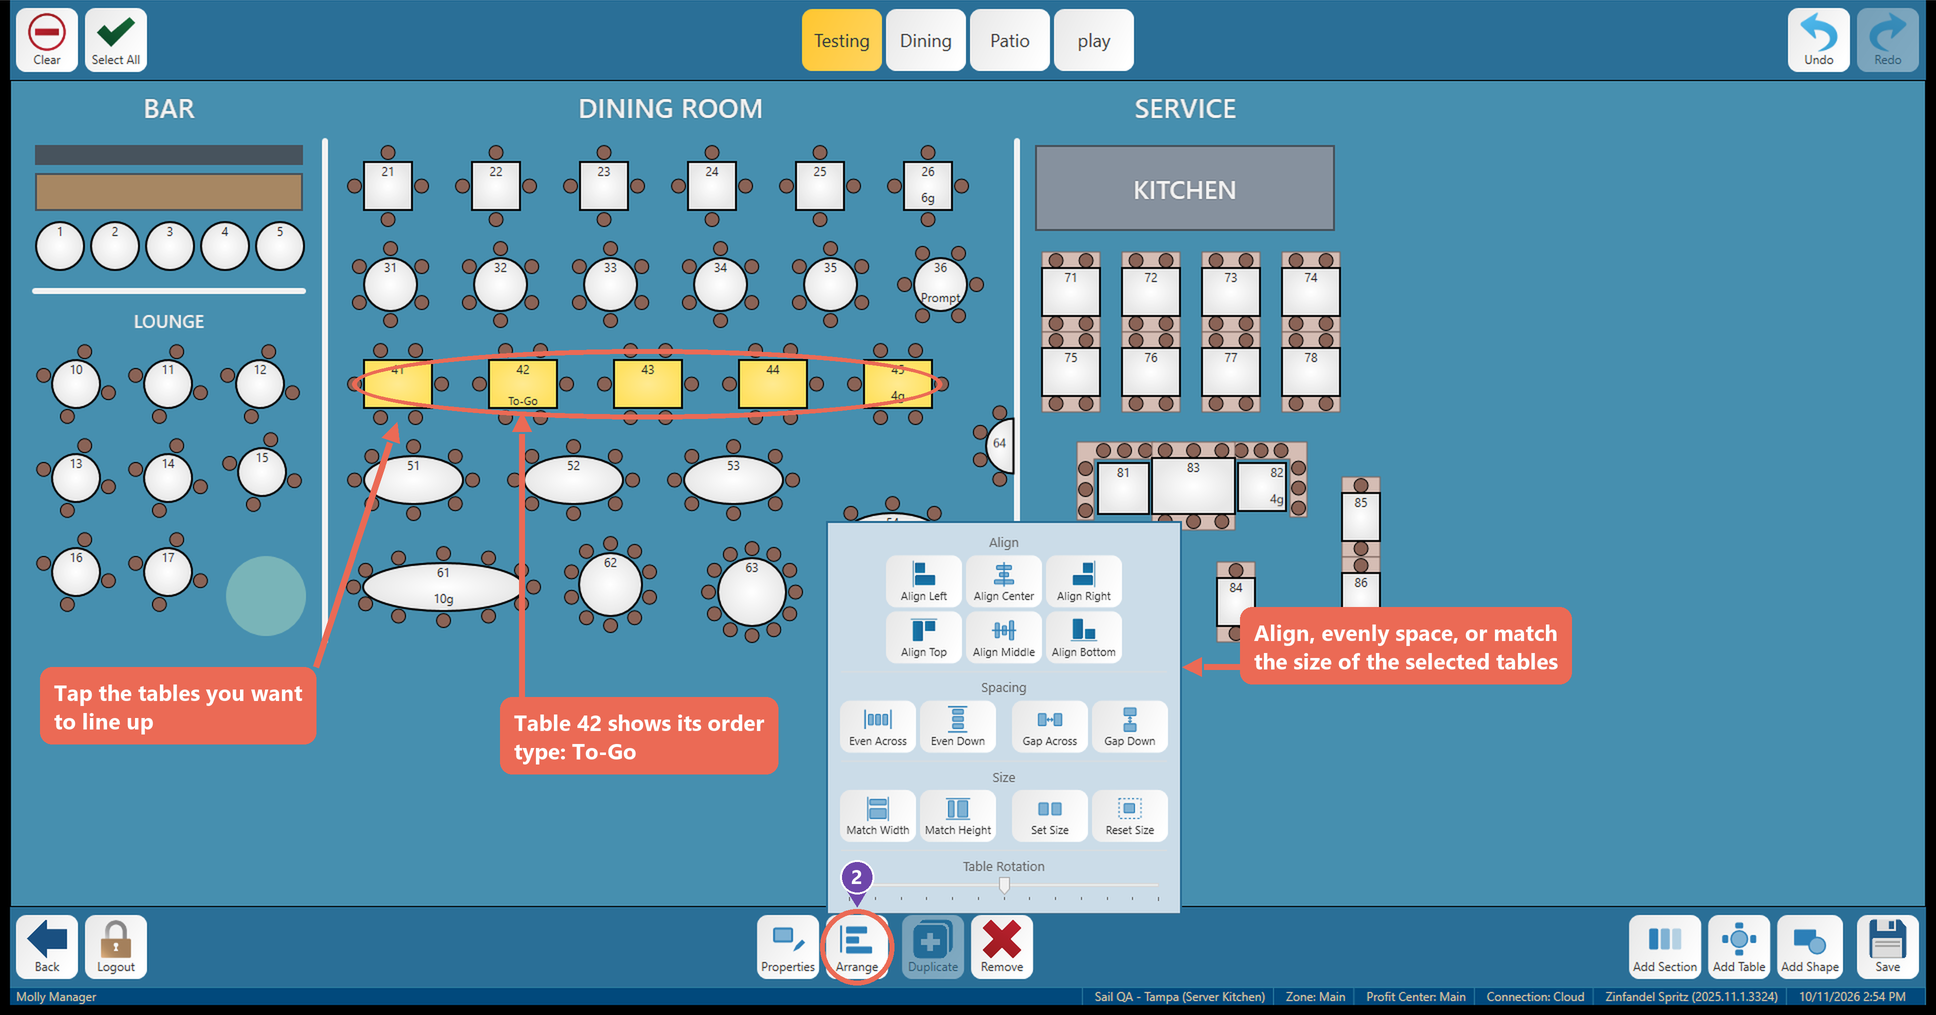
- Alignment tool: Tap the tables you want to line up, then tap Arrange (2) to align them (left, center, right, top, middle or bottom), space them evenly or with a set gap, match their width and height, or rotate them. Line-up guides also appear while you drag, and Undo and Redo let you step back through your changes.
- Nothing saves until you tap Save. If you switch sections or leave the editor with unsaved changes, you're asked to Save, Discard or Cancel.
- Note: Existing floor plans are carried over automatically. The first time you open a section in the new editor it lets you know the layout was updated — tap Save to keep it.
Click here to learn more about how to Edit the Table Layout
2. Edit the Time Clock for ANY DAY on the Terminal
- Managers can now fix an employee's time clock right from the terminal for any day, not just today - including days that have already been closed. Change a clock in, clock out or job role, add a shift someone forgot to clock in for, clear a shift, and fix breaks without going to Backoffice.
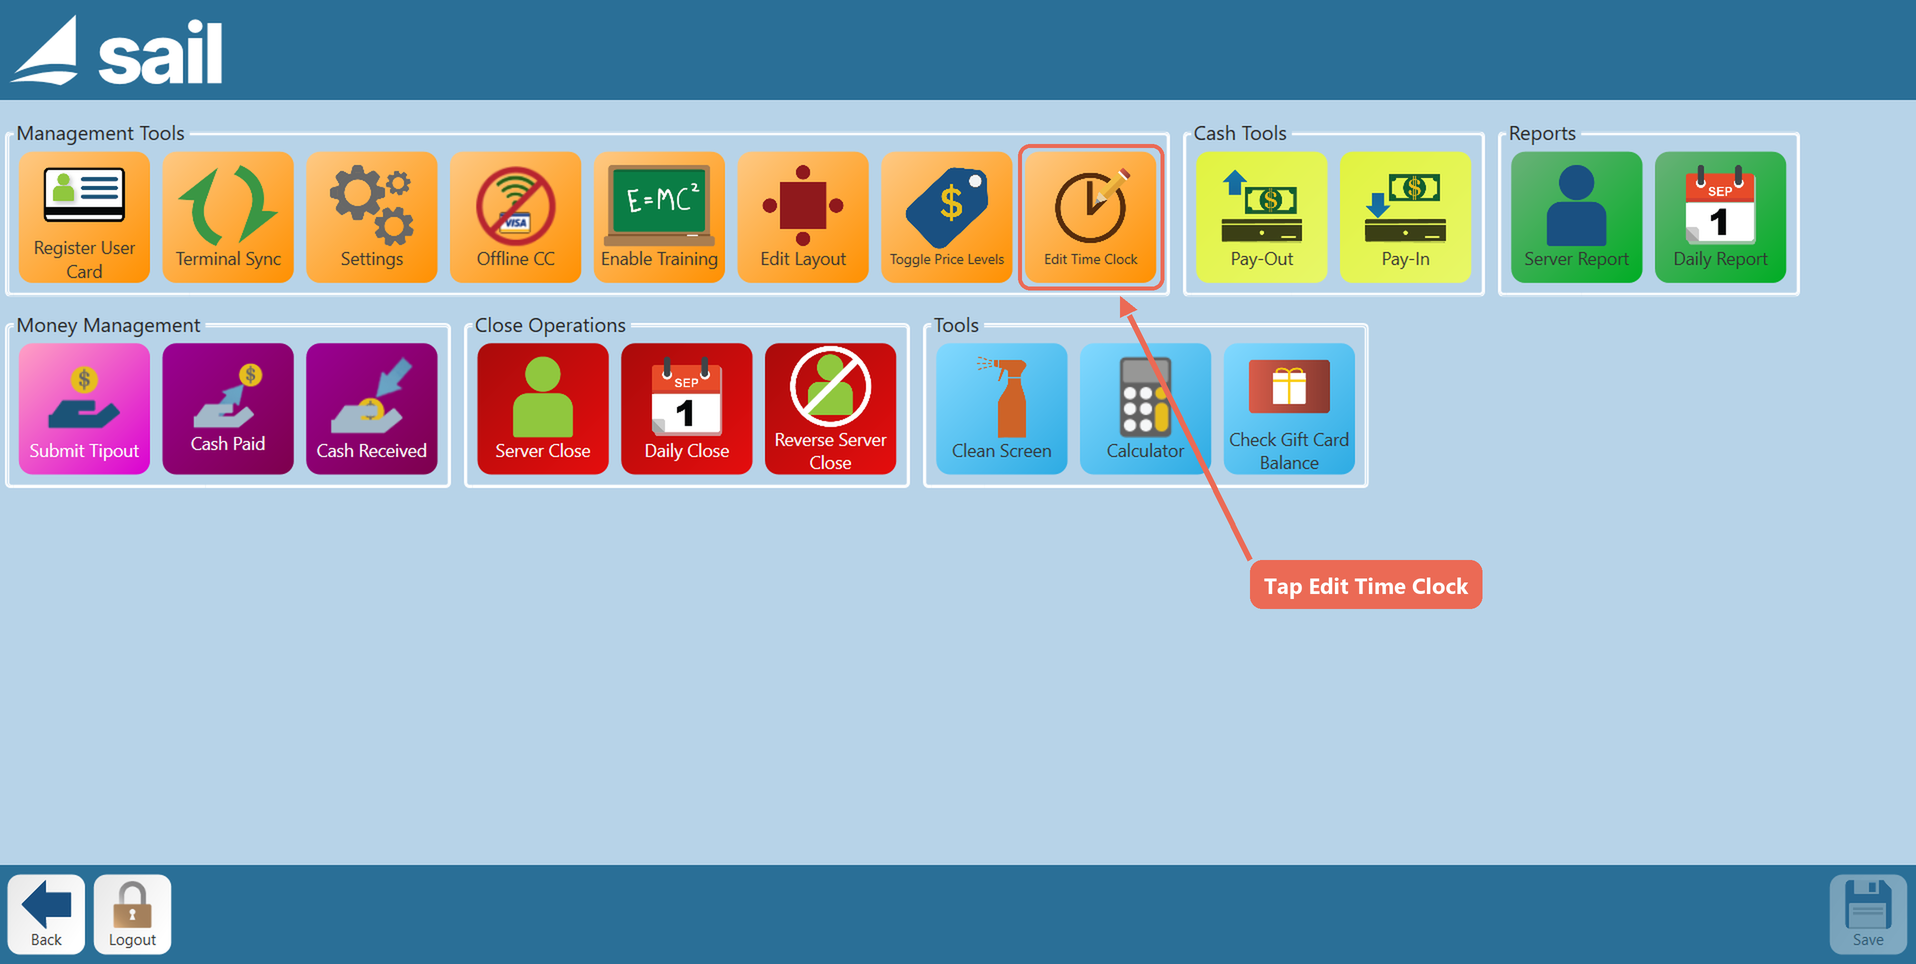
- Where to find it: Log in, tap Functions, then Edit Time Clock under Management Tools. You need the Manage Time Card permission on your job role to see the button.
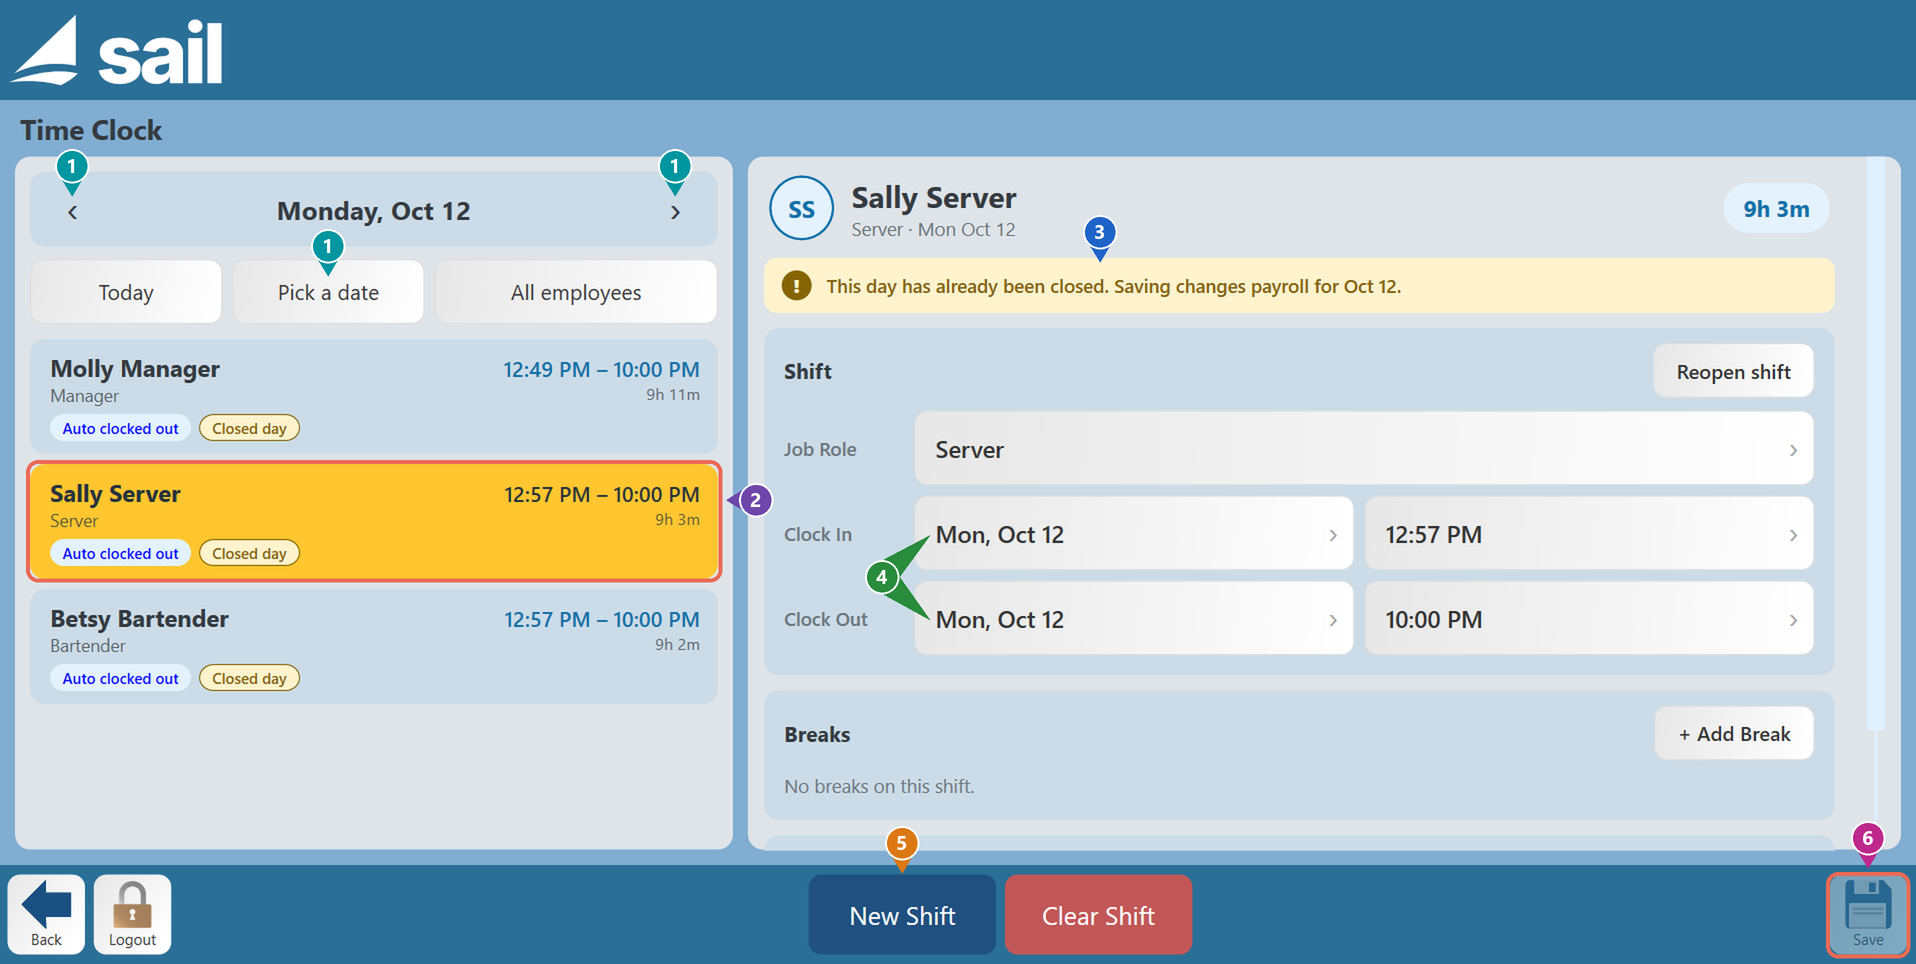
- Pick the day (1): Use the arrows to go back or forward a day, or Pick a date to choose any day from a calendar. All the shifts for that day are listed, with tags such as Open, Auto clocked out and Closed day.
- Fix a shift (2-4): Tap a shift (2) and its details open on the right. A yellow banner (3) shows when the day has already been closed - you can still change the shift, but saving changes the payroll for that day. Tap the date or time next to Clock In or Clock Out (4) to change it on a touch keypad (Example: type 545 for 5:45, then tap AM or PM).
- Forgot to clock in? (5): Go to the day the employee worked, tap New Shift, pick the employee and fill in the clock in and clock out.
- Save (6): Tap Save and enter the reason for the change. The reason is saved with the shift and shows in its history in Backoffice --> Staff --> Time Card. If you tap Back or Logout before saving, Sail asks whether to save or discard your changes.
- Note: This new full-screen Time Clock replaces the old Edit Time Clock screen on the terminal for all locations.
Click here to learn more about how to edit the time clock on the terminal
3. Customer Type on the terminal
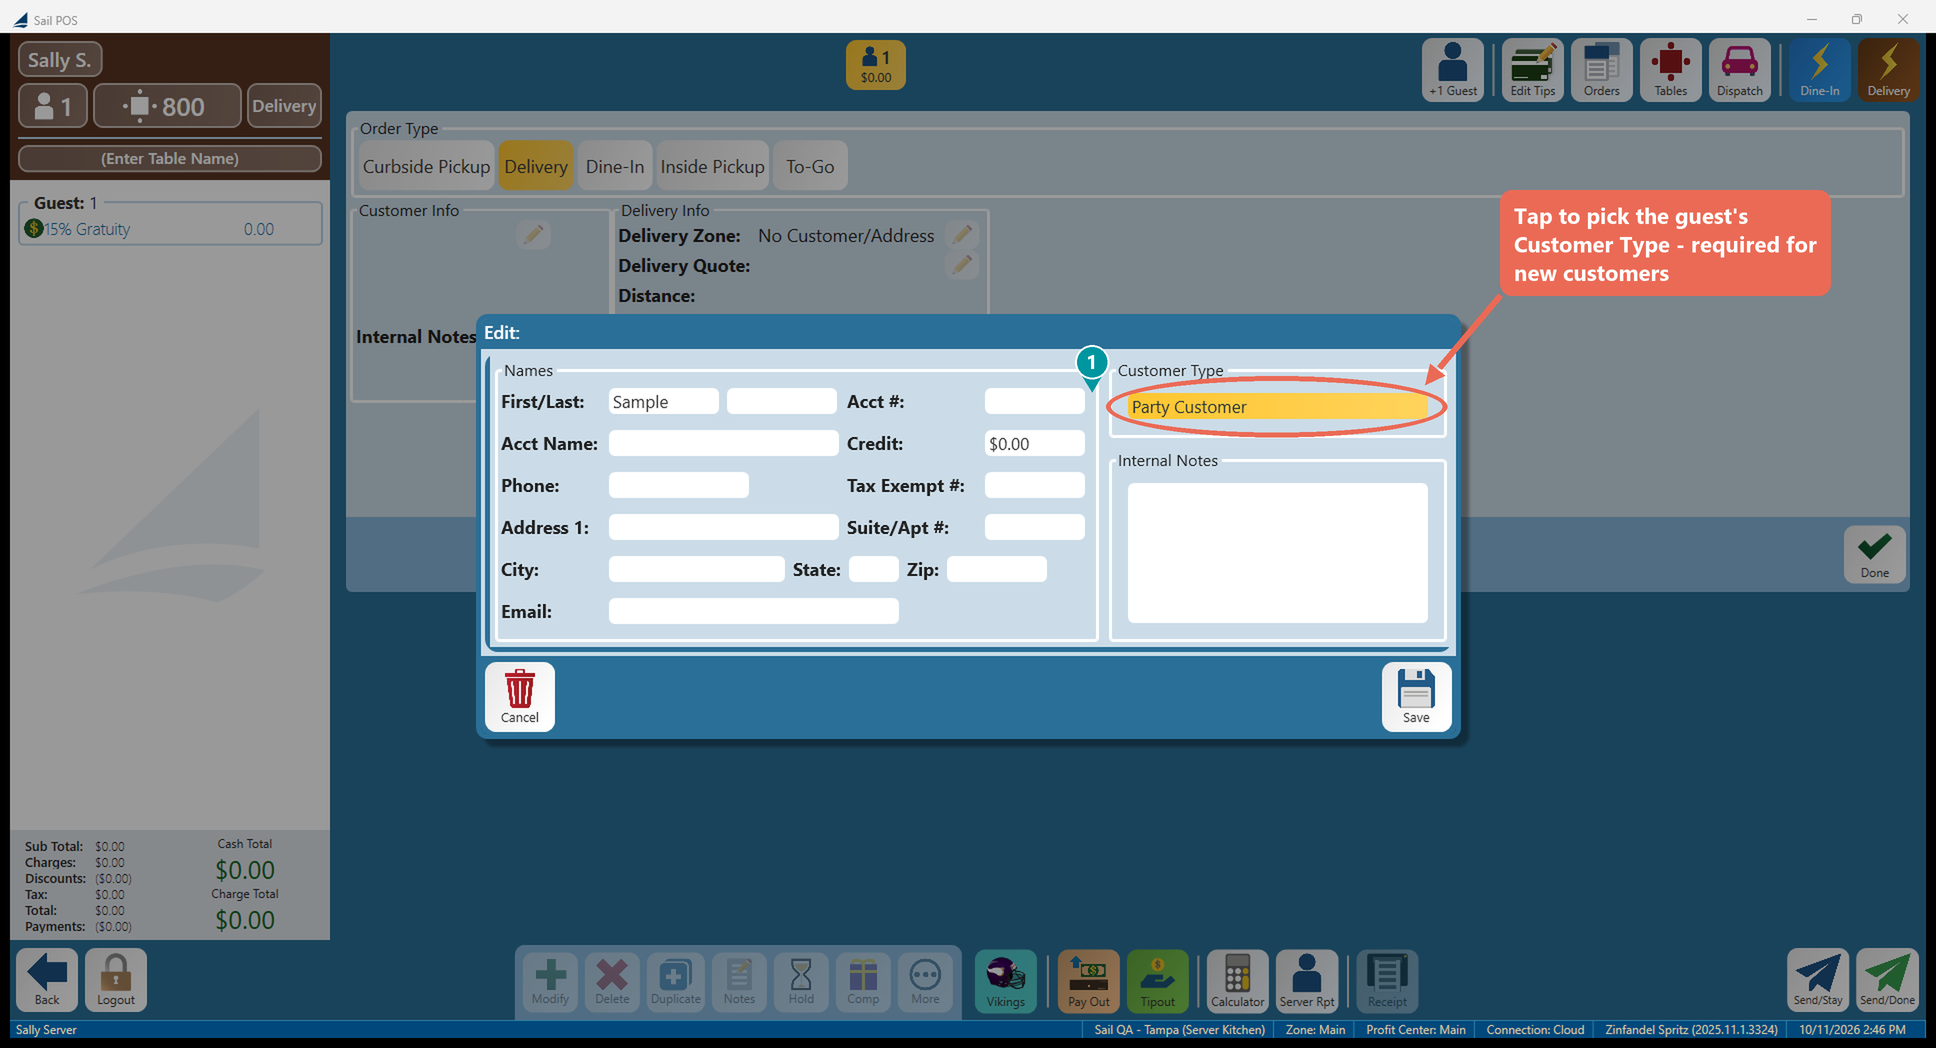
- When you add or edit a customer on the terminal (for example New Customer on a Delivery or To-Go order), their Customer Type now shows right on the customer screen. Tap it and pick from your restaurant's customer types — no trip to Backoffice needed. (1)
- Customer Type is now required: a new customer starts with it empty, and the terminal won't save them until one is picked.
- Opening an existing customer shows the type they already have, and you can change it there.
4. Order Count on Item Buttons
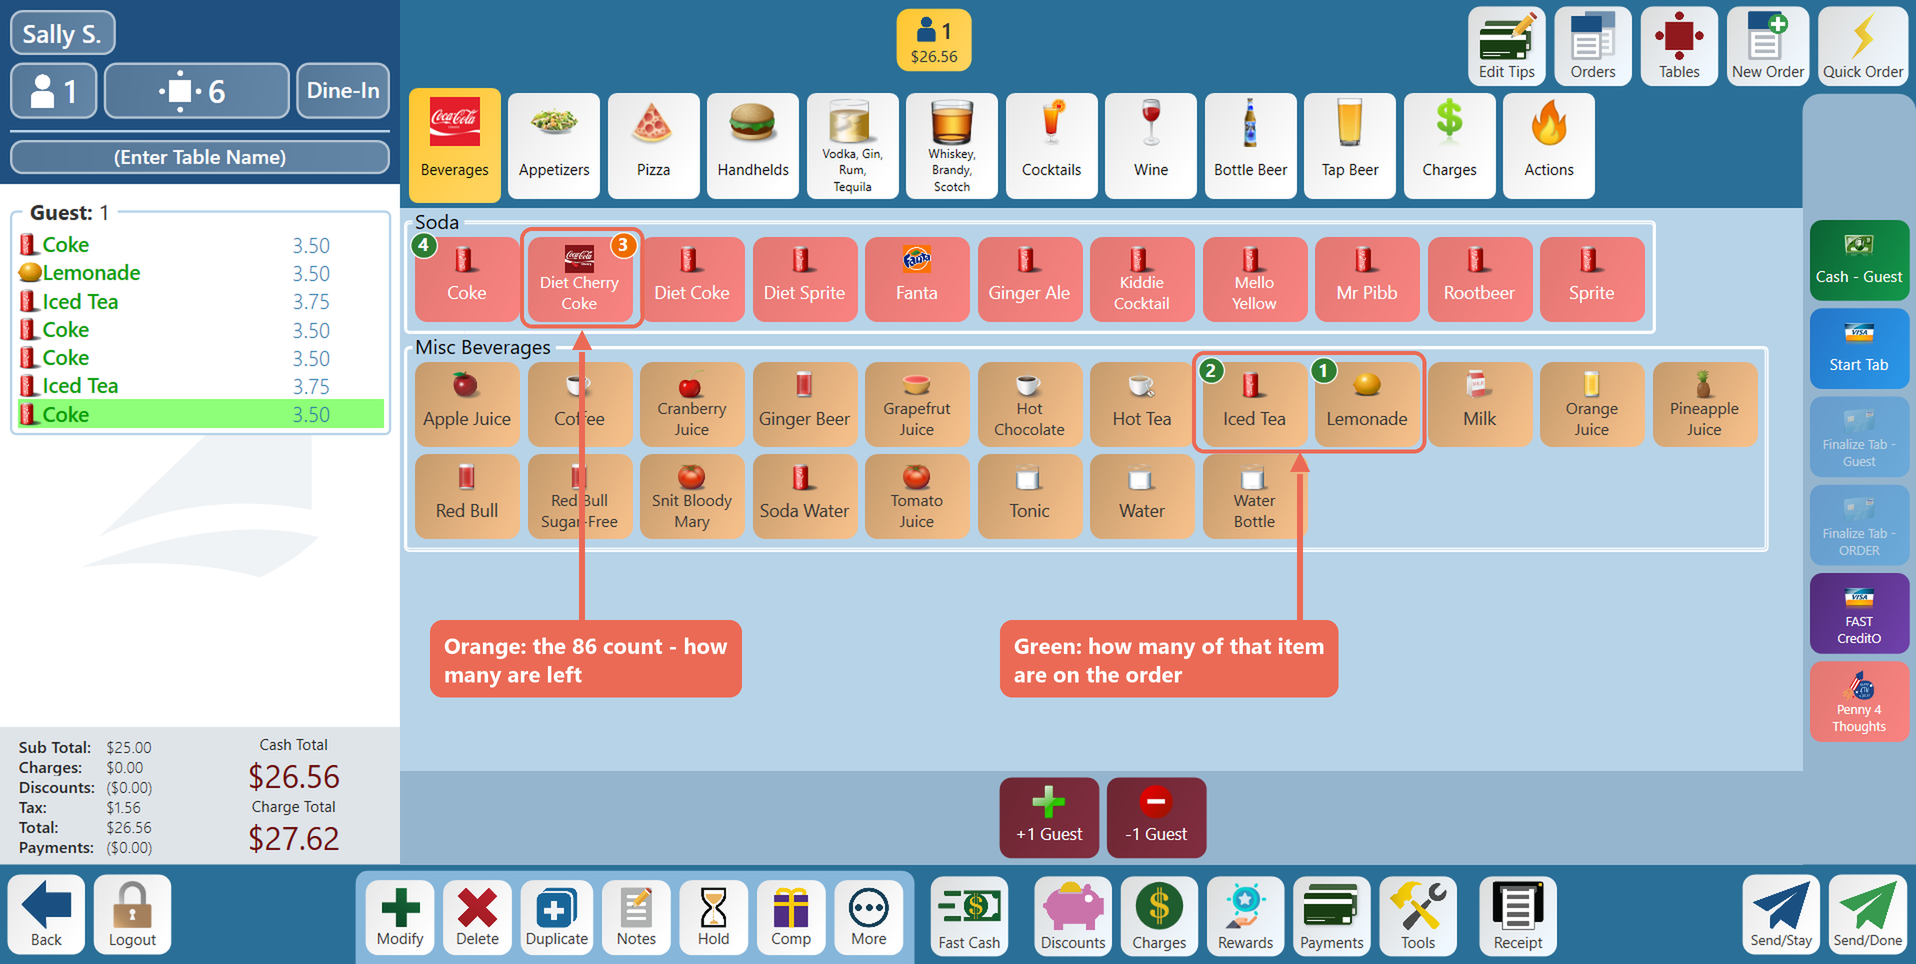
- Ringing in a big group just got easier: each item button now shows how many of that item are already on the order, in a green bubble on the button's top-left corner - for example 4 Cokes, 2 Iced Teas and 1 Lemonade. The count goes up and down as you add or remove items, so you always know where you are without scrolling through the order.
- Note: The 86 count bubble is now orange and sits in the button's top-right corner, so you can tell the two apart at a glance - green is how many are on the order, orange is how many are left.
- The setting is on by default. You can turn it off for all terminals or individual terminals.
- Backoffice Setup: To turn it off for every terminal at once, go to Backoffice --> POS --> Settings --> Terminal Setup --> Terminal Settings tab --> Misc Options and switch off Show Order Count On Item Buttons.
- Terminal Setup: To turn it off on just one terminal, log in as a manager on that terminal, go to Functions --> Management Tools --> Settings, uncheck Order Count On Item Buttons and tap Save.
5. Spotlight Guest
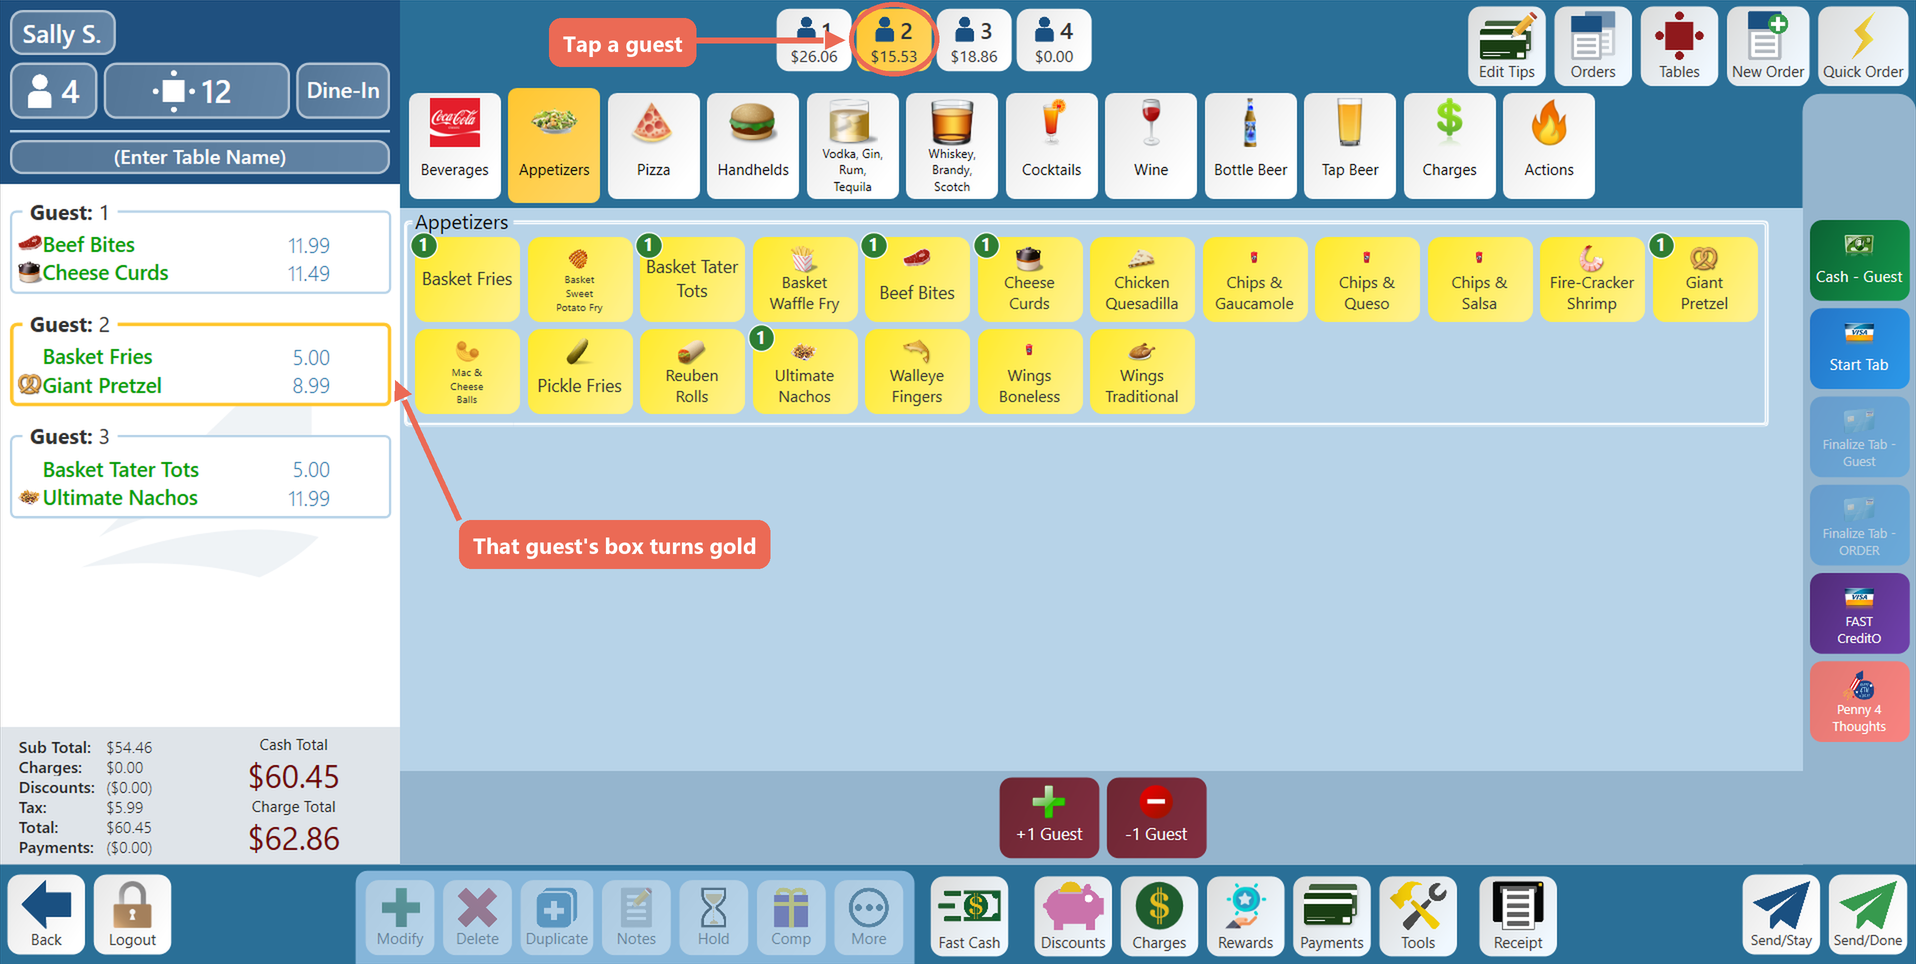
- Spotlight Guest makes it easy to see whose items you're ringing in. When you tap a guest at the top of the Order Entry screen, that guest's box in the order window is now outlined in gold.
- On large orders with lots of guests, the order window scrolls to the guest you tapped, so you never have to hunt for them.
6. Online Ordering: Included Ingredients
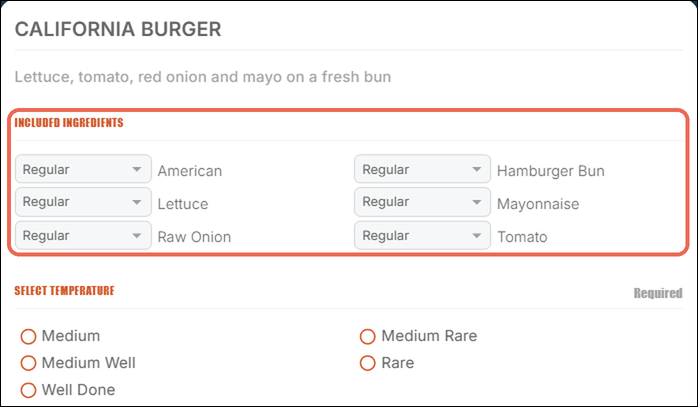
- Guests ordering online can now see exactly what comes on an item and change it before they add it to the cart. Ingredients you flag show in a new Included Ingredients section at the top of the item (right after the size), each already set to how it normally comes - for example Regular - with a drop-down to change it to No, Lite, Extra, On the Side and so on.
- Only changes go to the kitchen: an ingredient left as it comes doesn't print or show in the cart, so the ticket reads just "No Tomato" or "Extra Bacon". Ingredients in this section are no longer repeated in the item's other choices.
- Pizza Builder: included toppings are listed first and start on Whole at no charge. If the guest takes one off, it's sent to the kitchen as No that topping.
- Backoffice Setup: Go to Backoffice --> POS --> Items --> (your item) --> Ingredients tab and edit an ingredient. Turn on Show In Online Ingredient Section and pick its Modifier Type (required) - the type decides the choices the guest sees and their prices. Highlight Selected Modifiers (on by default) keeps showing the ingredient as already on the item at the terminal, and drives the Pizza Builder behavior above.
- Note: Nothing changes until you turn on Show In Online Ingredient Section for an item's ingredients.
Click here to learn more about adding ingredients to an item
No Comments