
Release: 2023.7.2 "Serval"
Notes: This release consists of 14 New features and Improvements. Use the page navigation section on the top left of this screen to jump between the features you'd like to read about.
**This release WILL require you to update your handheld to version 2023.7.2**
If you would like any additional information or help setting up any of these new features, please contact support at:
Support@ingageit.com or call (612) 861-5277
New Features
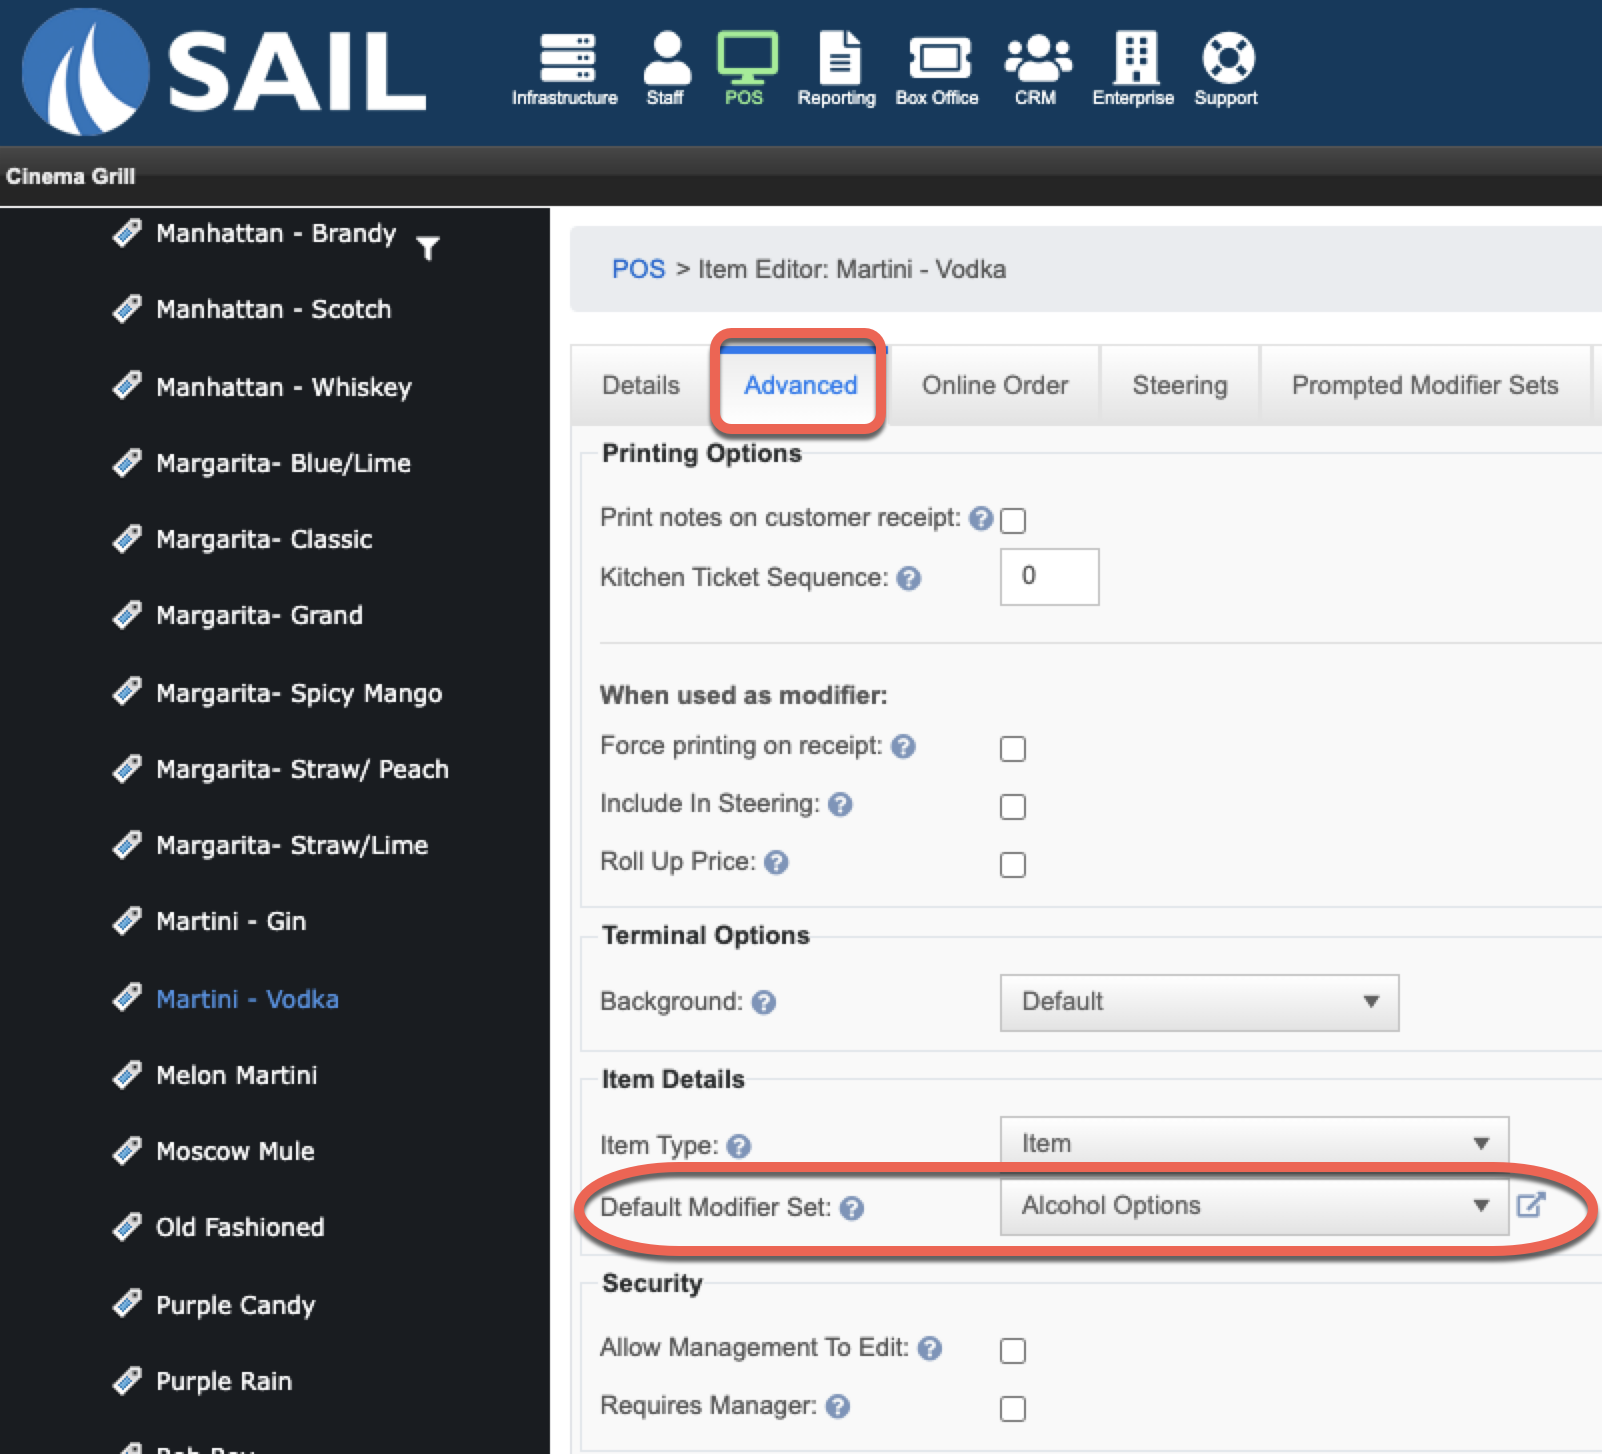
Terminal: Added the ability to change the modifier set that comes up when you click MODIFY on an item.
- Currently when you are in an order and you click the "MODIFY" button, you get all the ingredients for your food so you can modify your food items.
- You now have the ability to change the default modifier set on individual items.
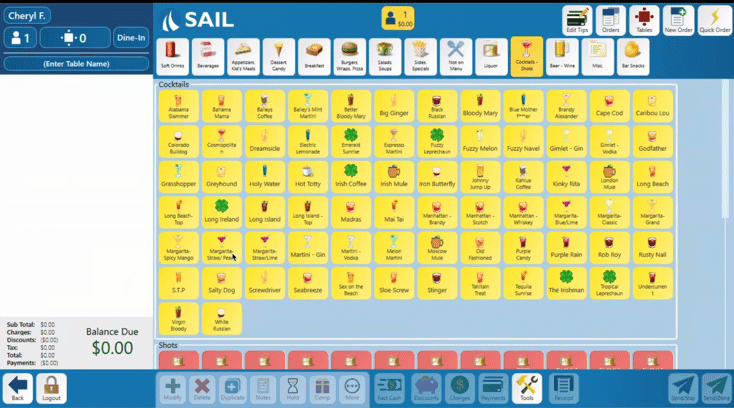
- For example you can put an alcohol modifier set on all the liquors, cocktails, and beers. So when you ring in a martini, you can click the MODIFY button and be able to do "X Dirty" or "Shaken"
- To set it up, go into Backoffice, and find the item you want to change the default on. Go to the Advanced tab, and use the dropdown for "Default Modifier Set" Here you can pick any of the modifier sets you'd like.

Here is that example in action:
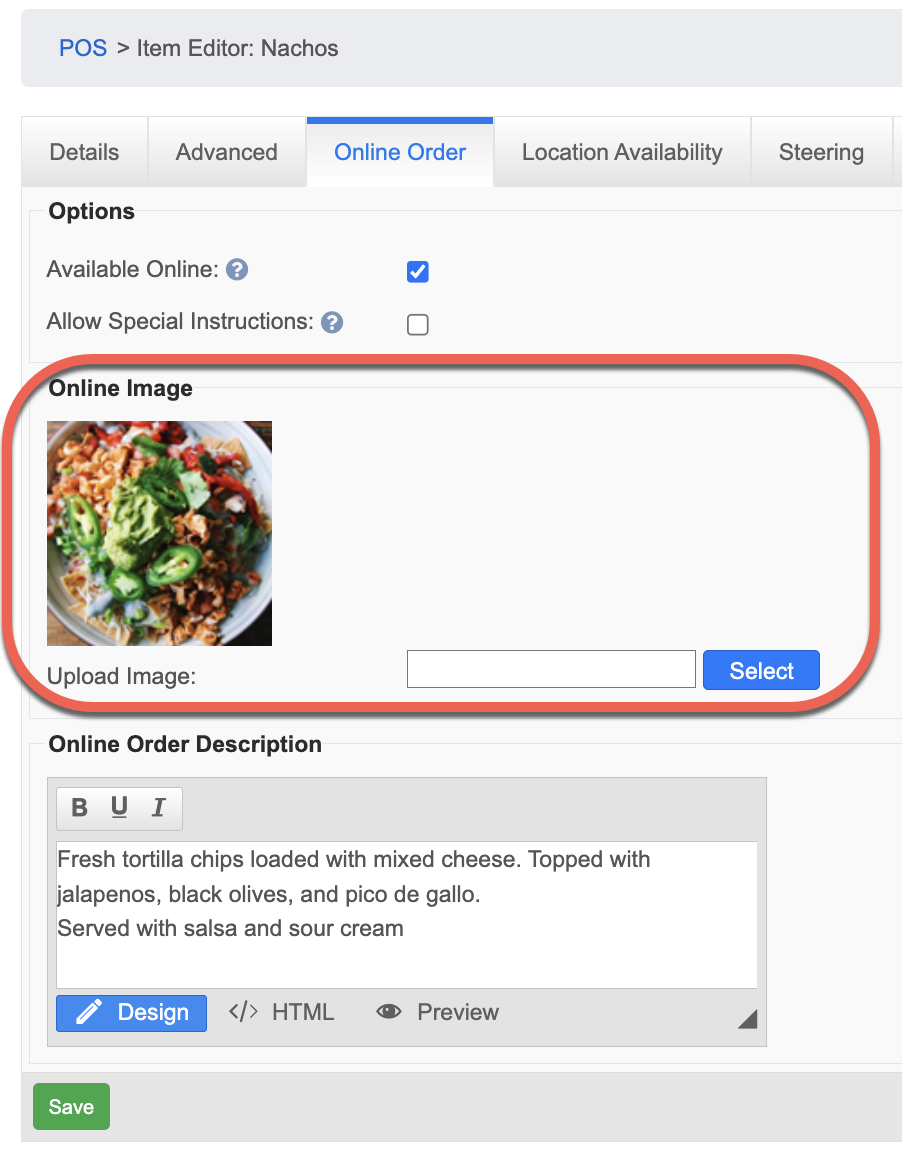
Online ordering: You can now attach an image to a menu item
In Backoffice, click on the item, then go into the Online Order tab.
Select the image you'd like to upload, click Save. An example of the image will appear for preview.
*JPG and PNG is the prefered format for the images
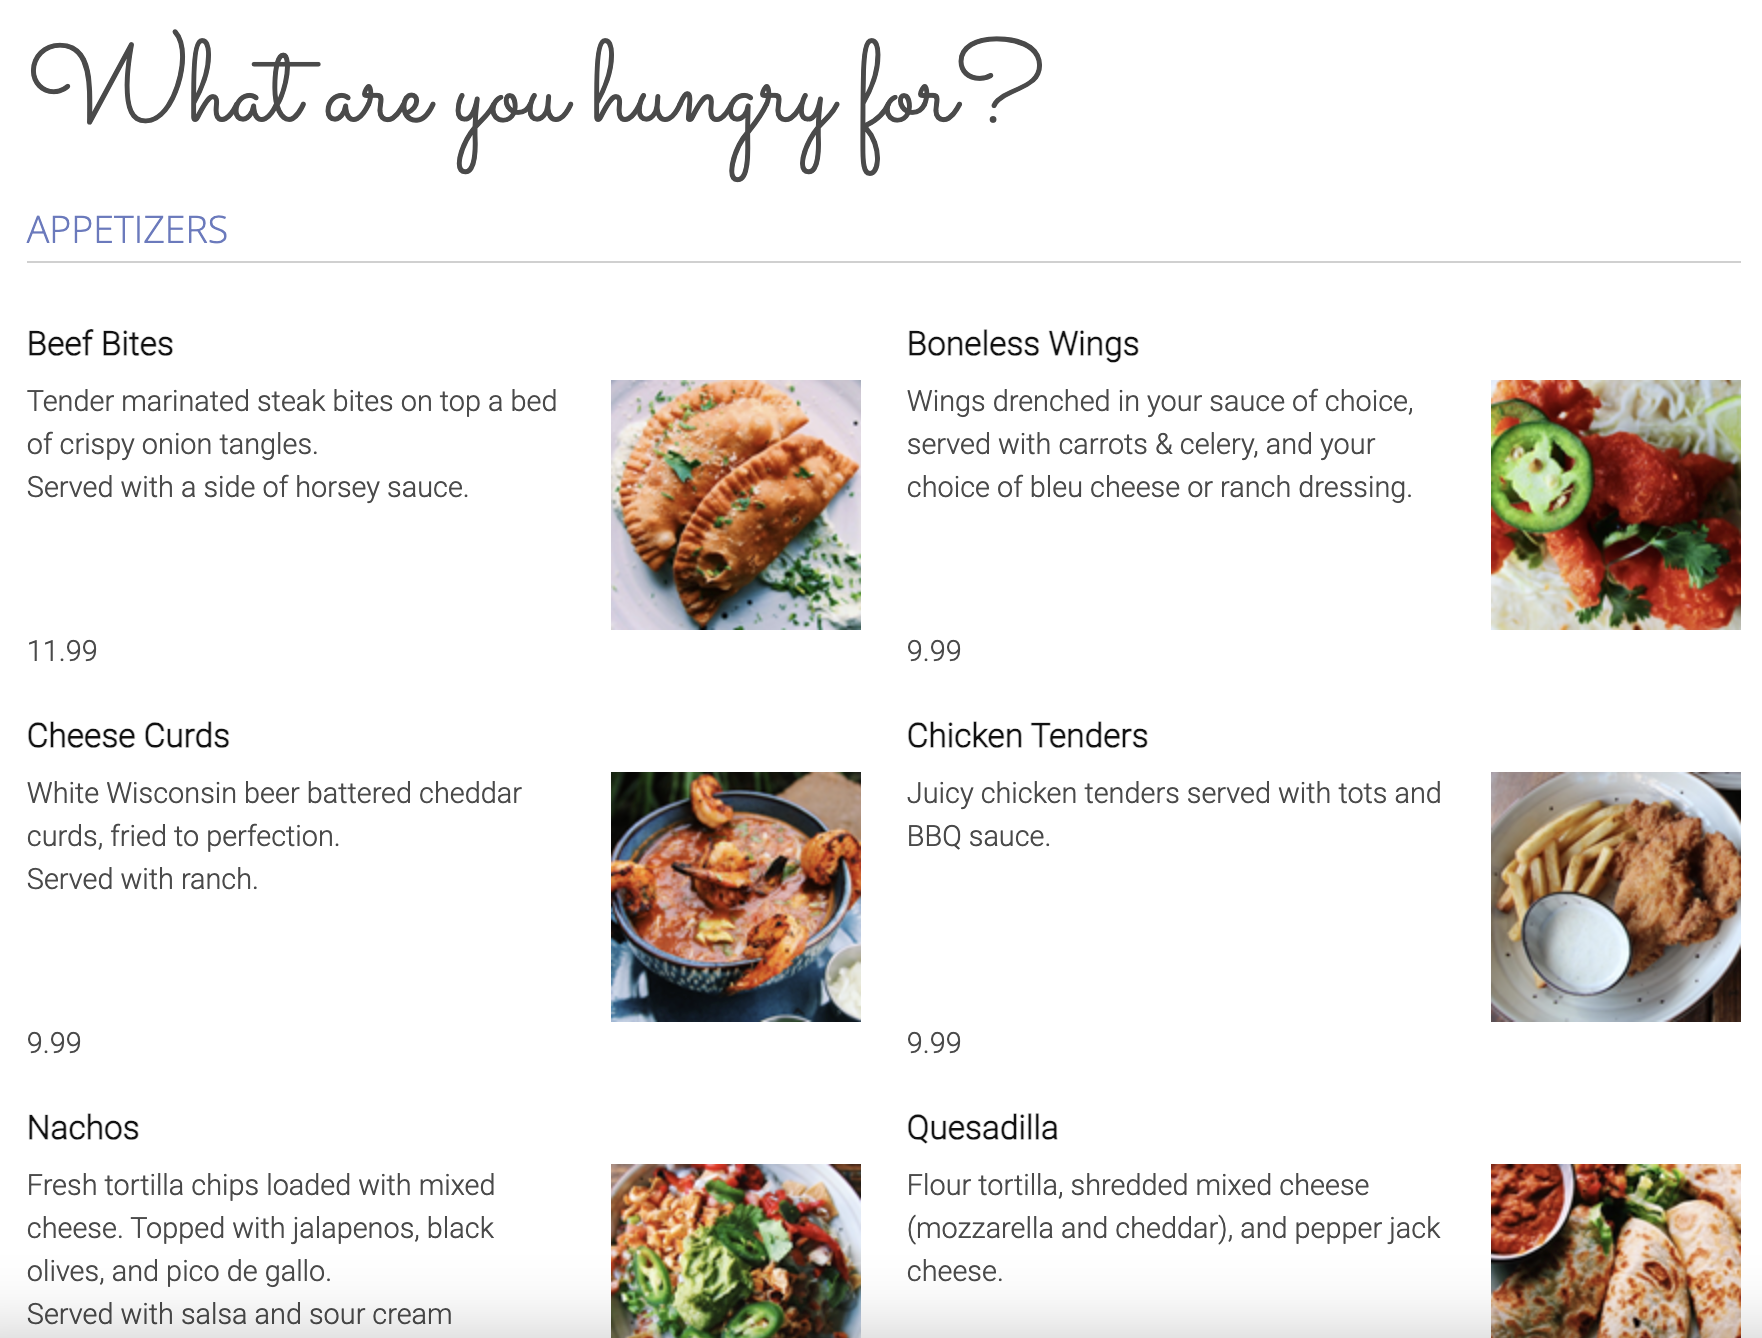
Here is what it will look like online:
Reports: Live reports
- We have made it so that you can now run ALL of your reports in Backoffice while the day is LIVE
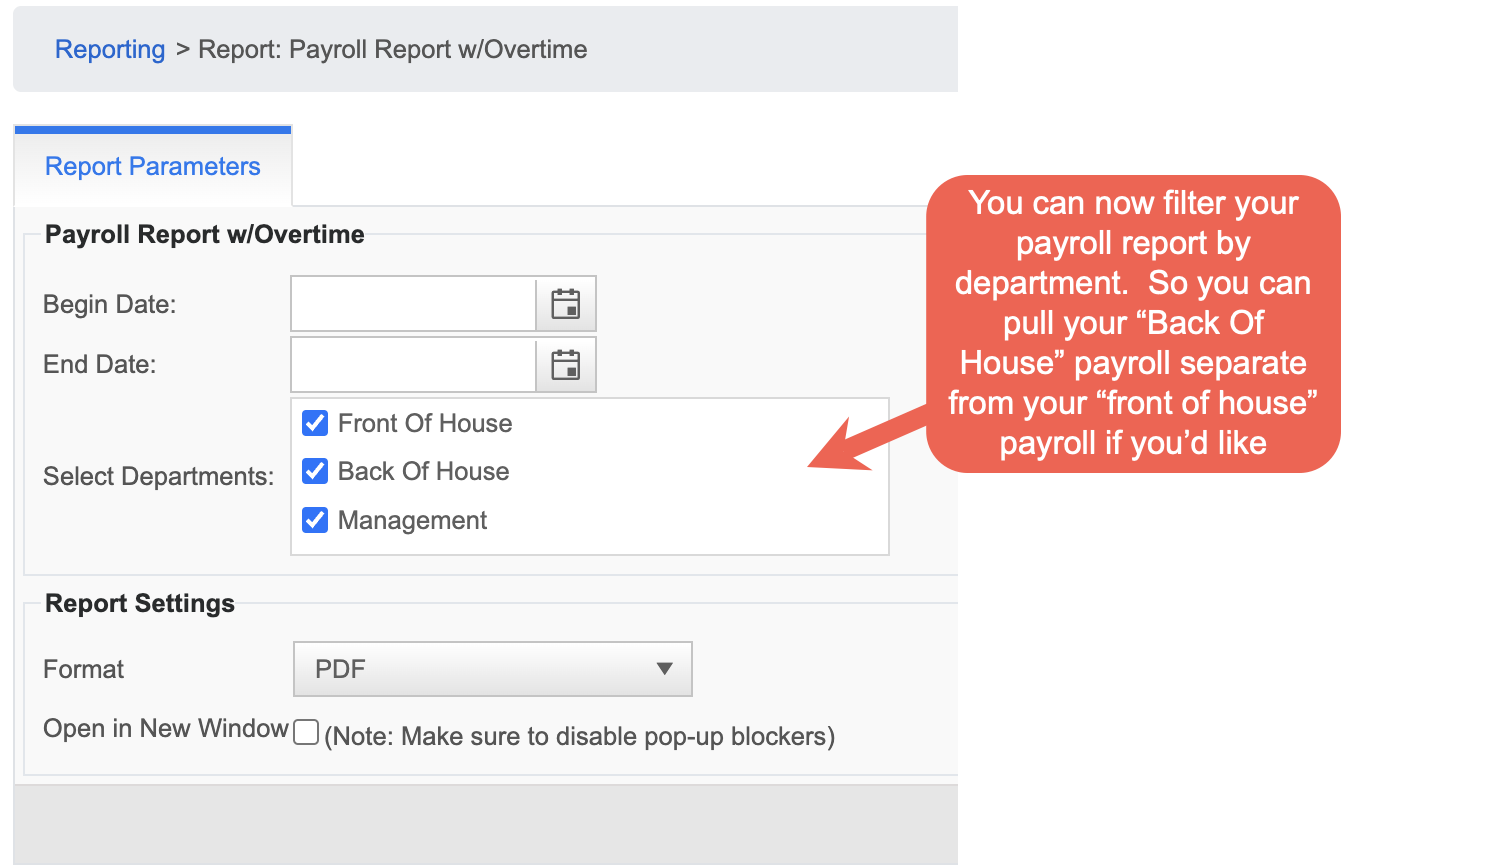
Reports: Payroll report by job departments
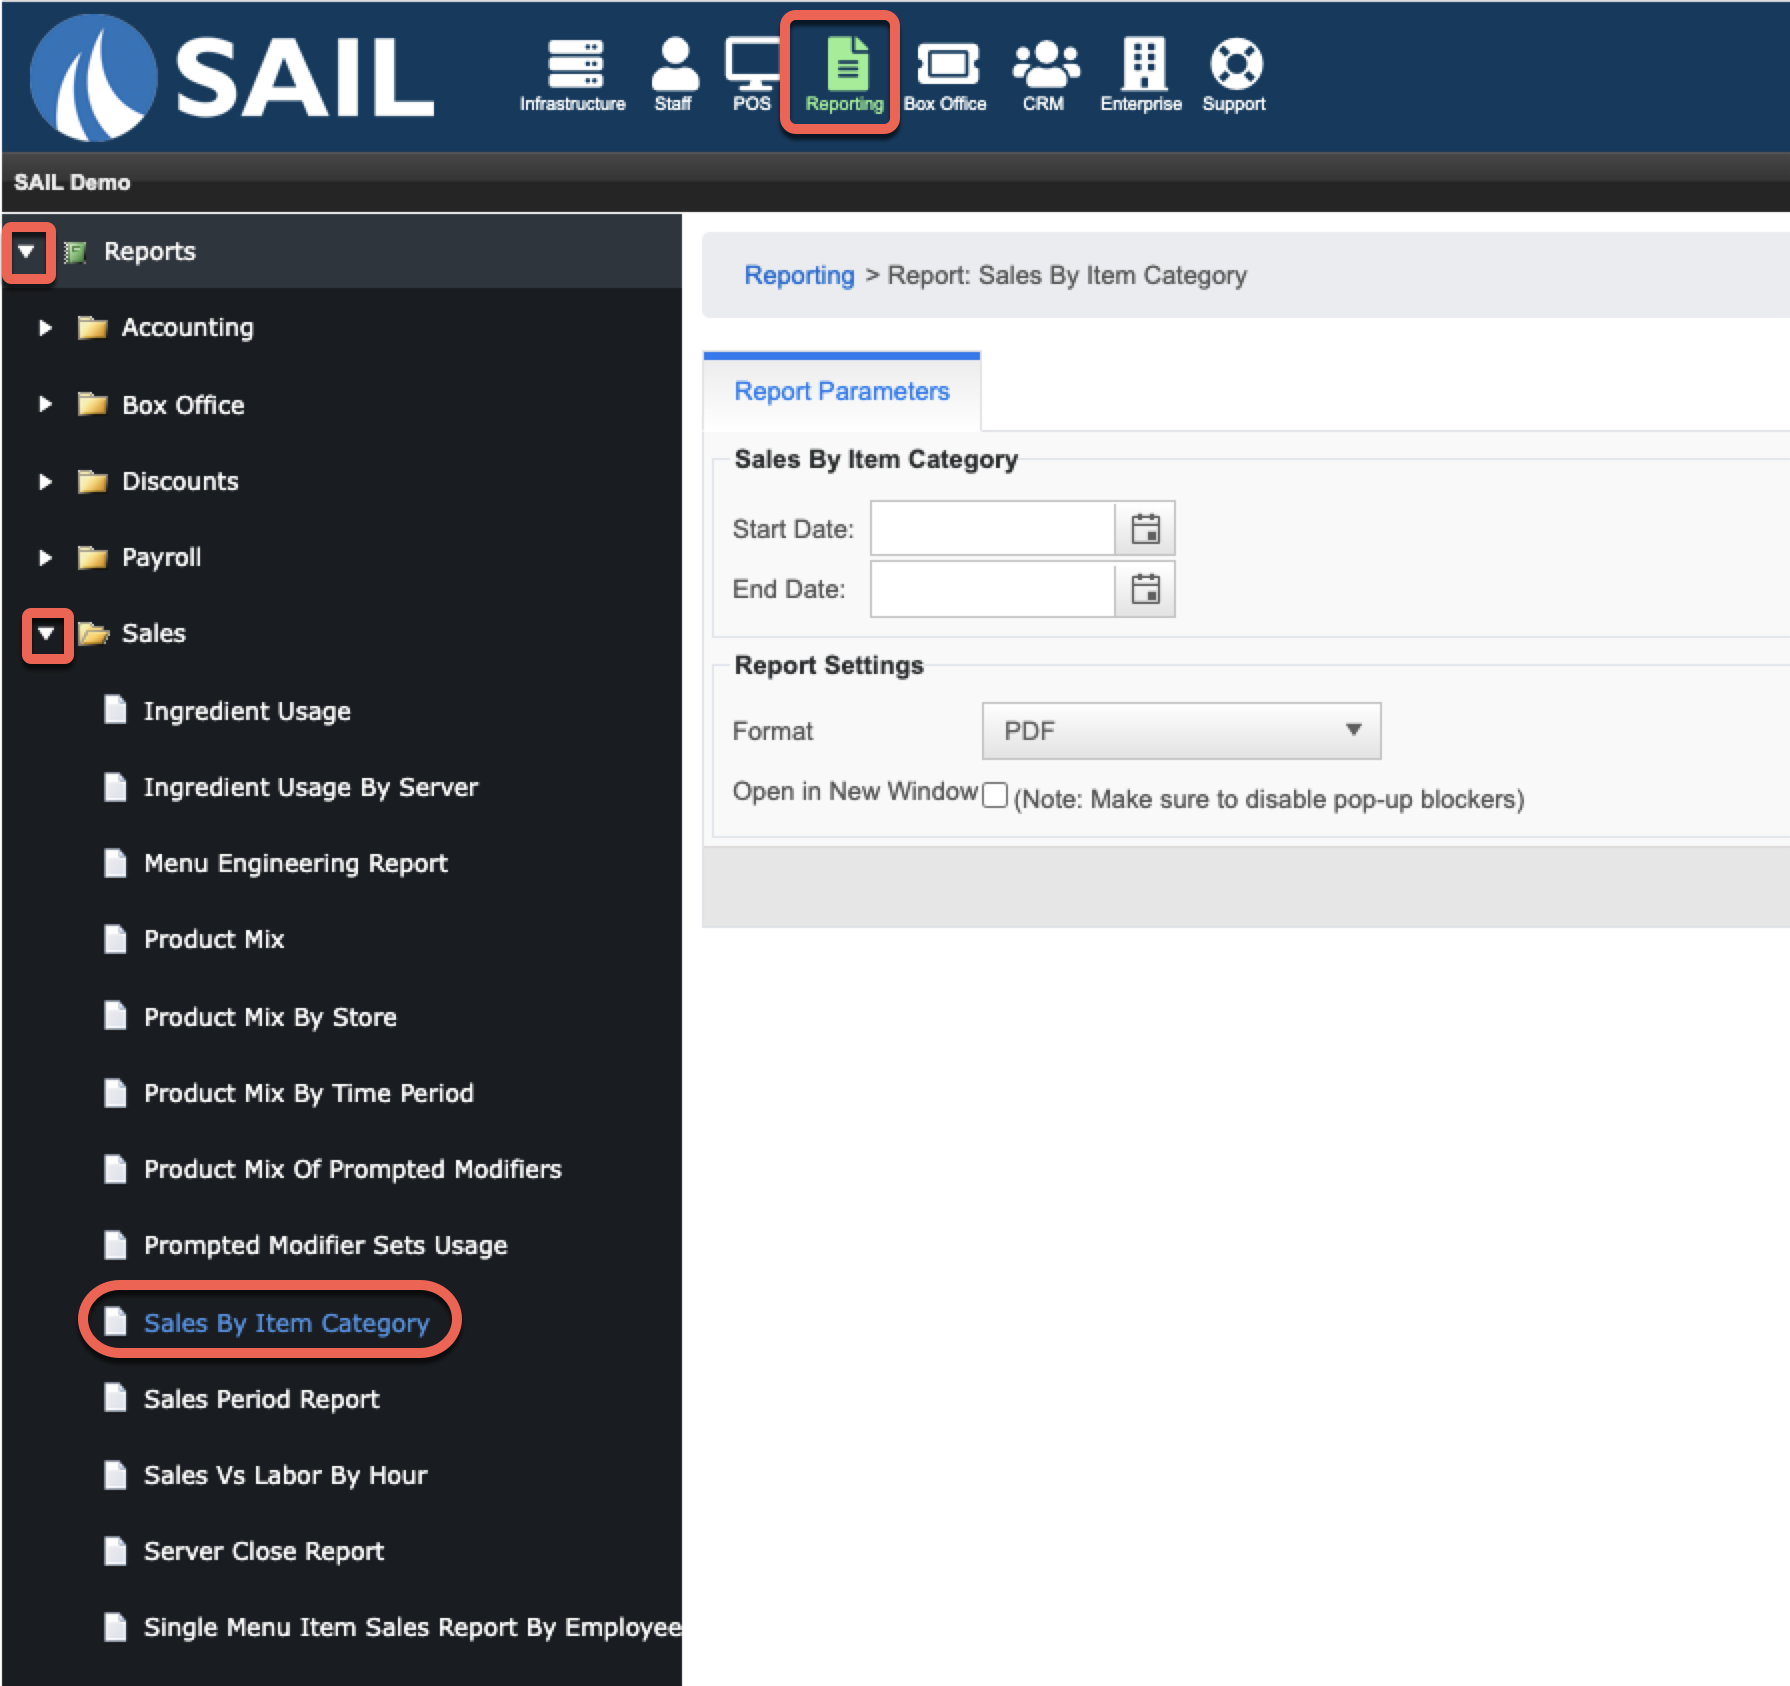
Reports: Item category sales report
To get to the report in Backoffice, go to the Reporting tab, Drop down Reports, Drop down Sales, And click on "Sales by Item Category"
- This report will break down your sales by reporting group first, and then by item category.
Here is an example of what the report will look like:

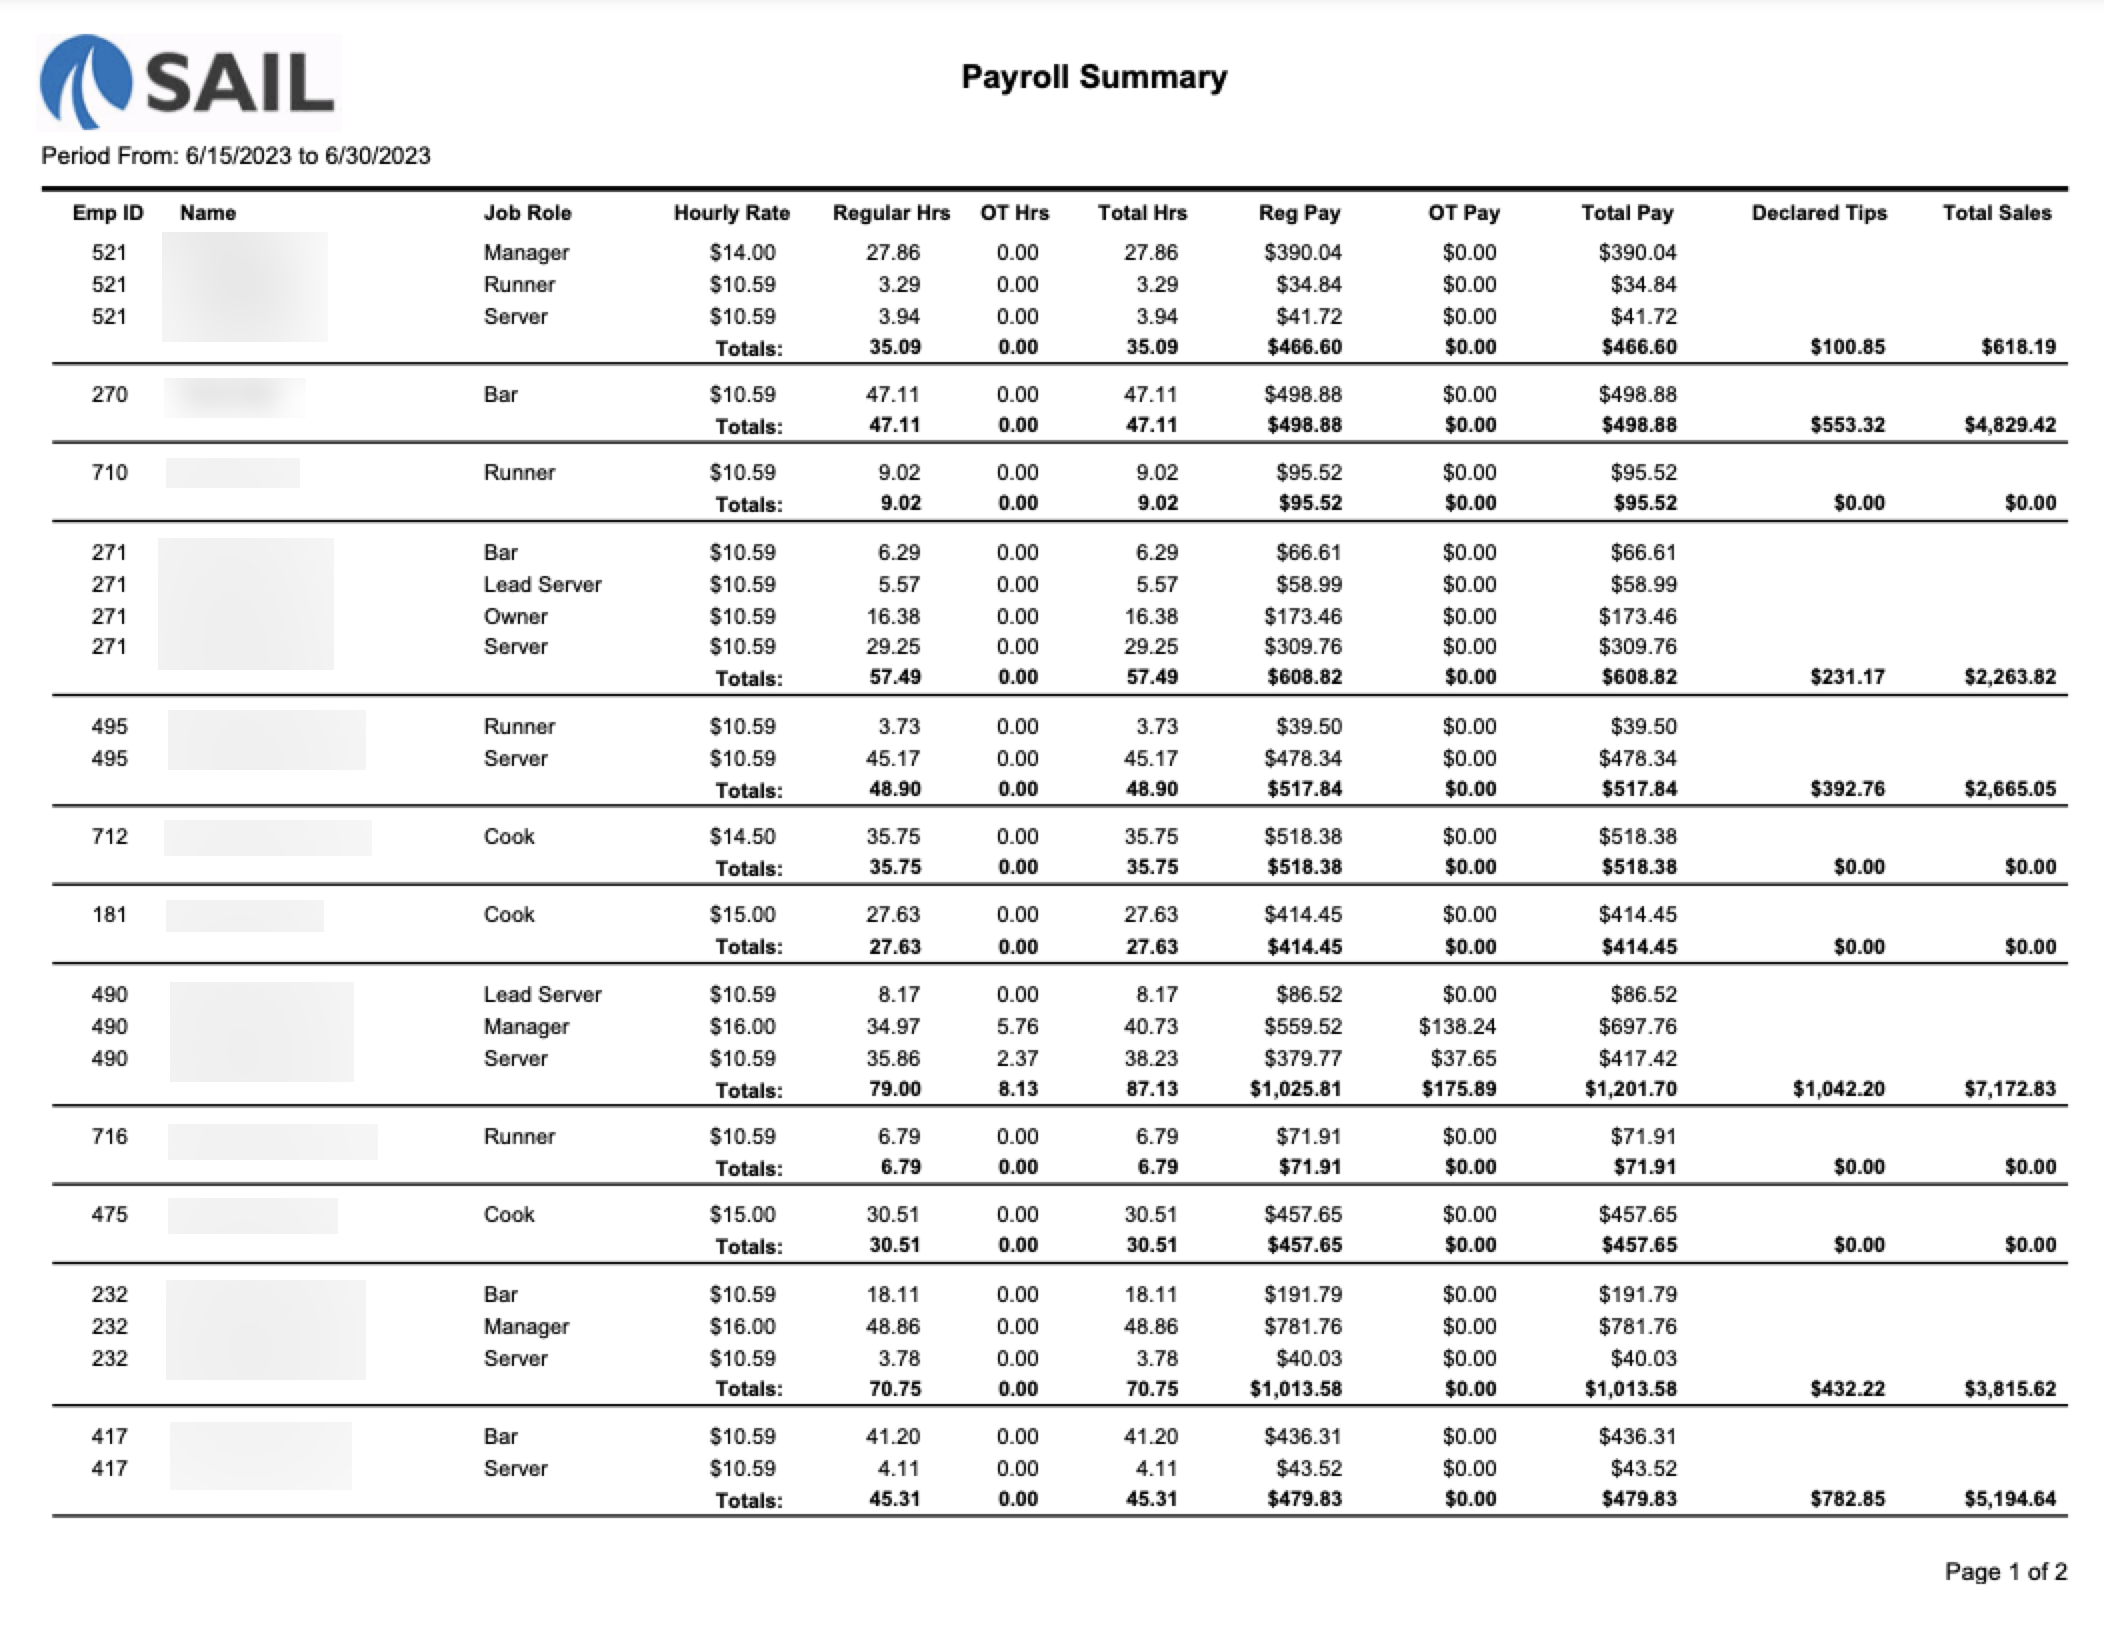
Reports: Payroll summary
- You can now run a payroll summary report.
- This will be a condensed version of the payroll report with overtime but without seeing the individual time punches. You will just see the total hours by job role
- Here is a preview of what this report will look like:

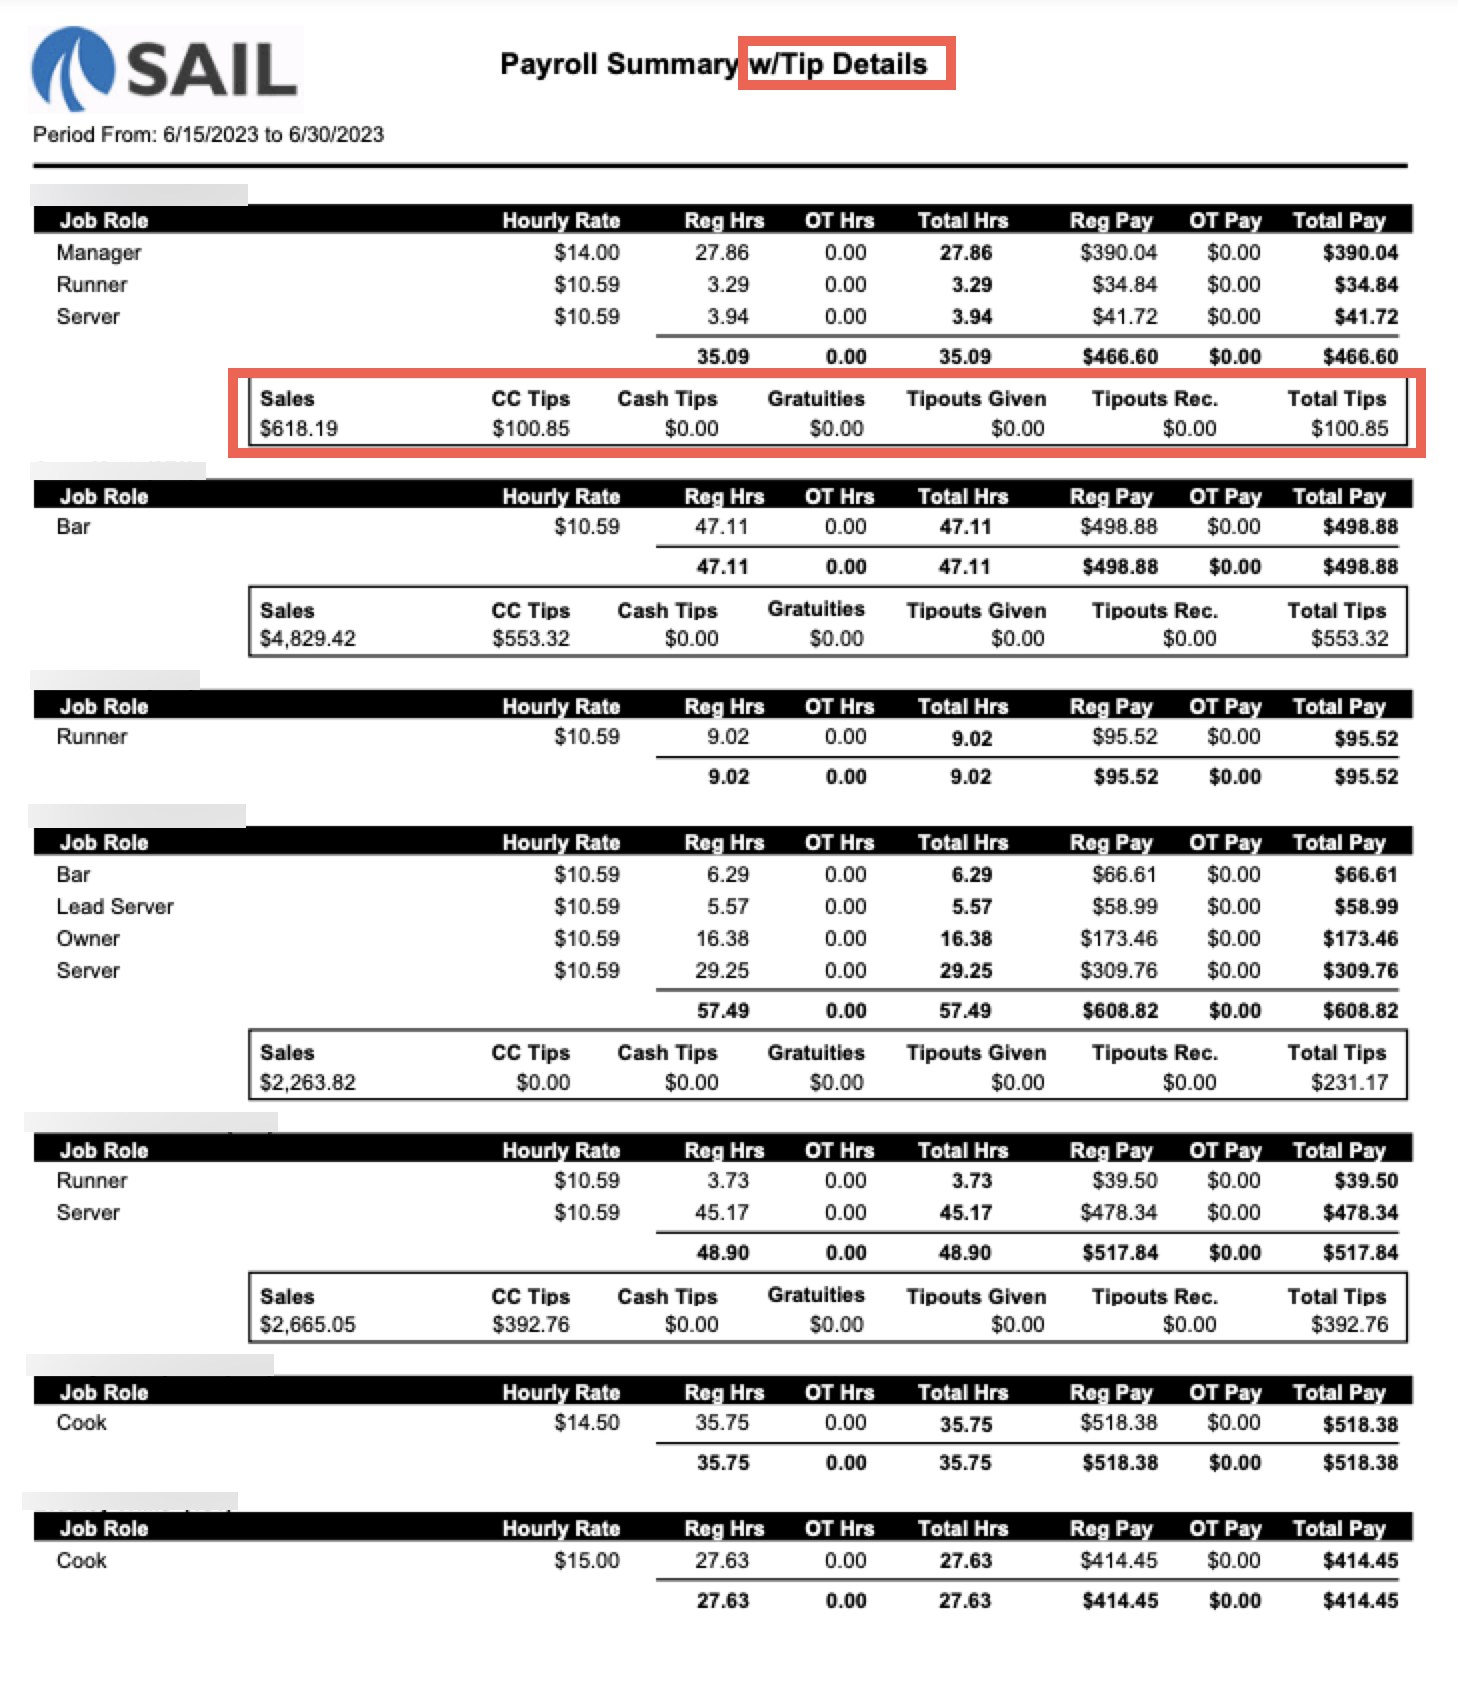
Reports: Payroll summary with tip details
- This is similar to the payroll summary, but will have a section that breaks out tips
- Here is an example of what the report will look like:
Improvements
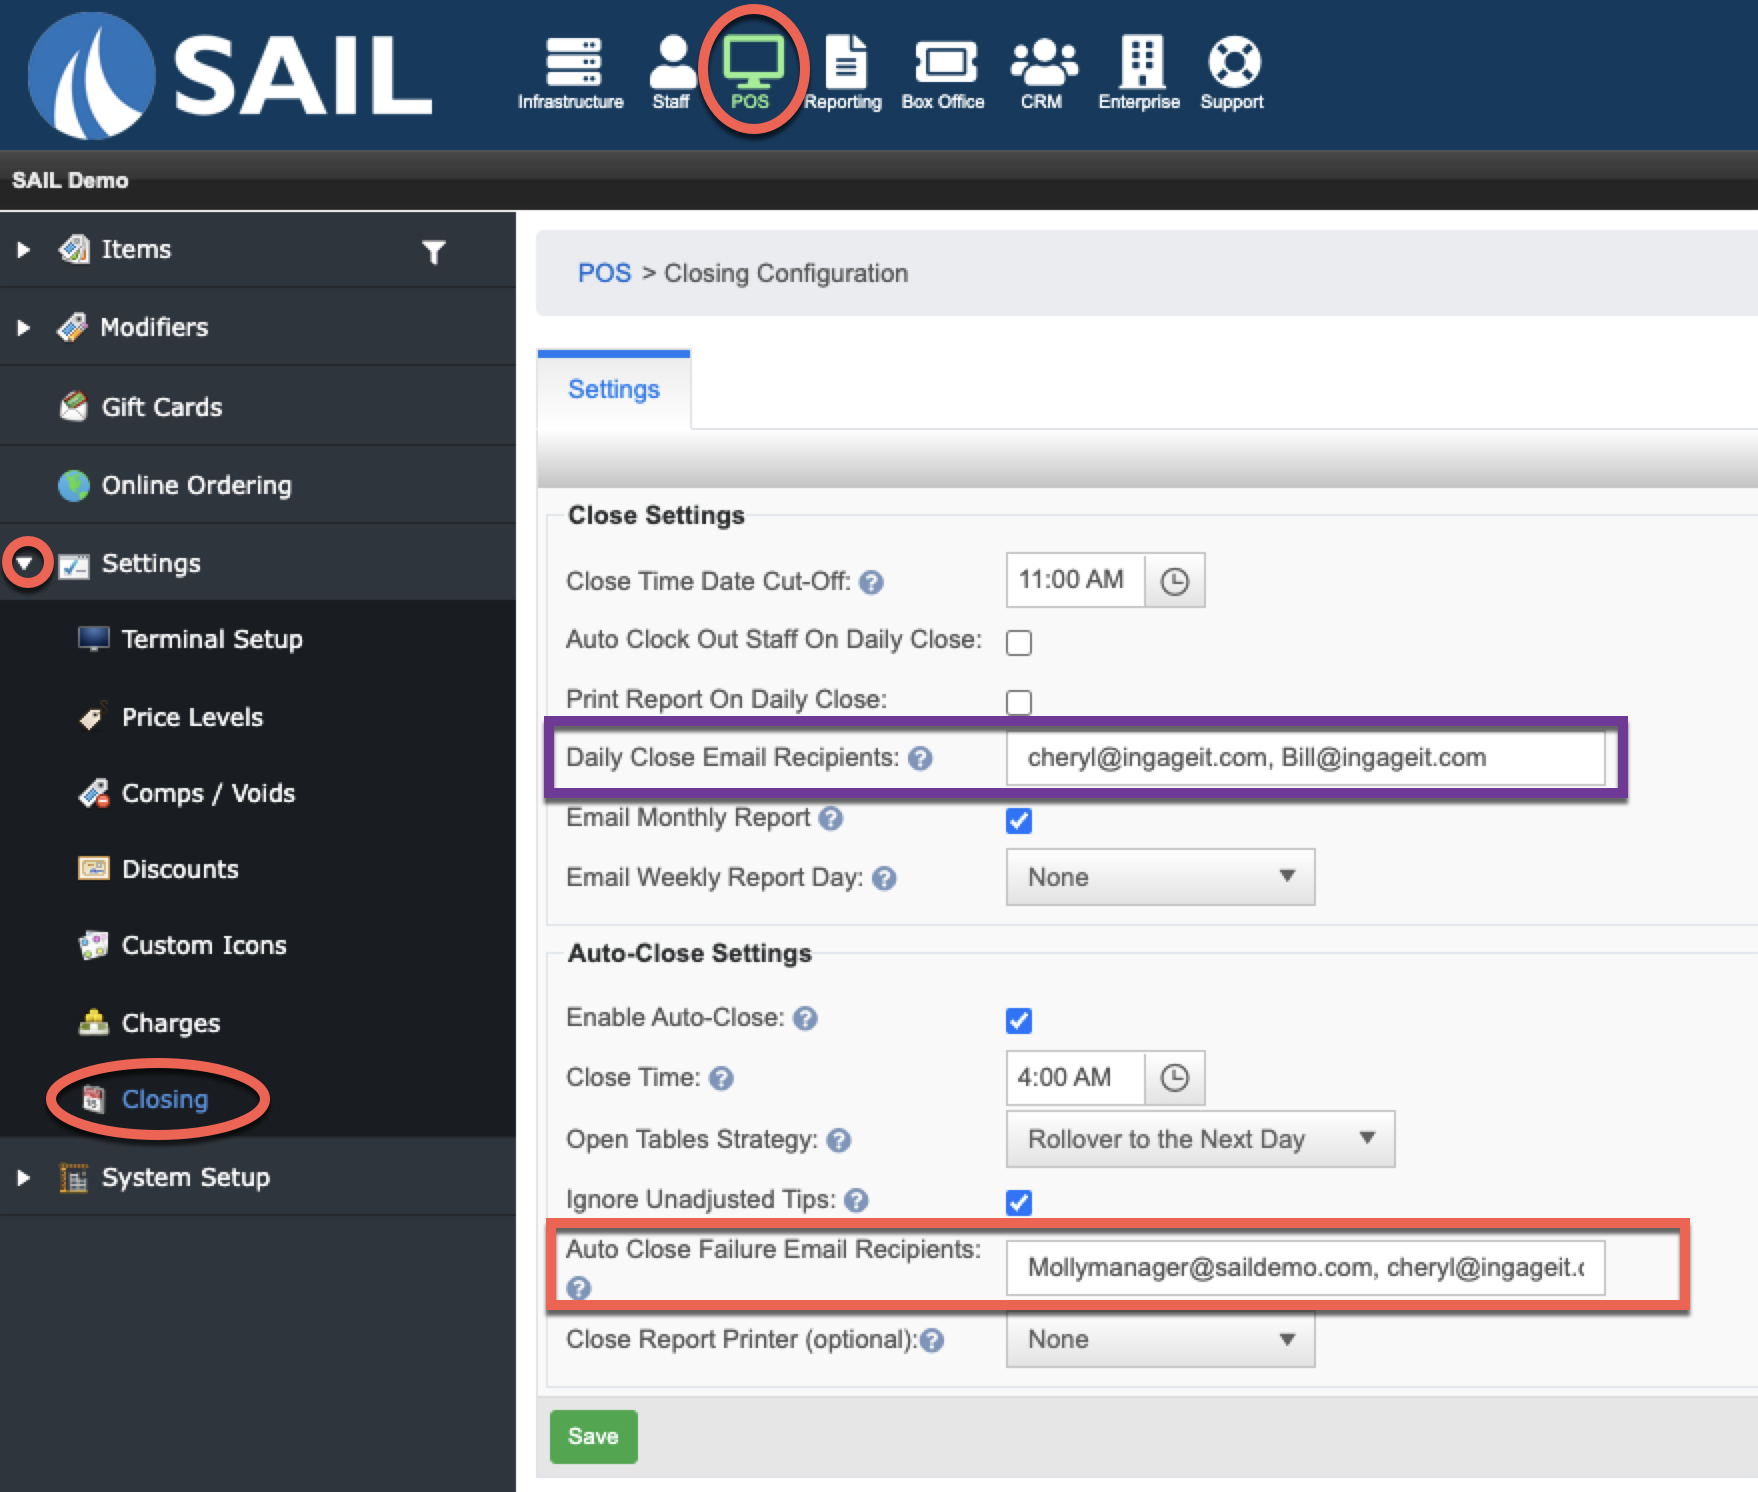
Back Office: Add a separate list of emails for the auto close failure
- You can now separate who gets the daily close emails and the auto close failure emails.
- There are 3 options
- Option #1 - ONLY put names in the "Daily Close Email Recipients" section - everyone in that section will get the daily close emails and the auto close failure emails (This is the way it is today.)
- Option #2 - (see example below) Cheryl and Bill will receive the Daily close email, and Molly and Cheryl will receive the auto close failure email. This way you can have the owner only receiving the daily emails and the managers receiving the failure emails, so they can fix them right away.
- Option #3 - If you want everyone in the daily close emails to also receive the auto close failure emails, and you want managers to get the auto close failure emails, then you can put the managers names in the Auto failure section, and copy everyone from the daily close emails into that section as well, so everyone receives the Auto close failure emails.

Terminal: Print time cards from the terminals for employees
- You can now have employees "time cards" for the current payroll period print when they clock out.
- To set it up: Log into Backoffice, Click on the Staff tab, Then click on Settings. This will be set up in the section called "Payroll Settings"
- Here is an example of what it looks like
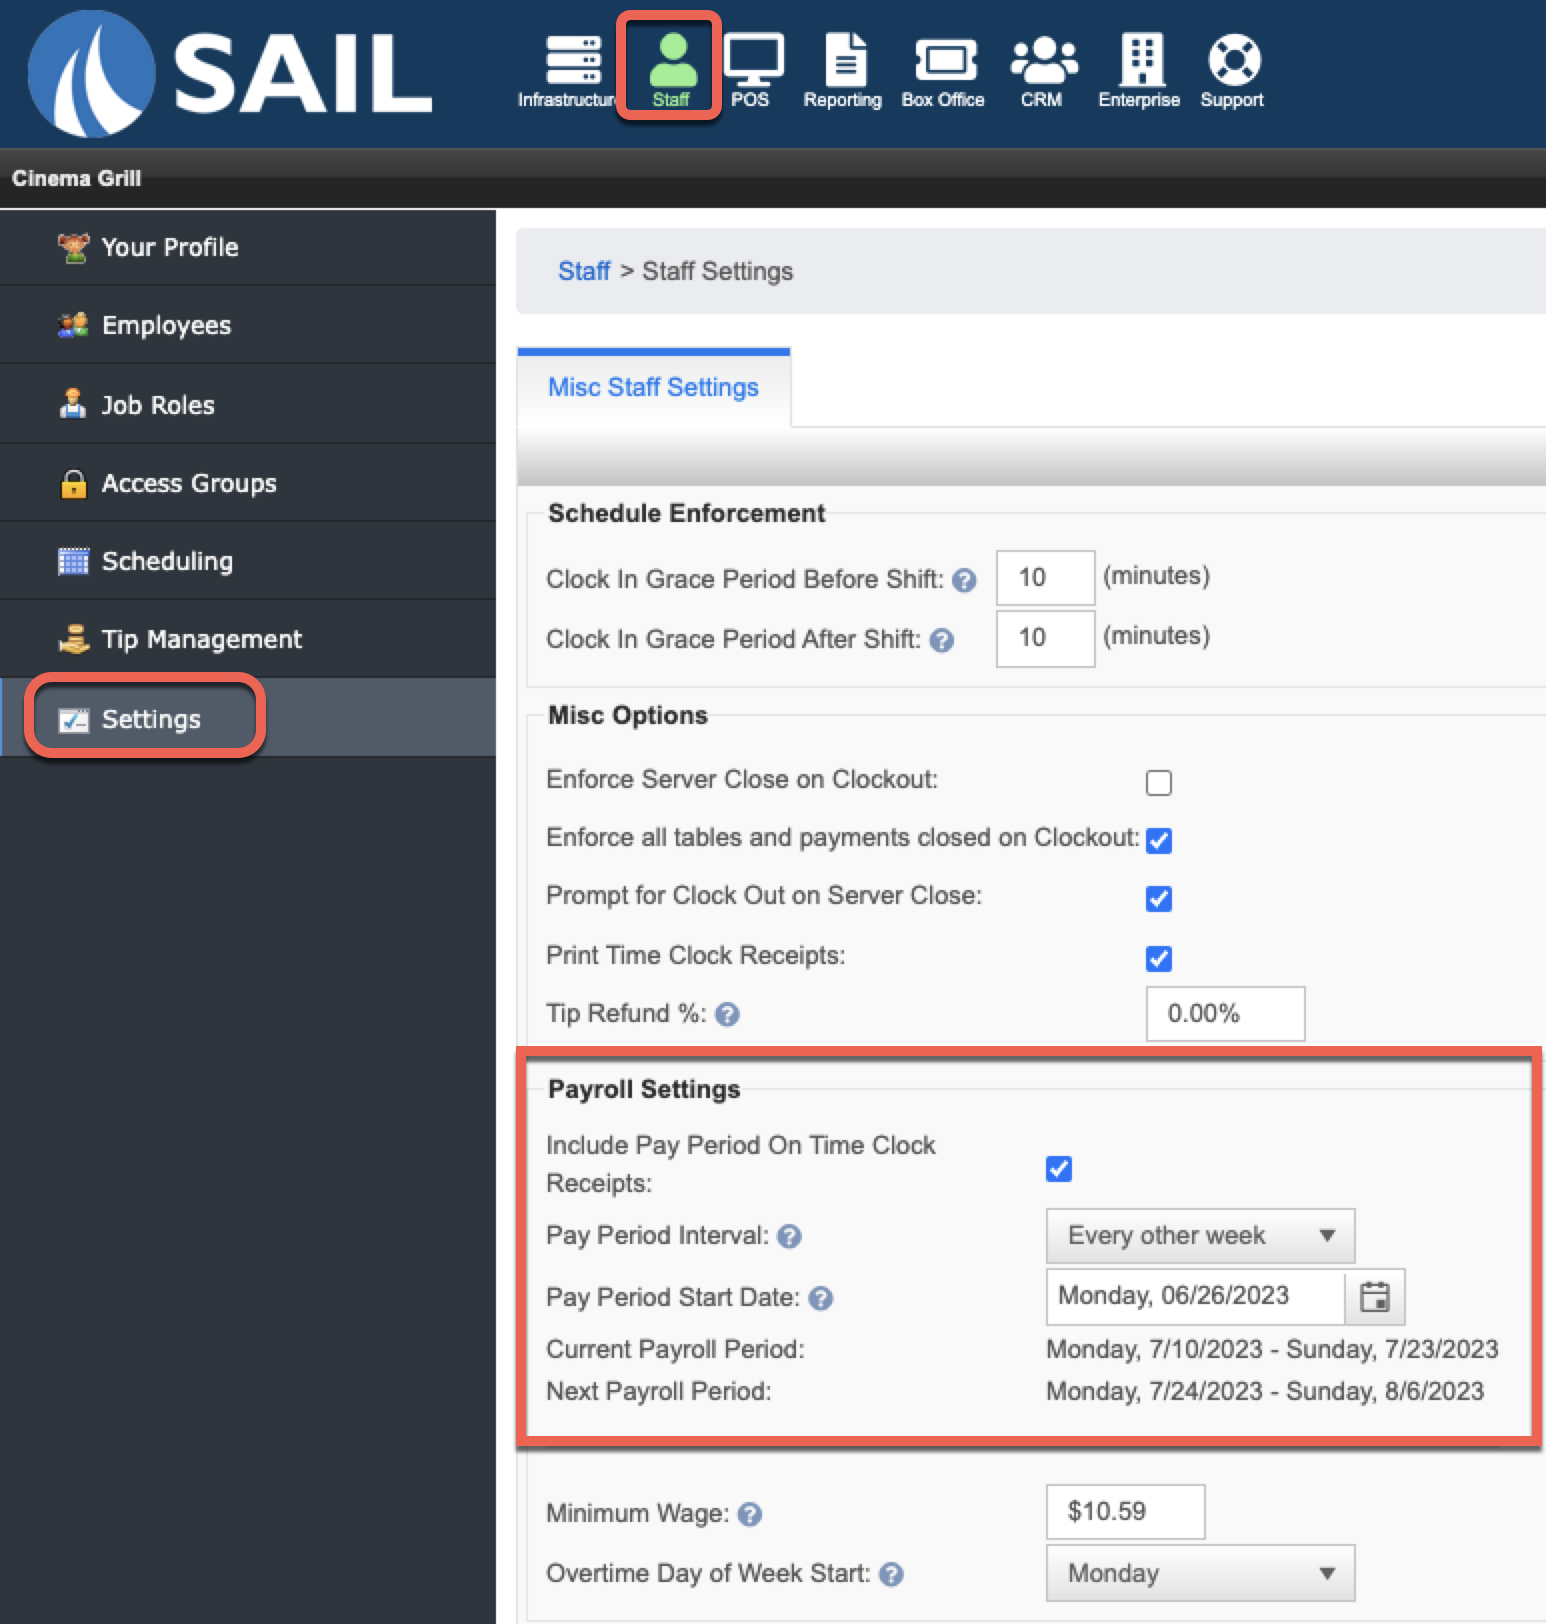
- If you would like to "Include the Pay Period on the Time Clock Receipts" for all employees, click the check box.
- Next select your pay period interval. Options are:
- Every week
- Every other week
- Twice per month
- Monthly
- Then use the calendar to enter the start date of the current payroll period you are on.
- It will automatically show the current payroll period, and the next payroll period so you can make sure you entered it correctly
- It will automatically show the current payroll period, and the next payroll period so you can make sure you entered it correctly
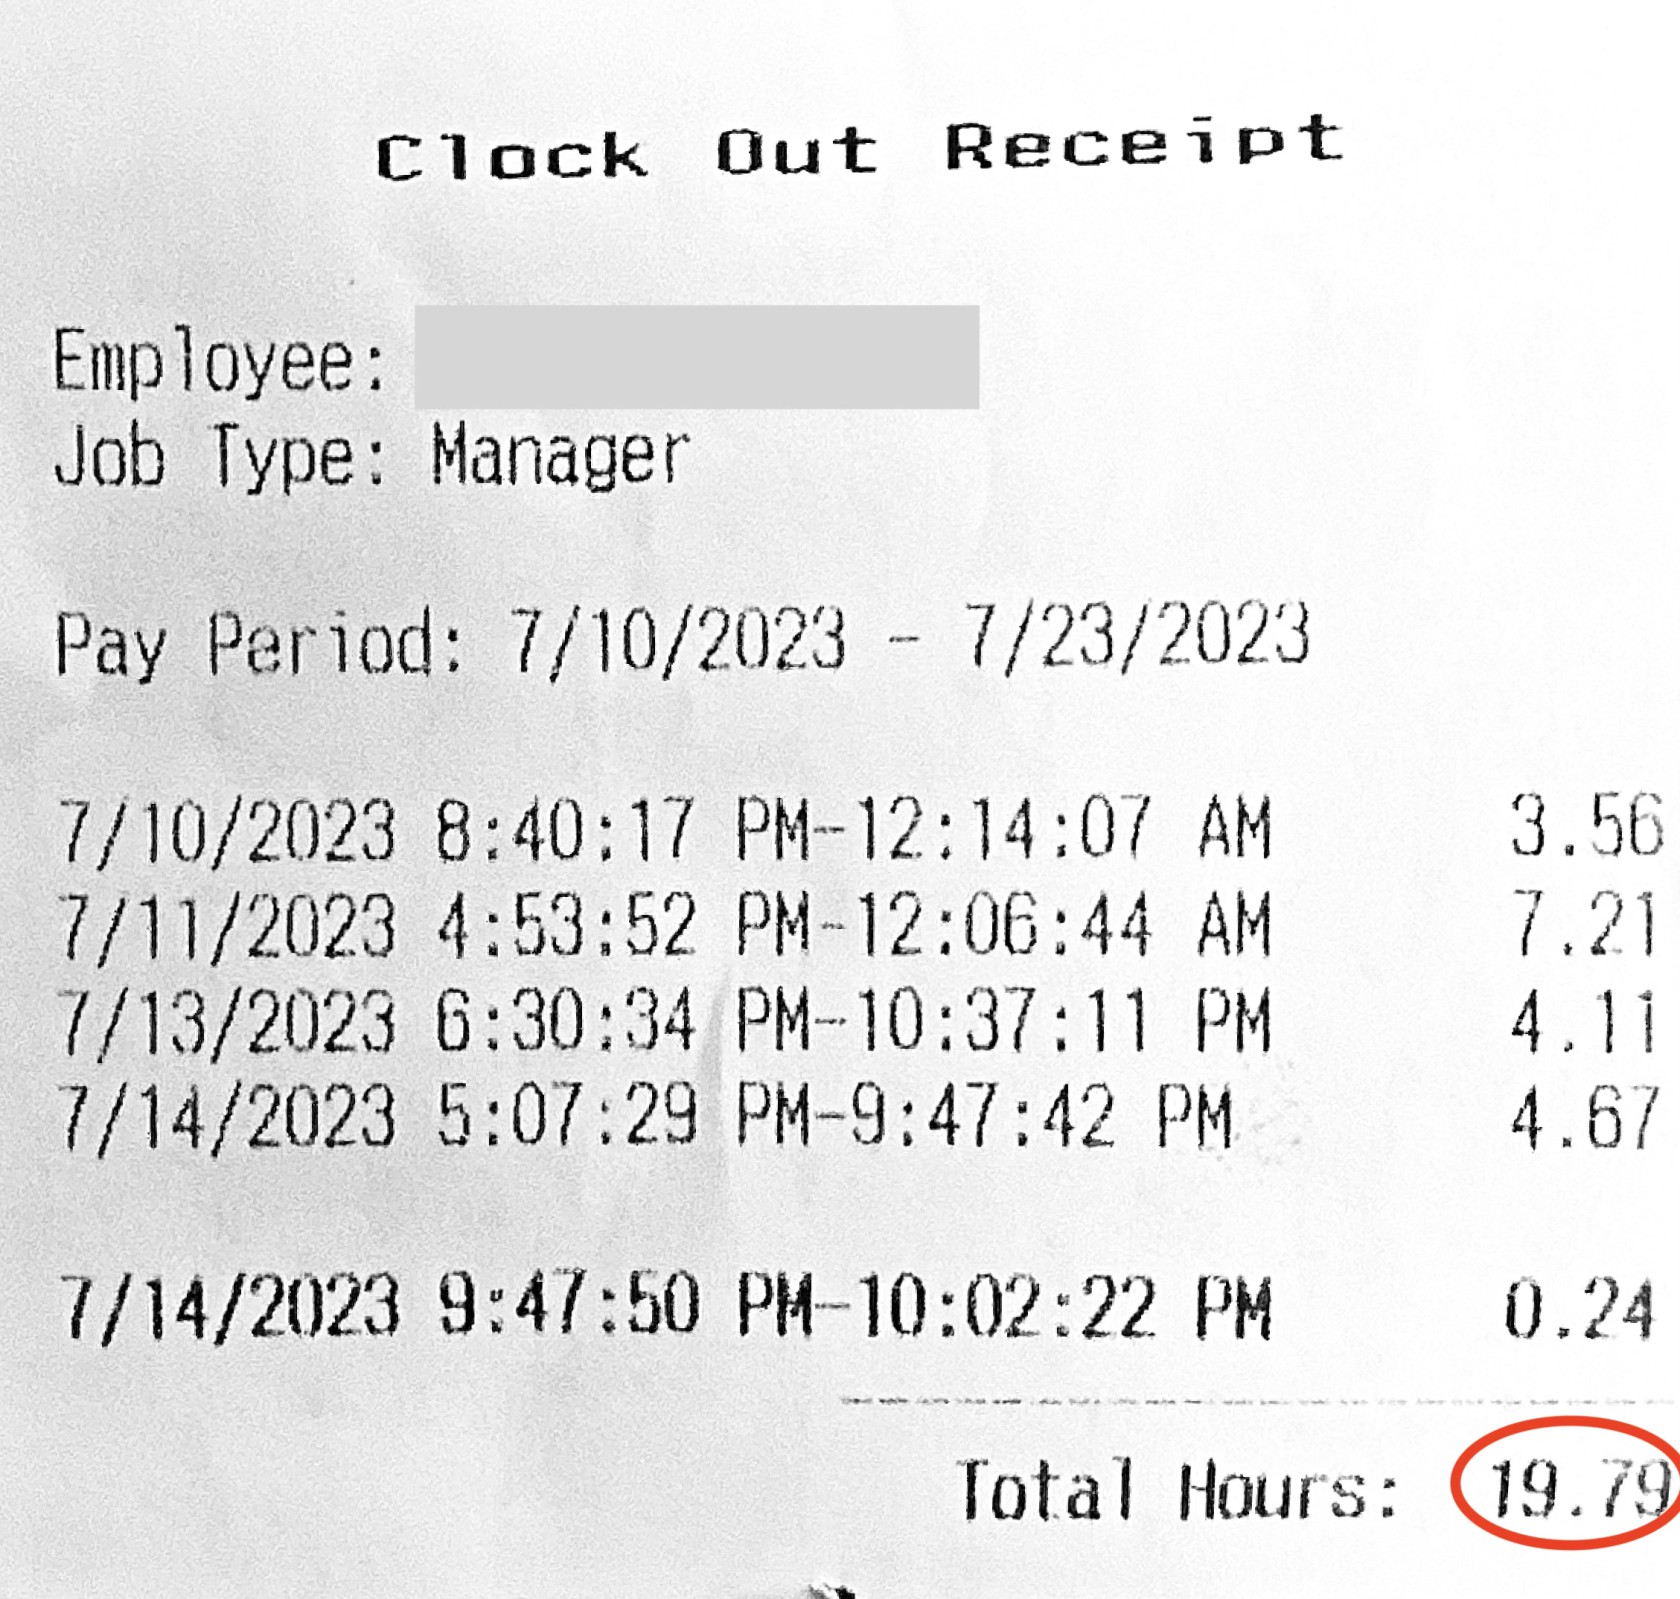
- When an employee clocks out at the end of their shift, they will get a print out that shows their current hours for the current day. and then a list of the other dates and times they worked so they can keep track of their hours.
- Here is an example of what that print out will look like:


Terminal: We have updated the icons on the check to match the state the item is in

Terminal: When you void, comp, or transfer an item, it will now prompt for manager approval instead of making you use the log out override
- If there is a job role that does not have rights to void, comp or transfer an item, the button will no longer be greyed out. They will be able to click on the button and a keypad will appear for a manager to type in their number so the action can quickly be done.
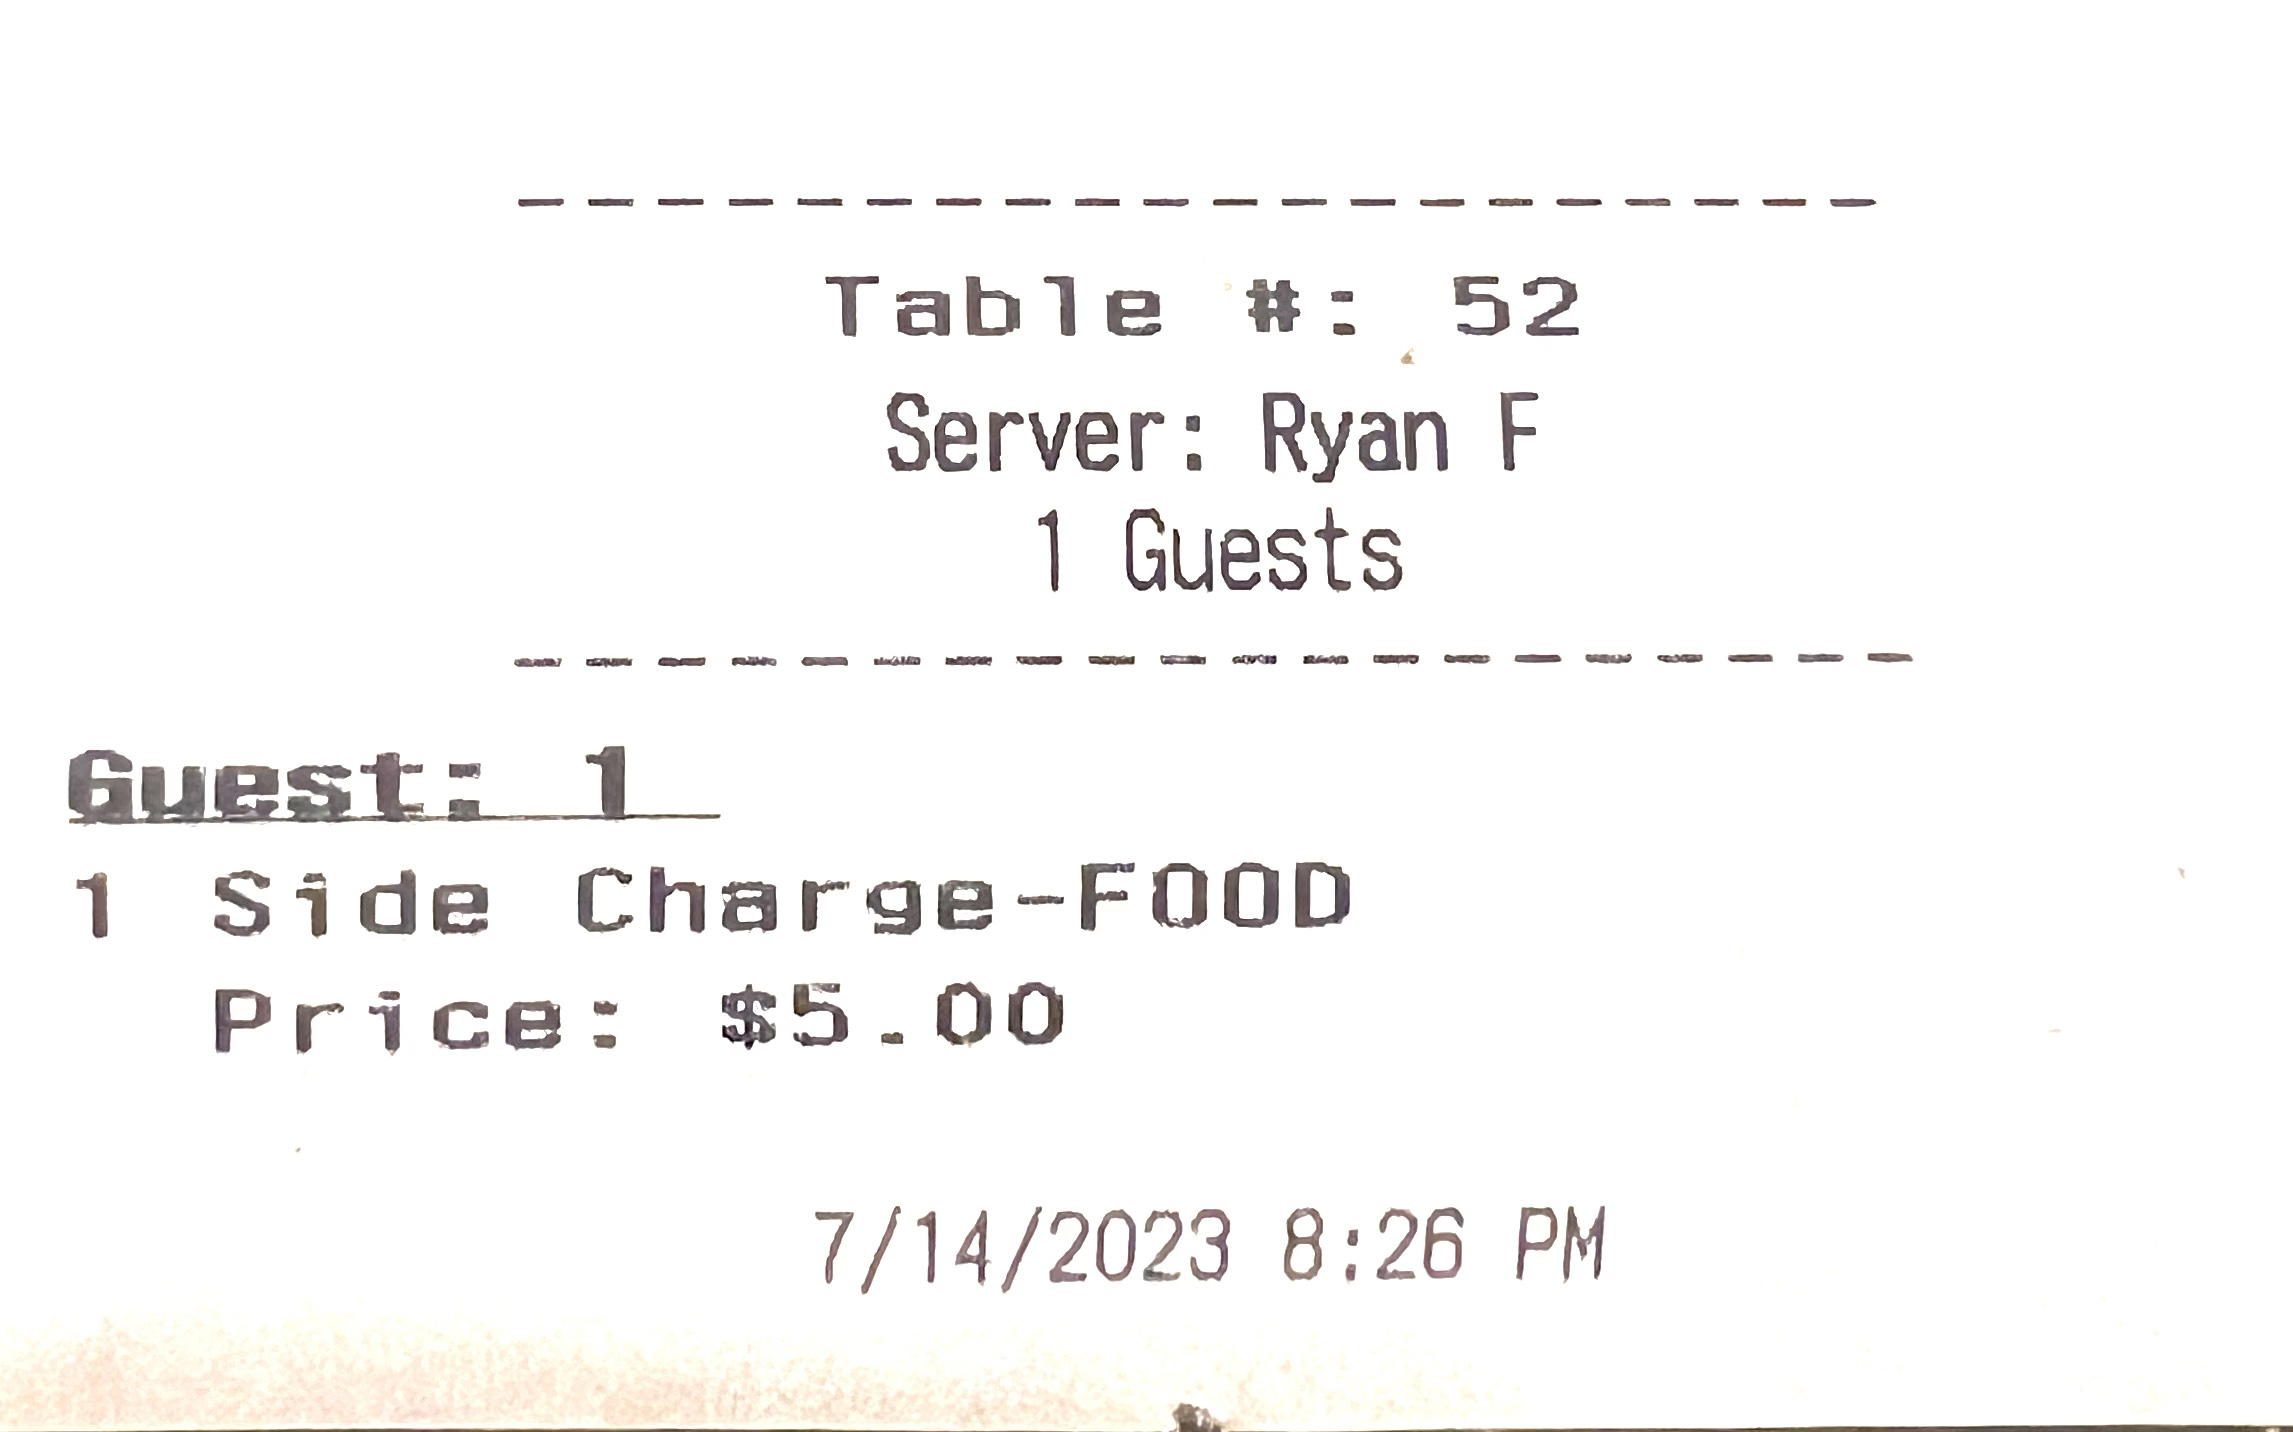
Kitchen/Bar tickets: Variable priced items will now have the price print on the kitchen or bar ticket
- When you have a variable priced item, like Open Food or Open Liquor, the price will now print on the kitchen or bar ticket.
- Here is an example of it on a kitchen ticket:
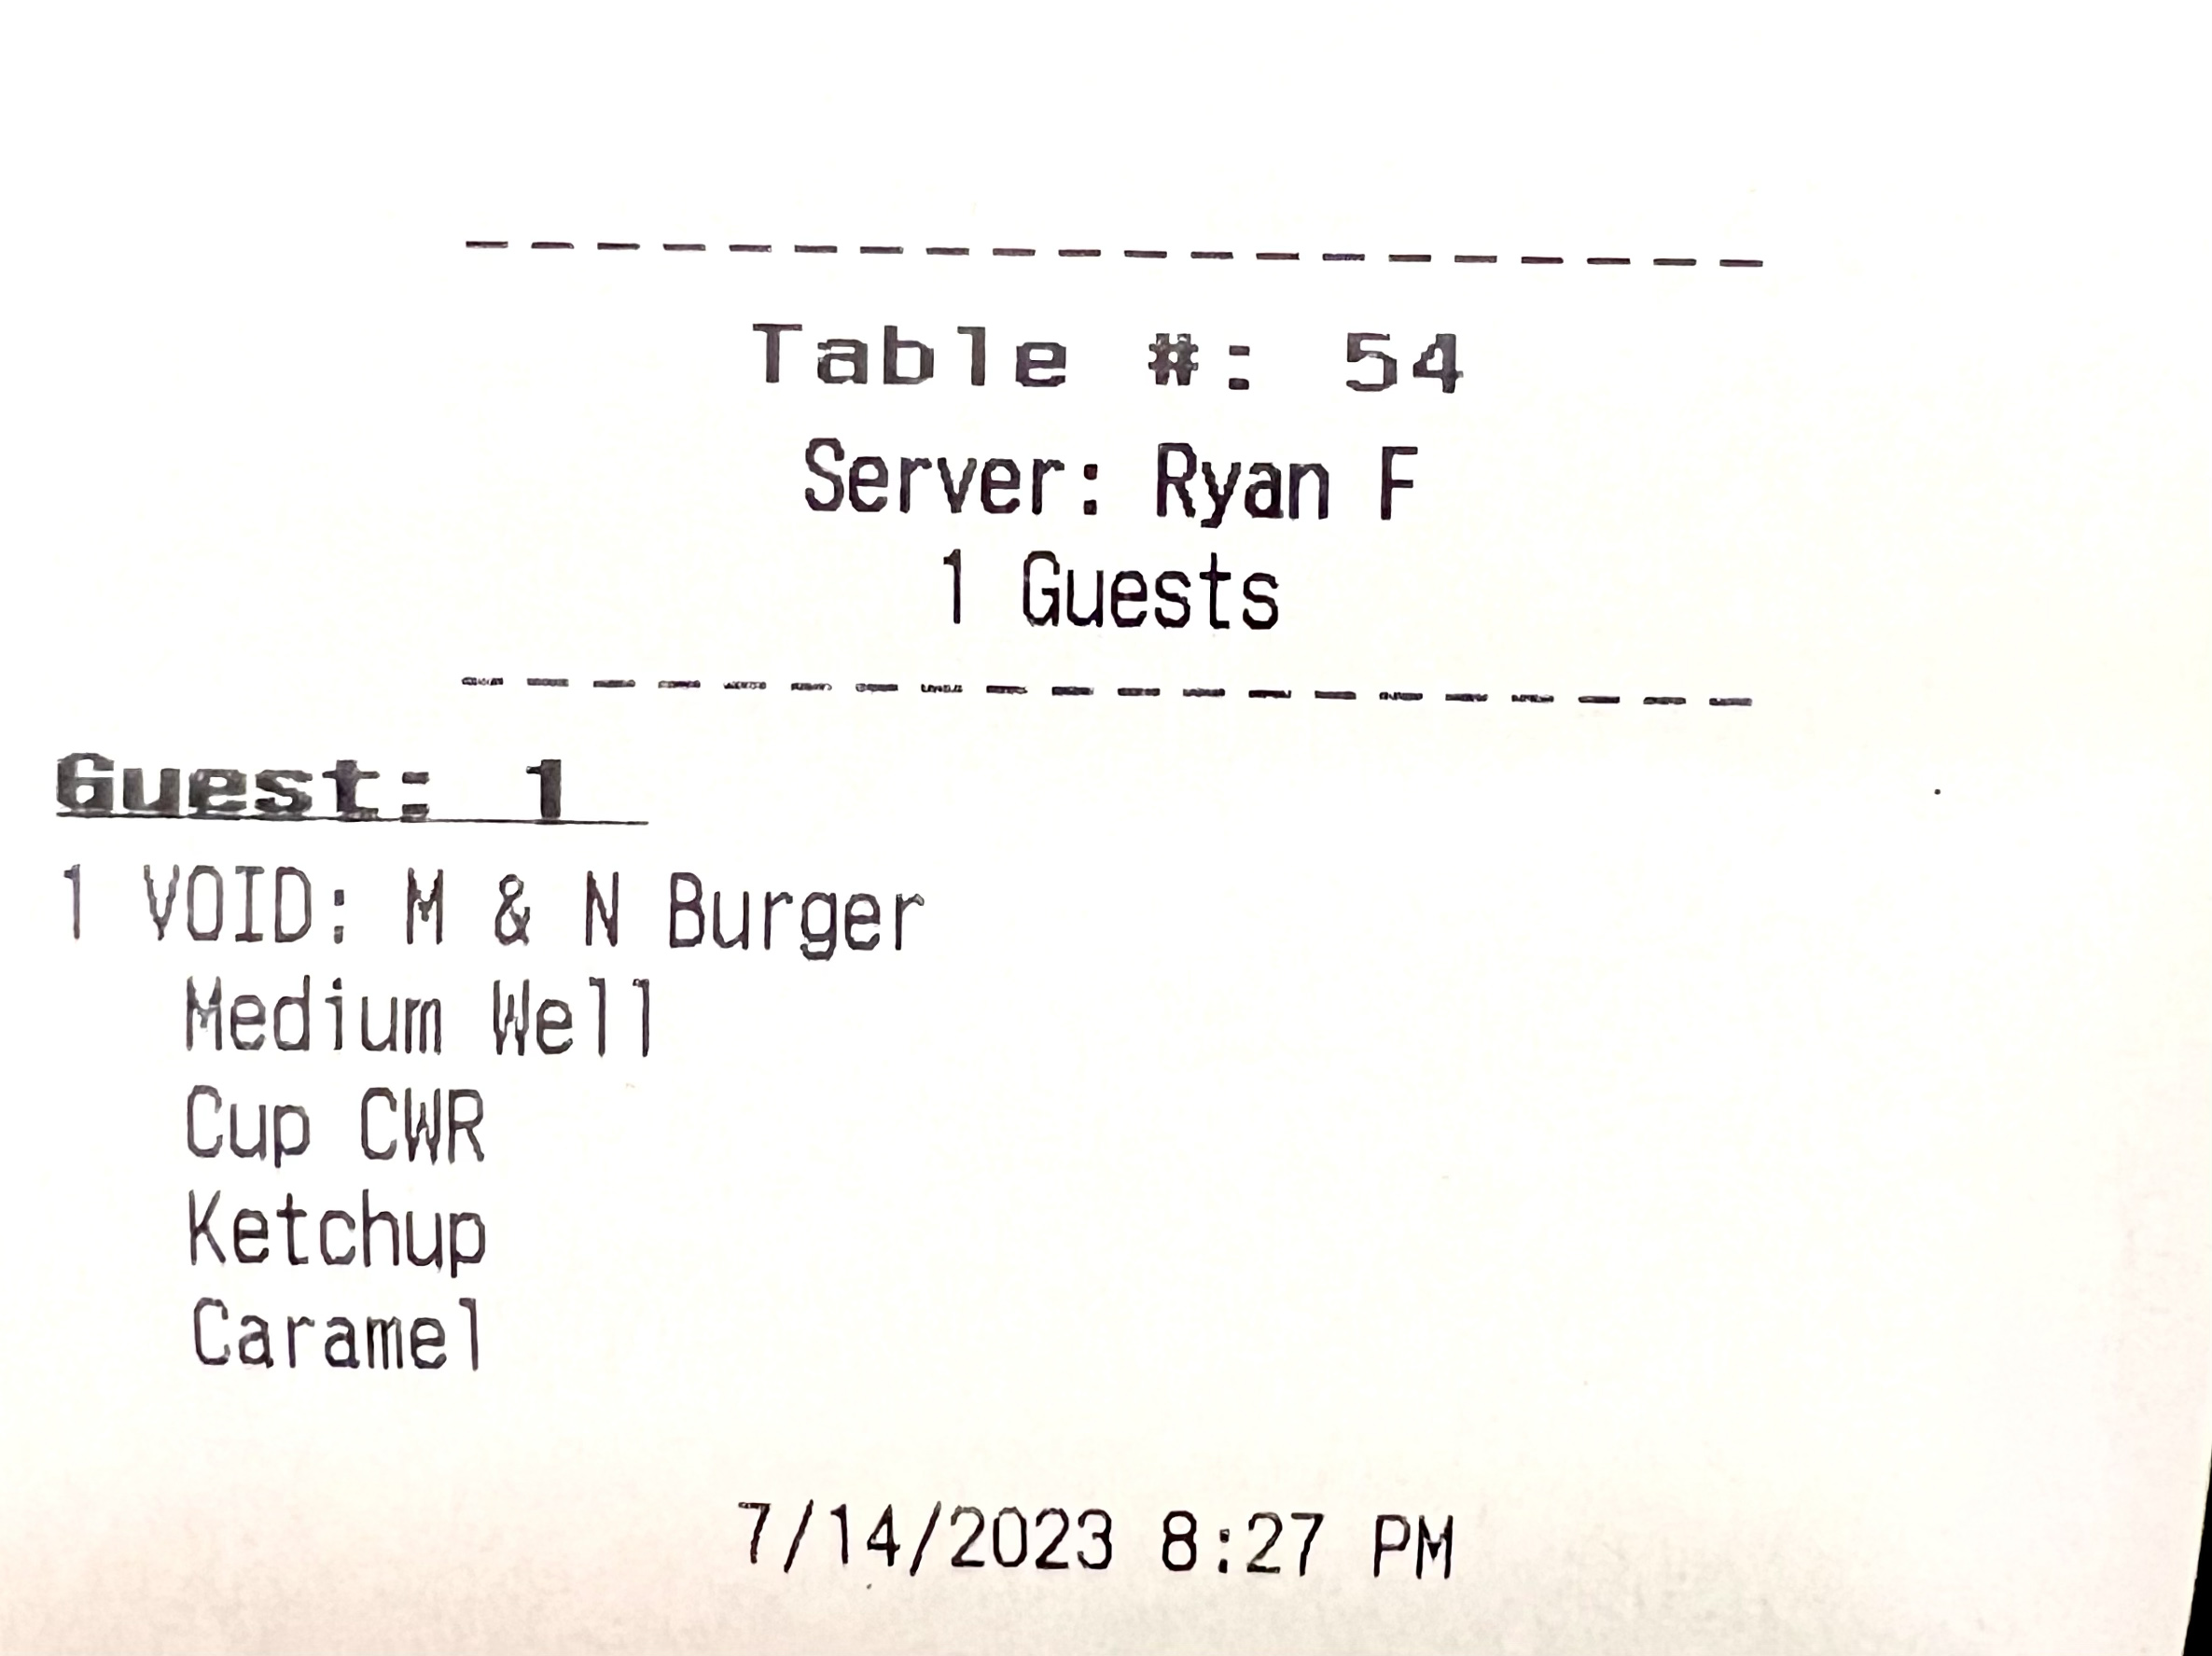
Kitchen/Bar tickets: When you void an item, you can now have it print to the kitchen or bar
- When selected voided items will be send to this printer prefaced with "VOID" before the item name.
- To set this up, please read next section
- Here is an example of it on a kitchen ticket
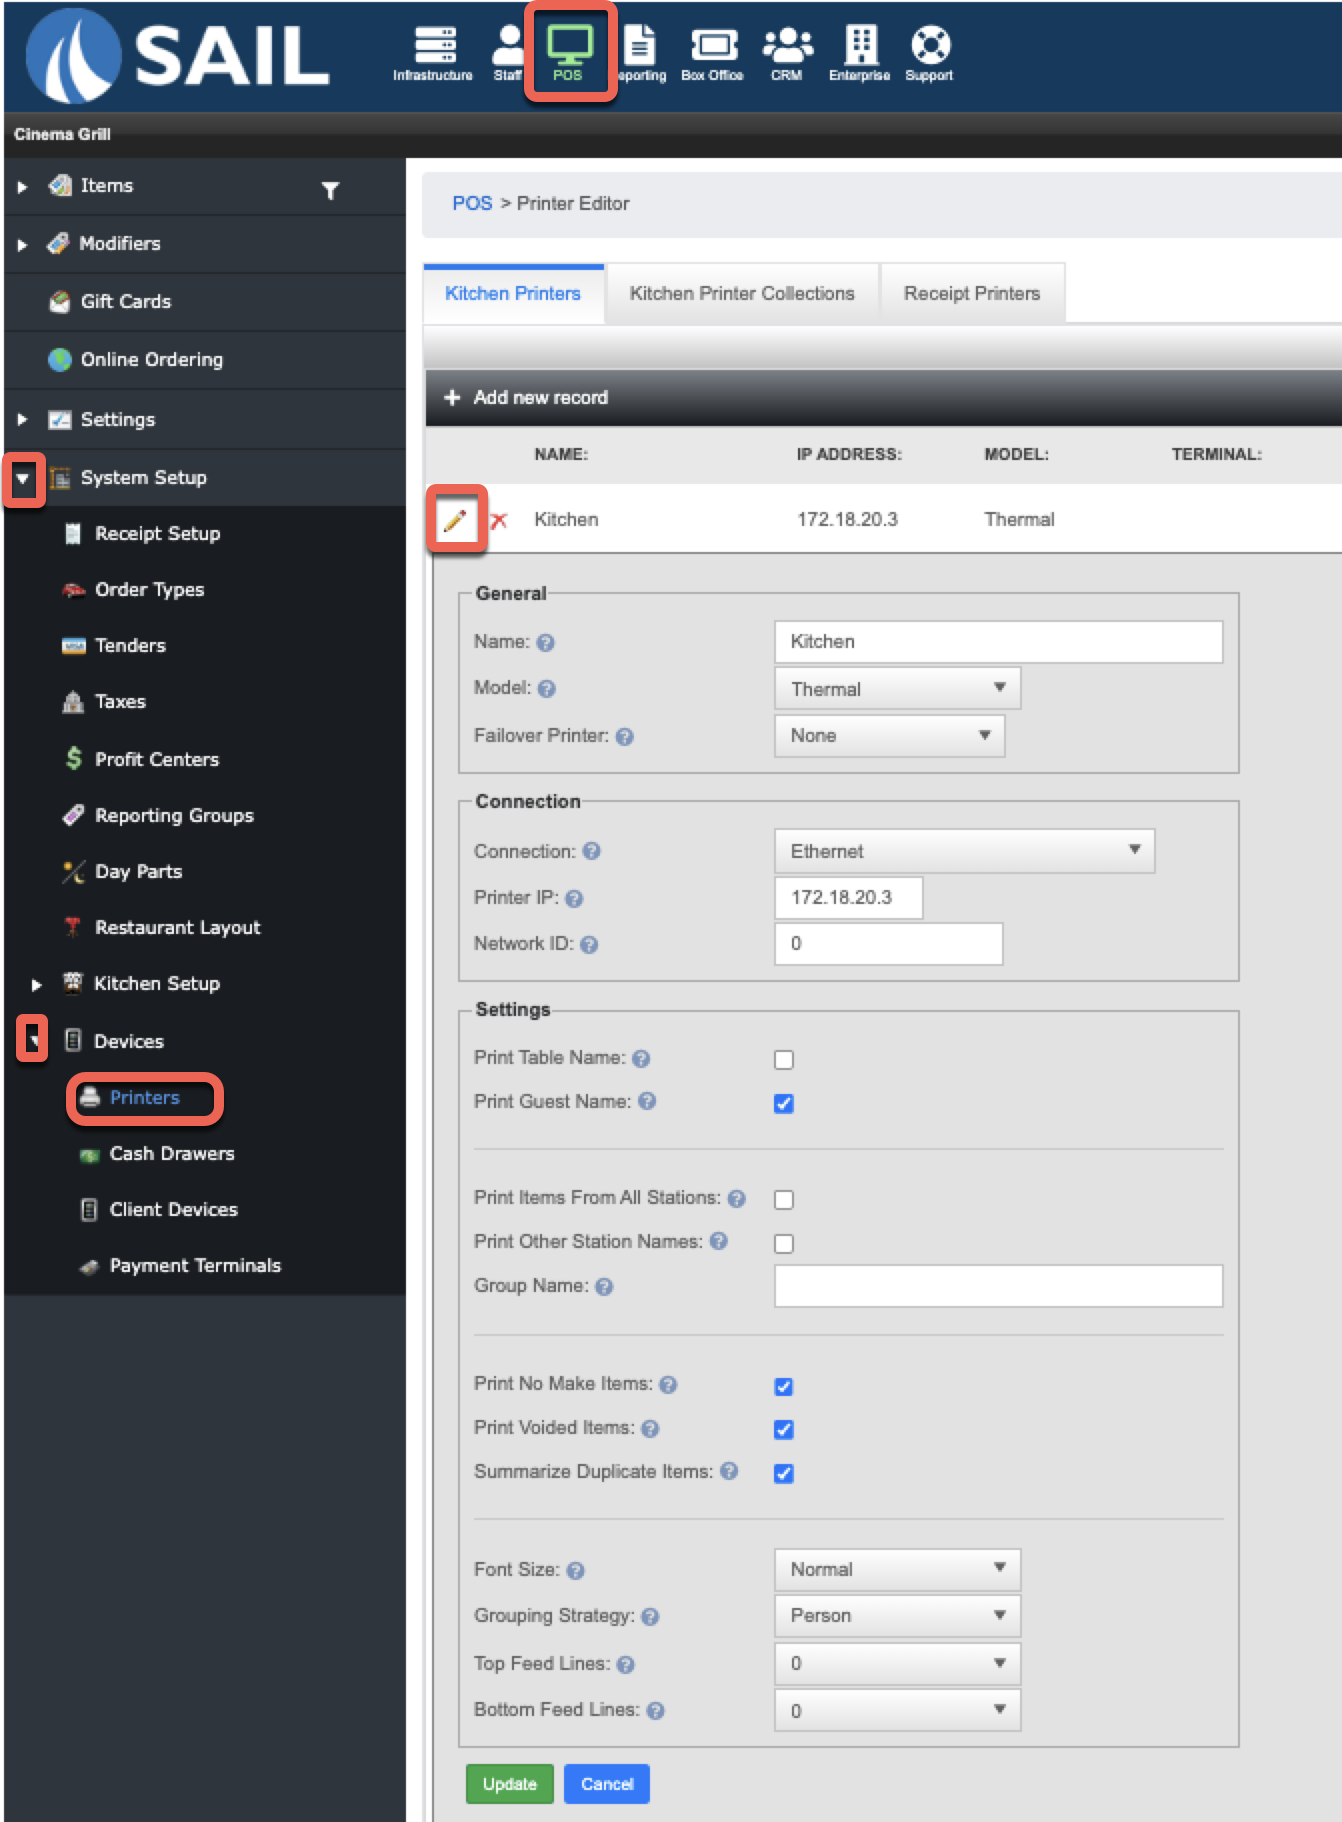
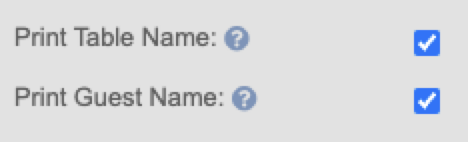
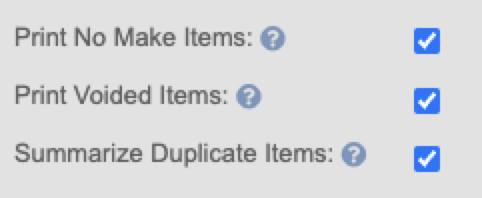
Kitchen/Bar tickets: You can now make more specific adjustments to your kitchen and bar printers individually
- Here is how to get to your printer settings:

- Here are the new/improved setting options

- Print Table Name: When selected the table name will be printed on the ticket (in addition to the table name)
- Print Guest Name: When selected the guest name will be printed (in addition to the seat number - this only applies with the "person" grouping strategy)

- Print No Make Items: When "No Make" is selected on an item the ticket will be sent to the kitchen, prefaced with "No Make" before the item name
- Print Voided Items: When selected voided items will be send to this printer prefaced with "VOID" before the item name (see photo above)
- Summarize Duplicate items: When selected exact like items will be summed up and a quantity shown
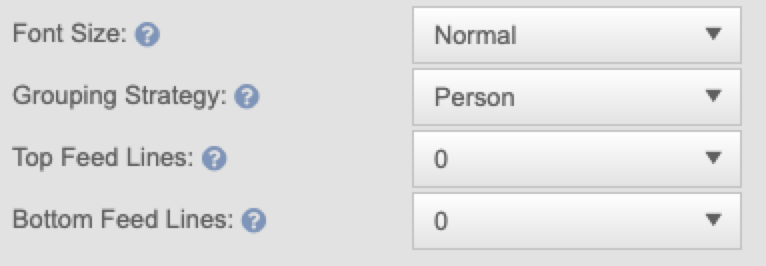
- Font size: This will override the default print size for this printer. (This allows you to change the printer size for each individual printer. So you can have the kitchen tickets be normal and the bar tickets be big.)
- Grouping Strategy: This will allow you to select the grouping strategy for each individual printer. So the kitchen tickets could print per person and the bar tickets can have no grouping.
- Top/bottom feed lines: This allows you to add additional spacing on the feed at the top or bottom of the tickets to accommodate ticket bars

Bug Fixes
General: Go Fish was loading receipts slowly - This has been sped up.
No Comments