
Release 2022.10.2 "Alligator"
This release focused on being able to multi select from the order screen and some reorganization and additional buttons.
Launch Buttons
We have added the launch buttons to the top right corner. This is helpful to quickly get to different areas of the system without having to cancel out and go back to the launch screen.
-
If you are in the middle of an order and have not sent the items, it will give you a pop up to ask if you are sure you want to navigate away from the order. If you click No it will keep you on this screen and allow you to send the order. If you hit Yes, it will delete the order you have rang in and navigate you out of that screen.
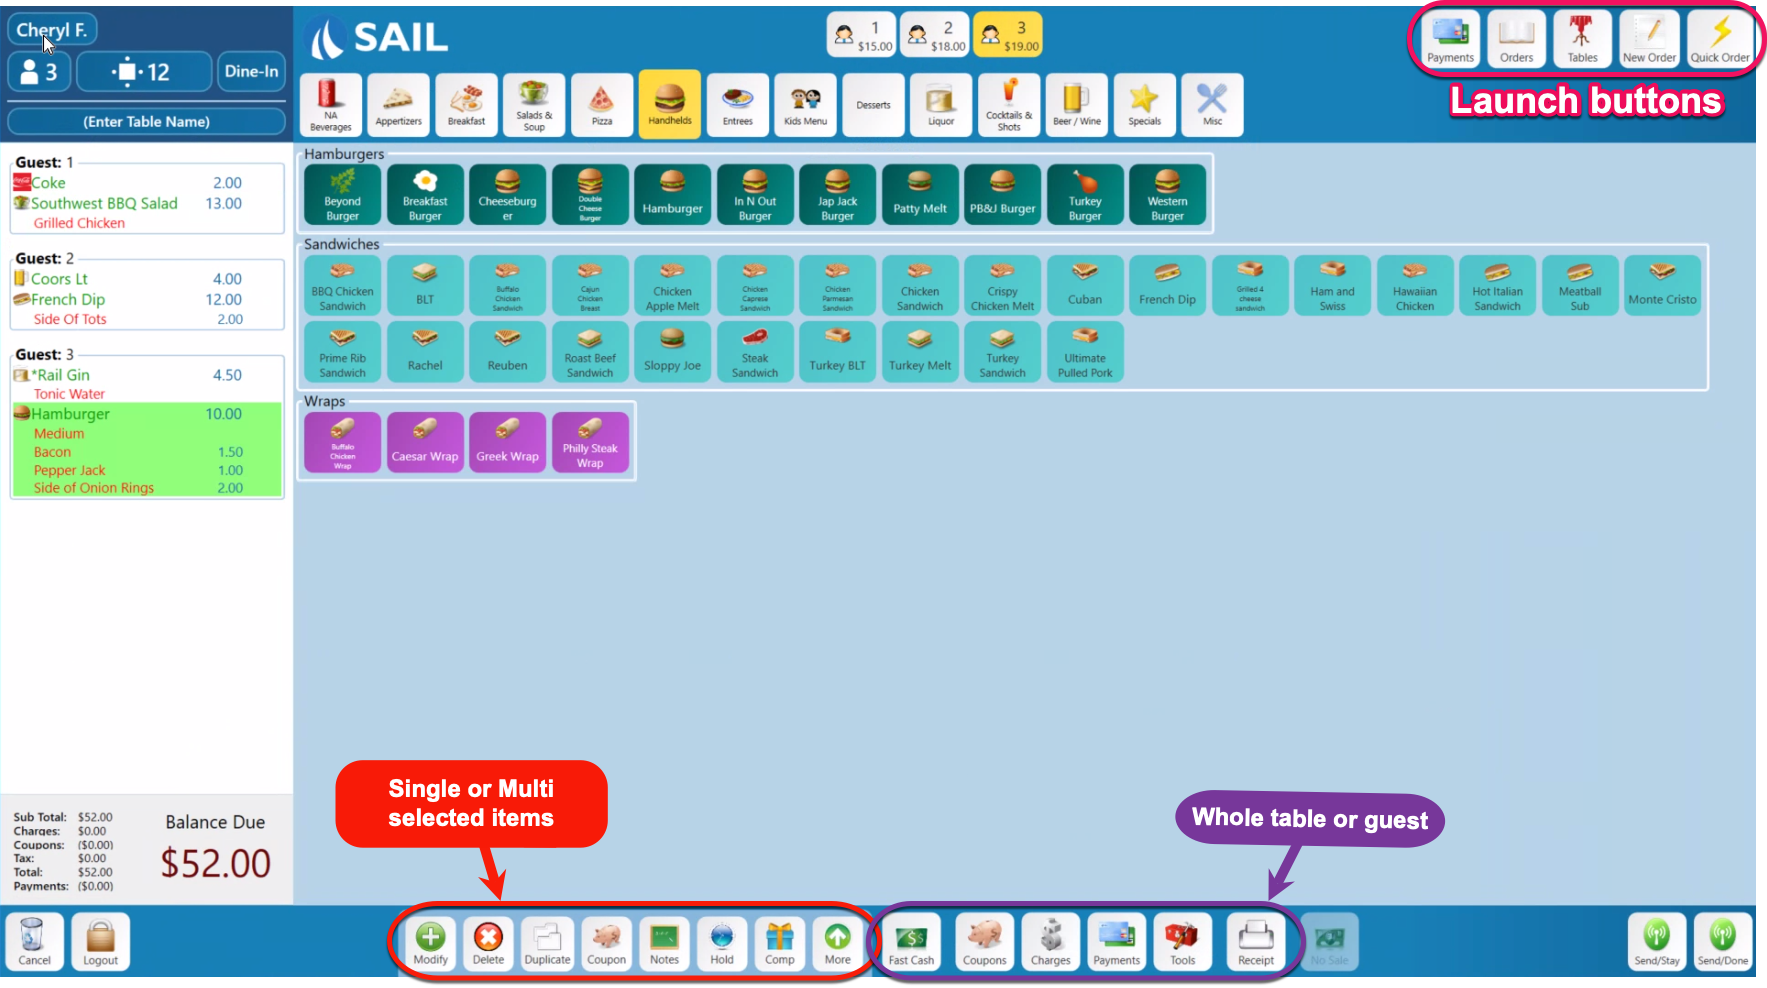
Bottom toolbar buttons
Multi Select

|
|
|
|
To deselect all the selected items, just press one time in the bottom grey box where the price is located. This will also work to select ALL of the items. |
To select or deselect all of the items on one guest, just click the “Guest: 1” above the item.
|

Multi/Single Select Buttons

-
“Modify” – Can only be used with 1 selected item. This will bring you into the modifier screen.
-
This button used to be called Quick Mod.
-
This is now the only way to get to the standard modifying screen.
-
-
“Void/Delete” – Select as many items as you’d like. If an item has not been sent, this button will say “Delete.” Once it has been sent, it will change to “Void,” and you will need to select the void reason from the list. The same reason will be applied to all. If you need to use a different reason, you will need to void them individually. If you do not have rights to void an item, it will be greyed out.
-
If you select 1 item that has been sent and 1 item that has not been sent, this button will say “Delete/void” which means it will prompt you for a reason to void the item, but will only record it as a void for the item that has already been sent, and will just delete the item that has not been sent.
-
-
“Duplicate” – Select as many items as you’d like, click Duplicate, and it will duplicate all of the selected items and keep it on the correct guest. (This works great for duplicating another round for a group of customers.)
-
“Coupon” – Select as many items as you’d like to apply an individual coupon to.
-
Please keep in mind that this button should only be used to coupon an individual item. (if you’d like to coupon the entire guest or entire table, you need to use the Coupons button on the right side)
-
-
“Notes” – Select as many items as you’d like to apply the same message to.
-
“Re-fire/Hold/Fire” - Select as many items as you’d like to Hold/Fire at once.
-
If an item has not been sent, this button will say “Hold.”
-
If there are items on hold, once you select them it will say “Fire.”
-
Once it has been sent to the kitchen, it will change to “Re-fire.”
-
You can not select 1 item to hold and 1 item to fire at the same time.
-
-
“Comp” - Select as many items as you’d like to apply the same comp reason to. If you need to use a different reason, you will need to comp them individually. If you don’t have rights to comp an item, it will be greyed out.
-
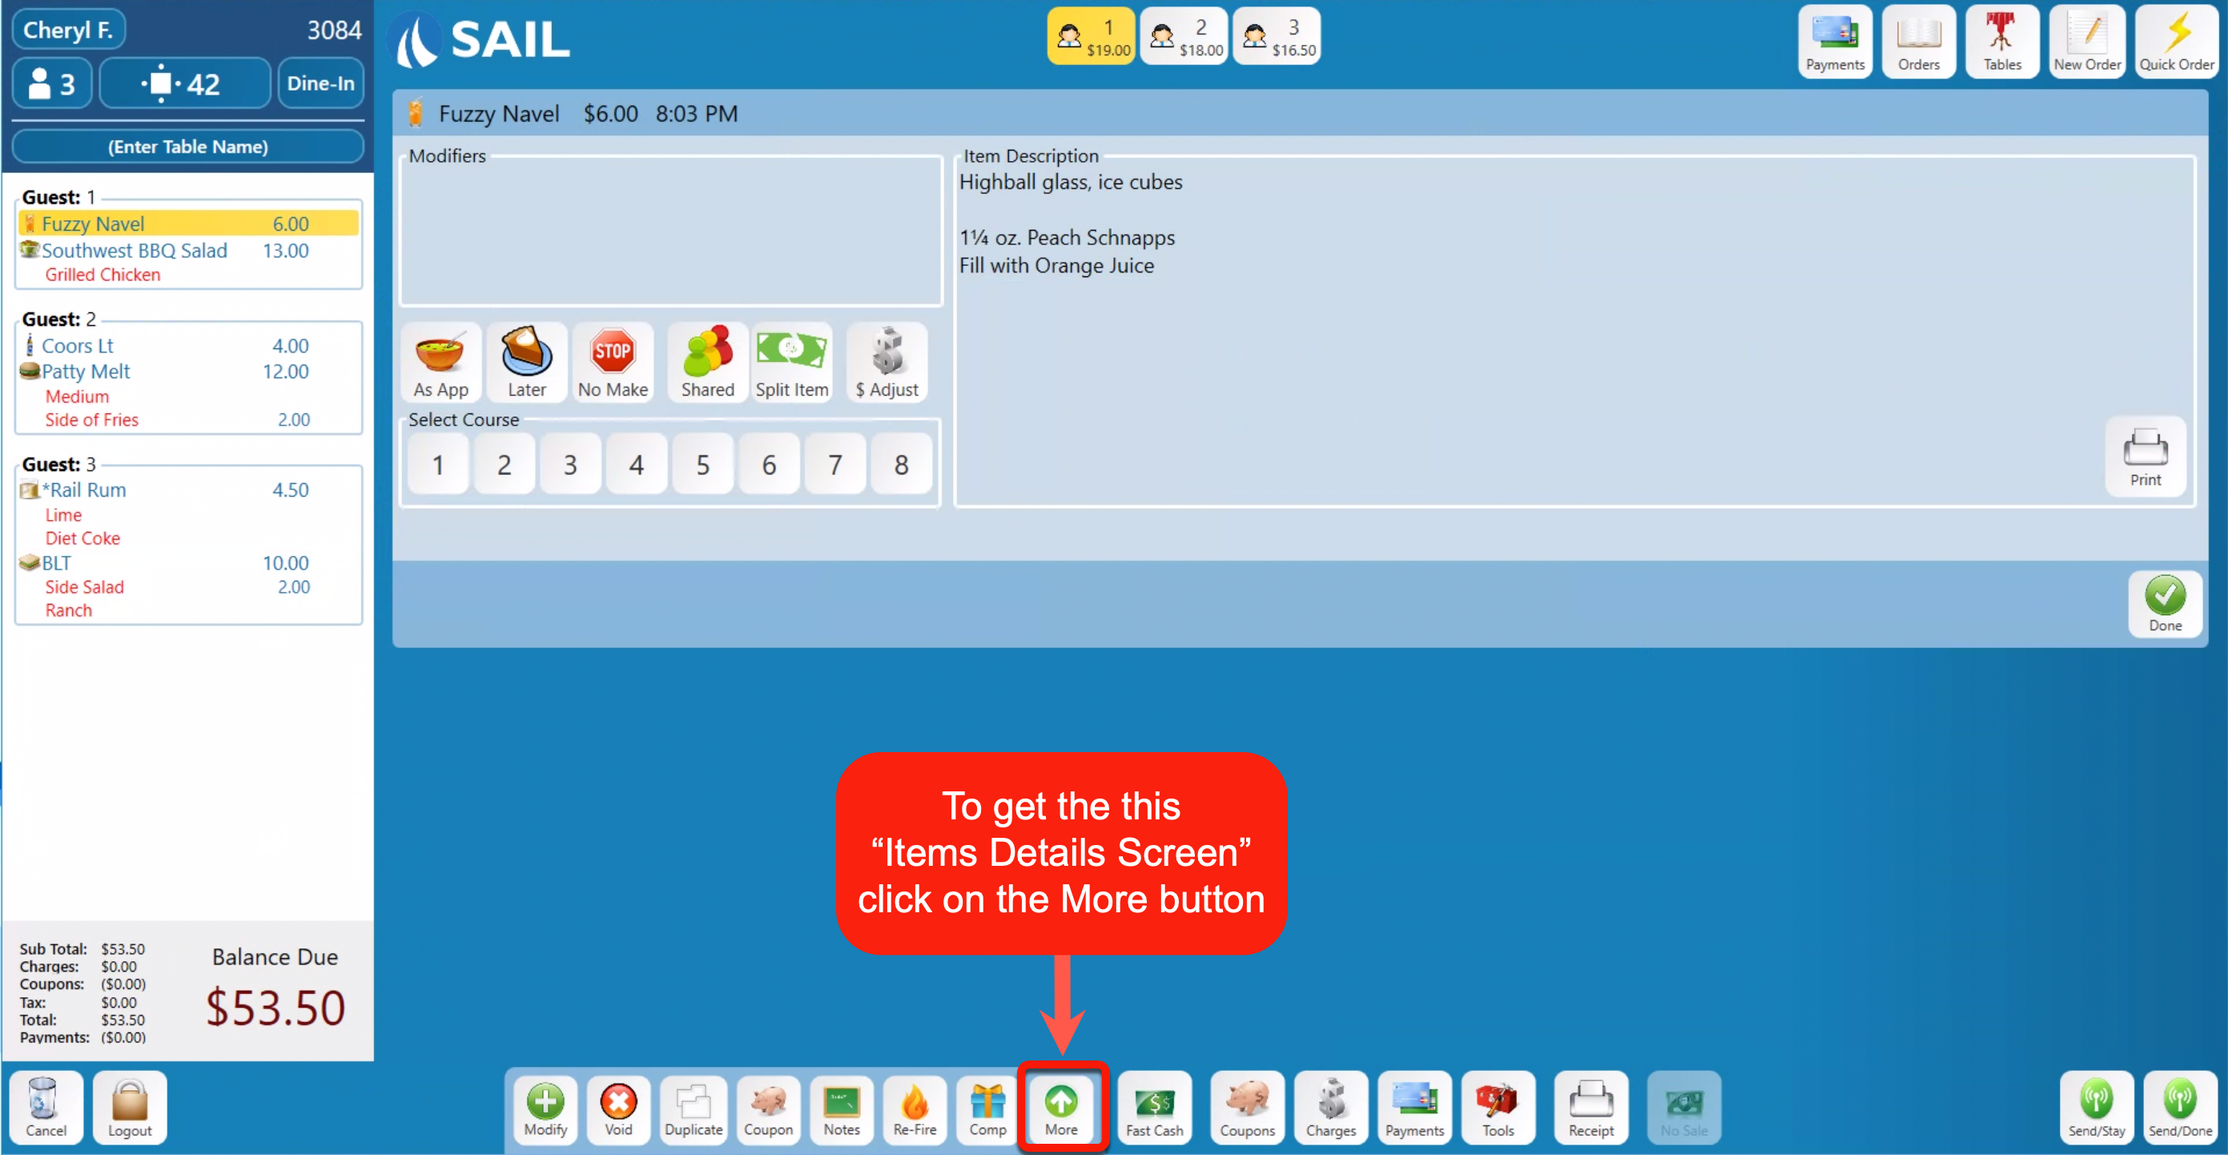
“More” – Can only be used with 1 selected item. This will bring you into the Item Details screen. (See details below about the items details screen.)
Items Details Screen
-
To get to this screen, select an item, and click “More” on the bottom left toolbar.
-
If the item is the last item you rang in, it is already selected in green and you don’t need to touch it before pressing the More button.
-
-
5 of the buttons that used to be on this screen have moved to the bottom left toolbar for quicker access.
-
If you select, “As App,” “Later,” “No Make,” “Shared,” or “Price Adjust,” it will automatically exit once done. You will not need to press the done button.
-
If you select “Split Item,” you will need to select done when finished to exit this screen.
-
If the menu item has a modifier on it, you can click on it from the modifiers section to delete it.
-
If there is something listed in the Item description section, you can selected ”Print” in the bottom right corner of that box, and it will print the description. It will also leave you on this screen incase you need to perform another function. You will need to select done to exit this screen.
-
Item Description is most often used for drink recipes, so a bartender can print off the recipe and go to the rail to make it.
-
This section is also sometime used to put the menu item ingredients in, so that staff can see what is in the item quickly if a customer asks.
-
1 other suggestion is to list allergies that are in this menu item.
-
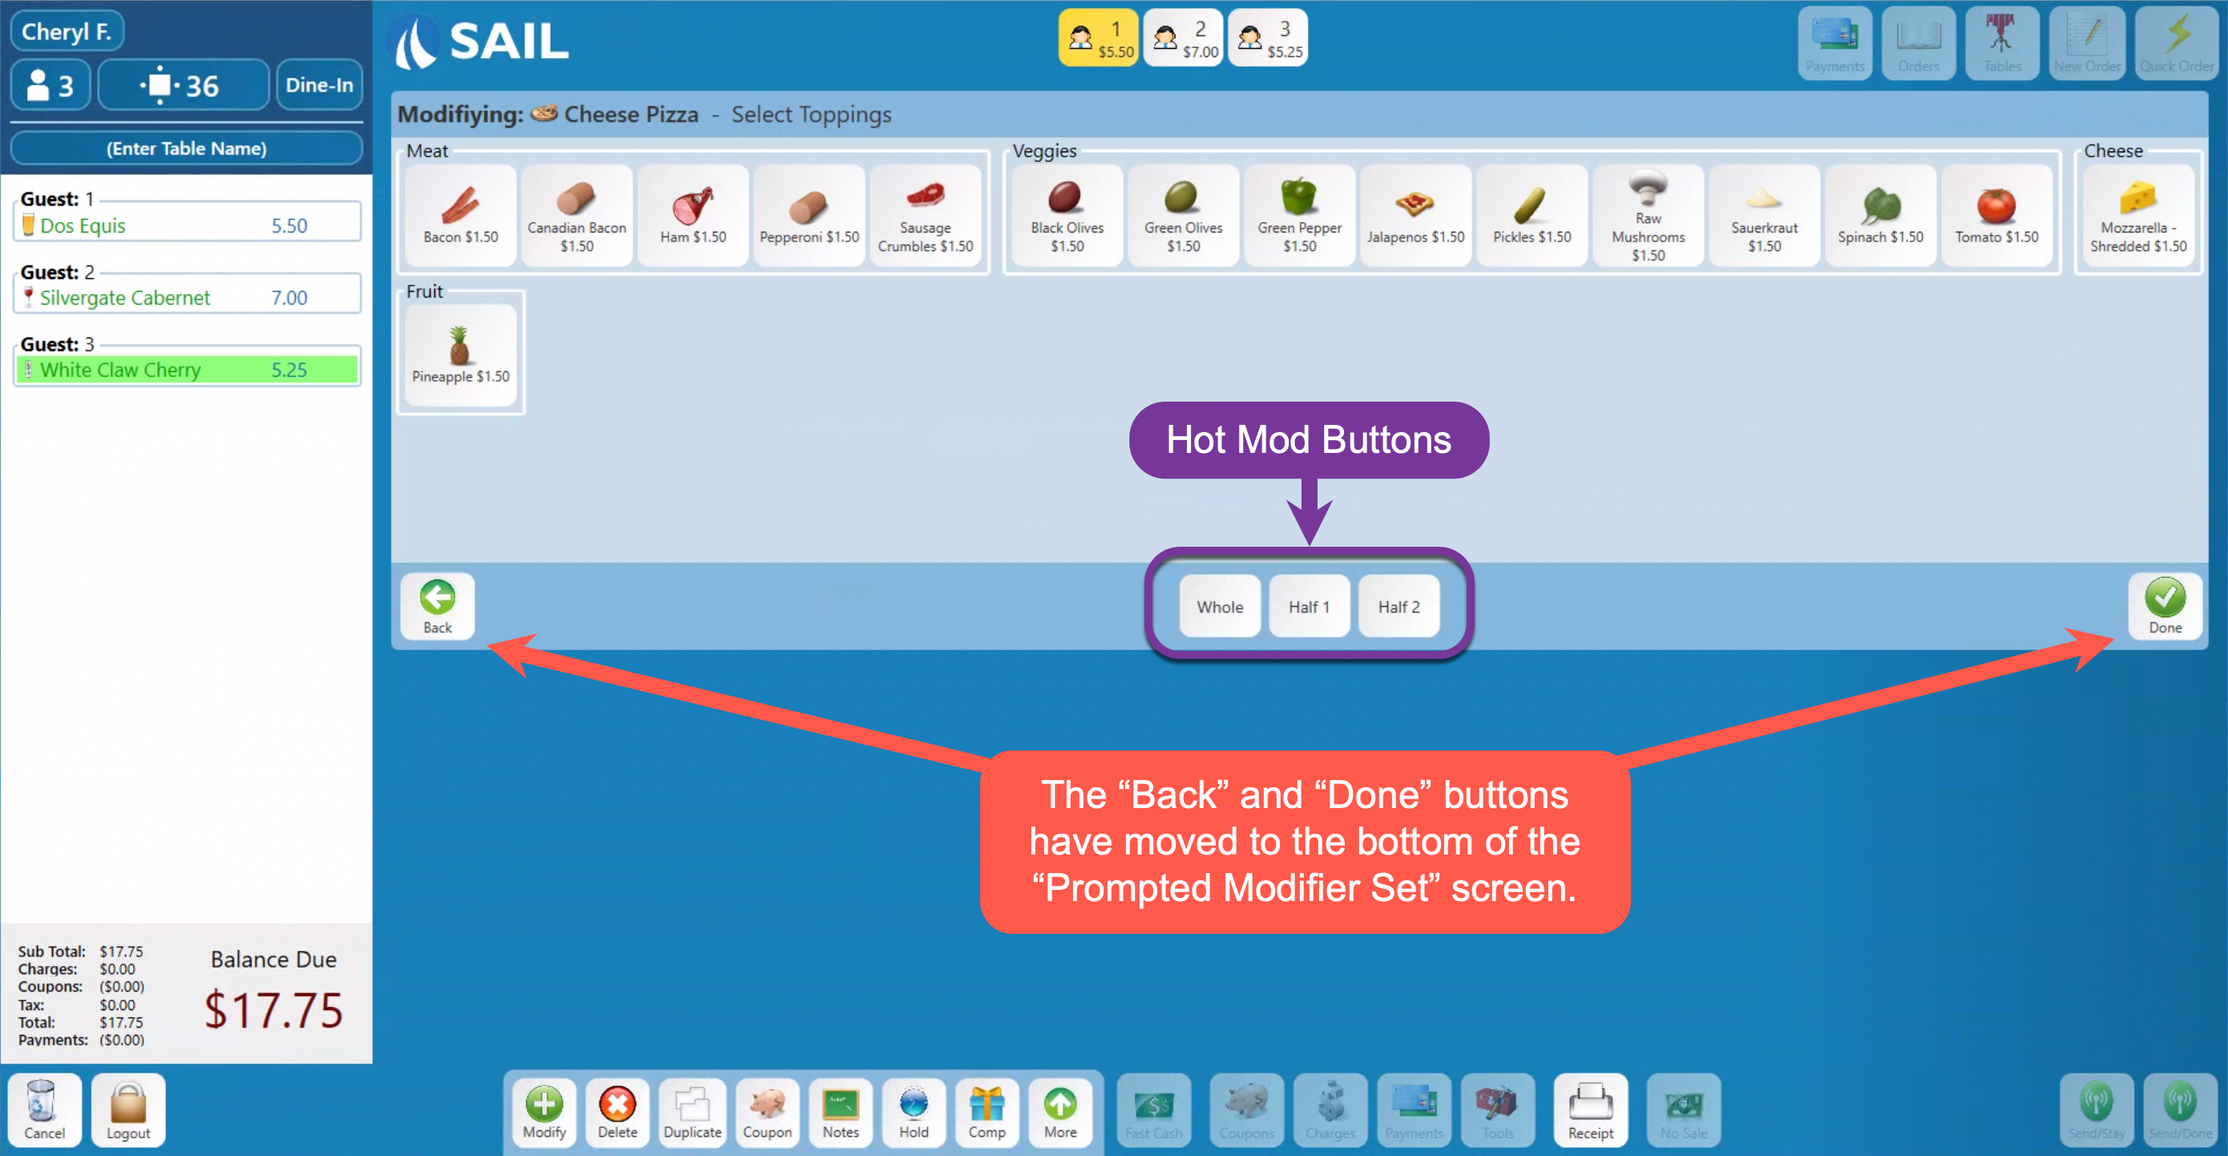
Prompted Modifier Set
-
The promoted modifier set screen has changed just a little bit. Because we added the launch buttons to the top right, we needed to move the done and back button. They are now located in the middle of the screen.
-
If your prompted modifier set was not just a simple toggle on/off type. Then the Hot Mod Buttons will also appear in the bottom section to make it easier to select.
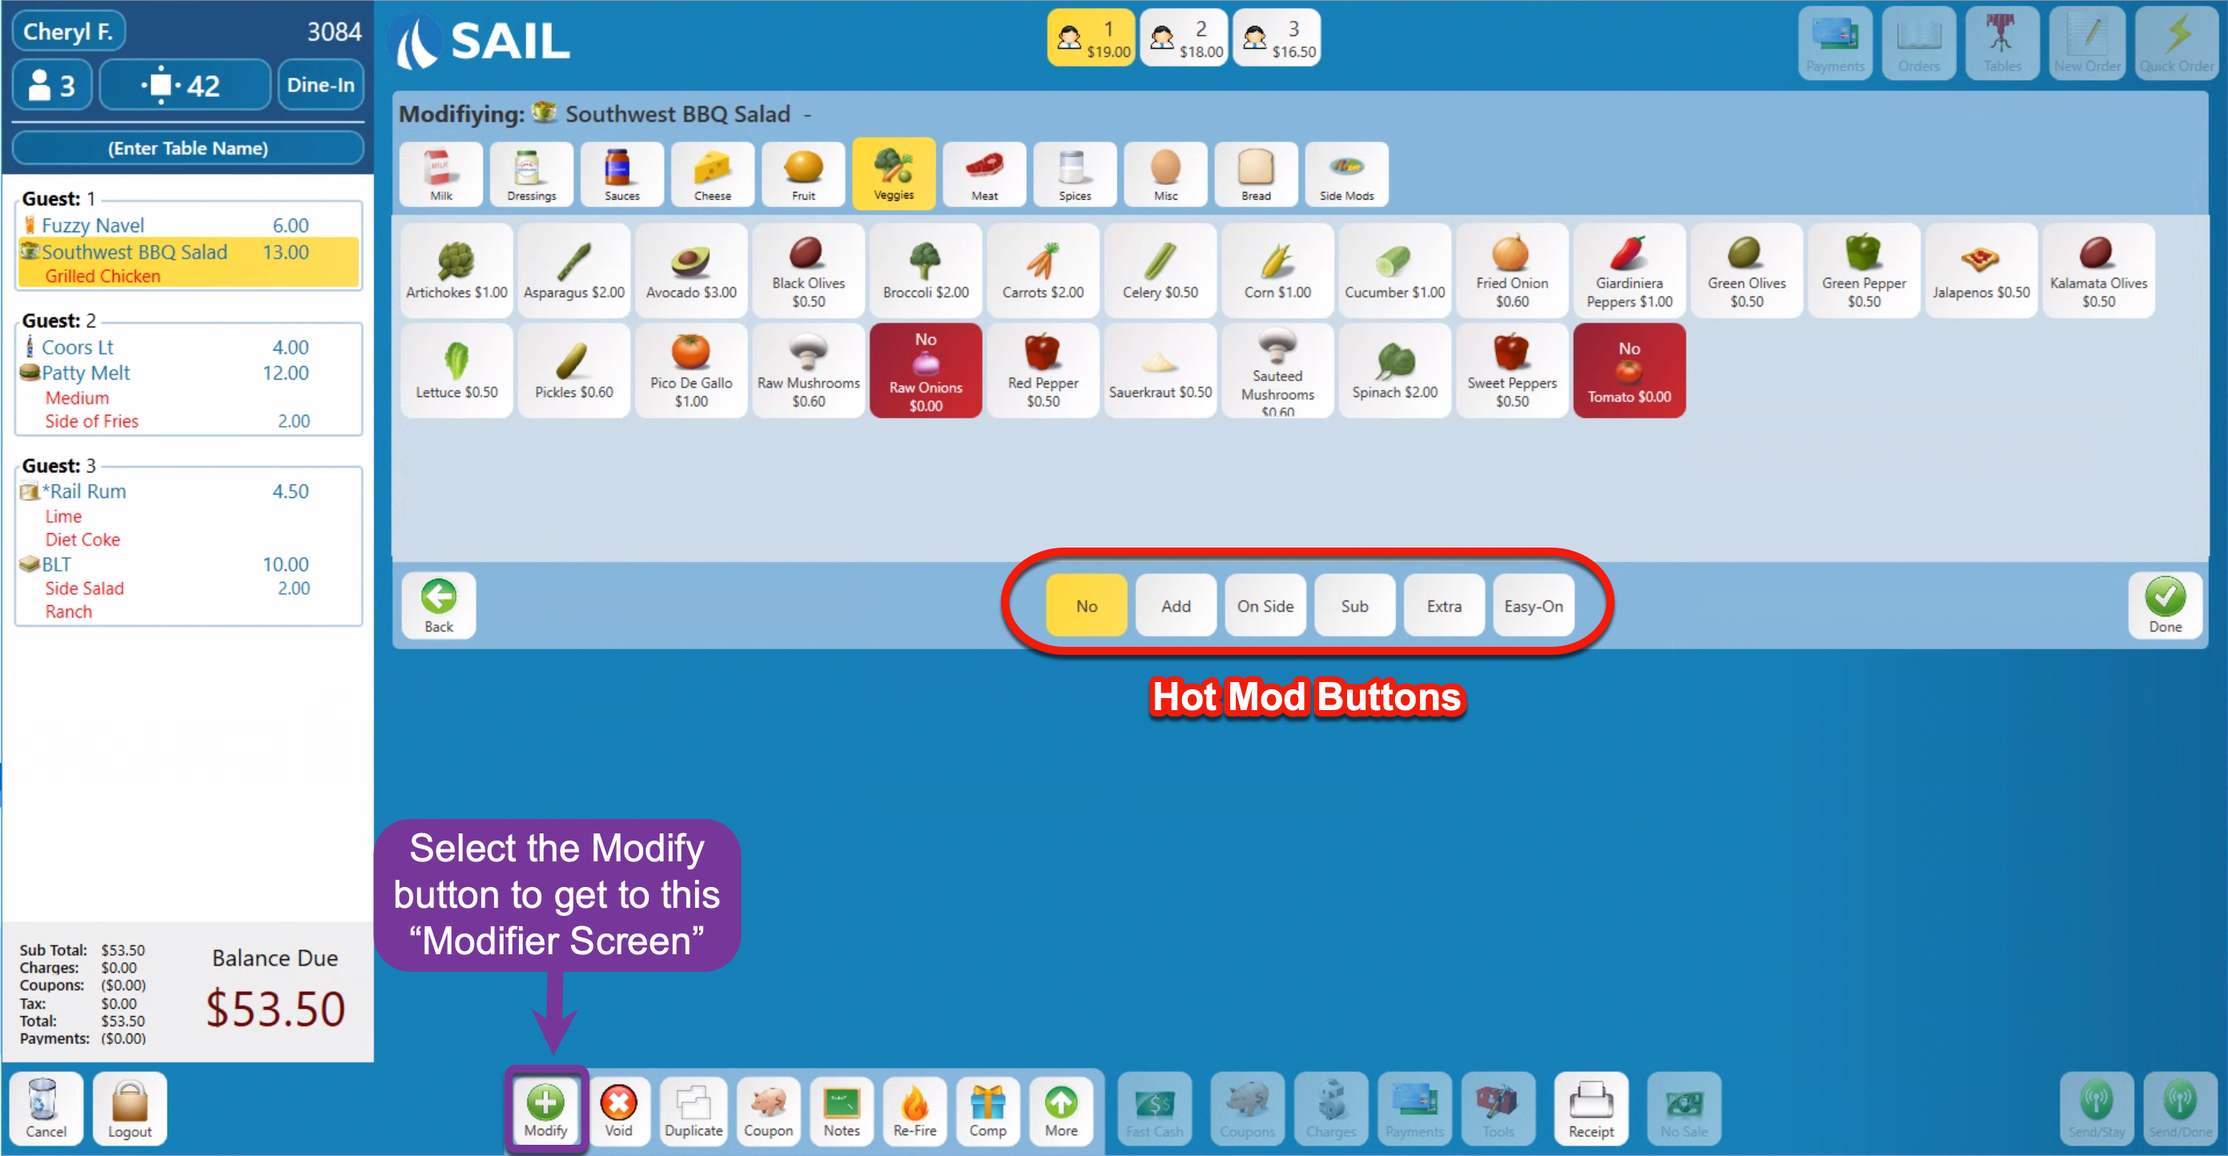
Modifier Screen
-
To get to the modifier screen, select the “Modify” button on the very left of the tool bar
-
If it's the last item you rang in and selected in green, you do not need to touch the item.
-
If not, then you will need to make sure its selected in yellow, and then hit the Modify button.
-
-
We have added the Hot Mod Buttons to the middle toolbar to speed up modifying an item
-
(Clicking on the ingredient to go through the list is still an option, if you want.)
-
-
All you need to do is click on the quick button, “No,” then click on the ingredient.
-
If you selected an ingredient by mistake, just click on the ingredient again and it will unselect it. If you clicked on the wrong Hot Mod Button, just select the correct Hot Mod Button and then select the ingredient again.
-
-
Once a Hot Mod Button is selected, like “No,” you can click on multiple ingredients without needing to keep selecting the same Hot Mod Button. You can even go to different categories and the “No” will still stay selected.
-
In this example: I selected “No,” then selected “Tomato” and “Raw Onion.” Now if I needed, I could go to the Cheese category and select “Shredded Cheese” without having to select “No” again!
-
Did you know?!?!?! 

There are a couple places in the system that you can press and hold to perform a function
-
If you’d like to ring in multiple of the same item, you can press and hold the menu item, and a number pad will pop up and you can select the quantity you’d like.
-
This is helpful when you need to ring in grape ape 6 shots
-
-
If you press and hold the “Receipts” button the 4 different print options will come up so you don’t need to go into the tools button
-
If you would like to get manager access without having to log out employee and log the manager in, press and hold the “Log Out” button, a number pad will pop up to type in your manager number. Then a red bar will appear at the bottom saying “Servers name (with privileges of manager name)” Then the manager can perform the function they need to. When they are done press the “Log Out” button again and it will log the manager out, and leave the server logged in.
-
If you’d like to attach a name to an individual guest, in the top middle where the guests buttons are located, press and hold one of them, the keyboard will come up for you to type in the name.
No Comments