
Functions Screen
This will detail the Functions screen.
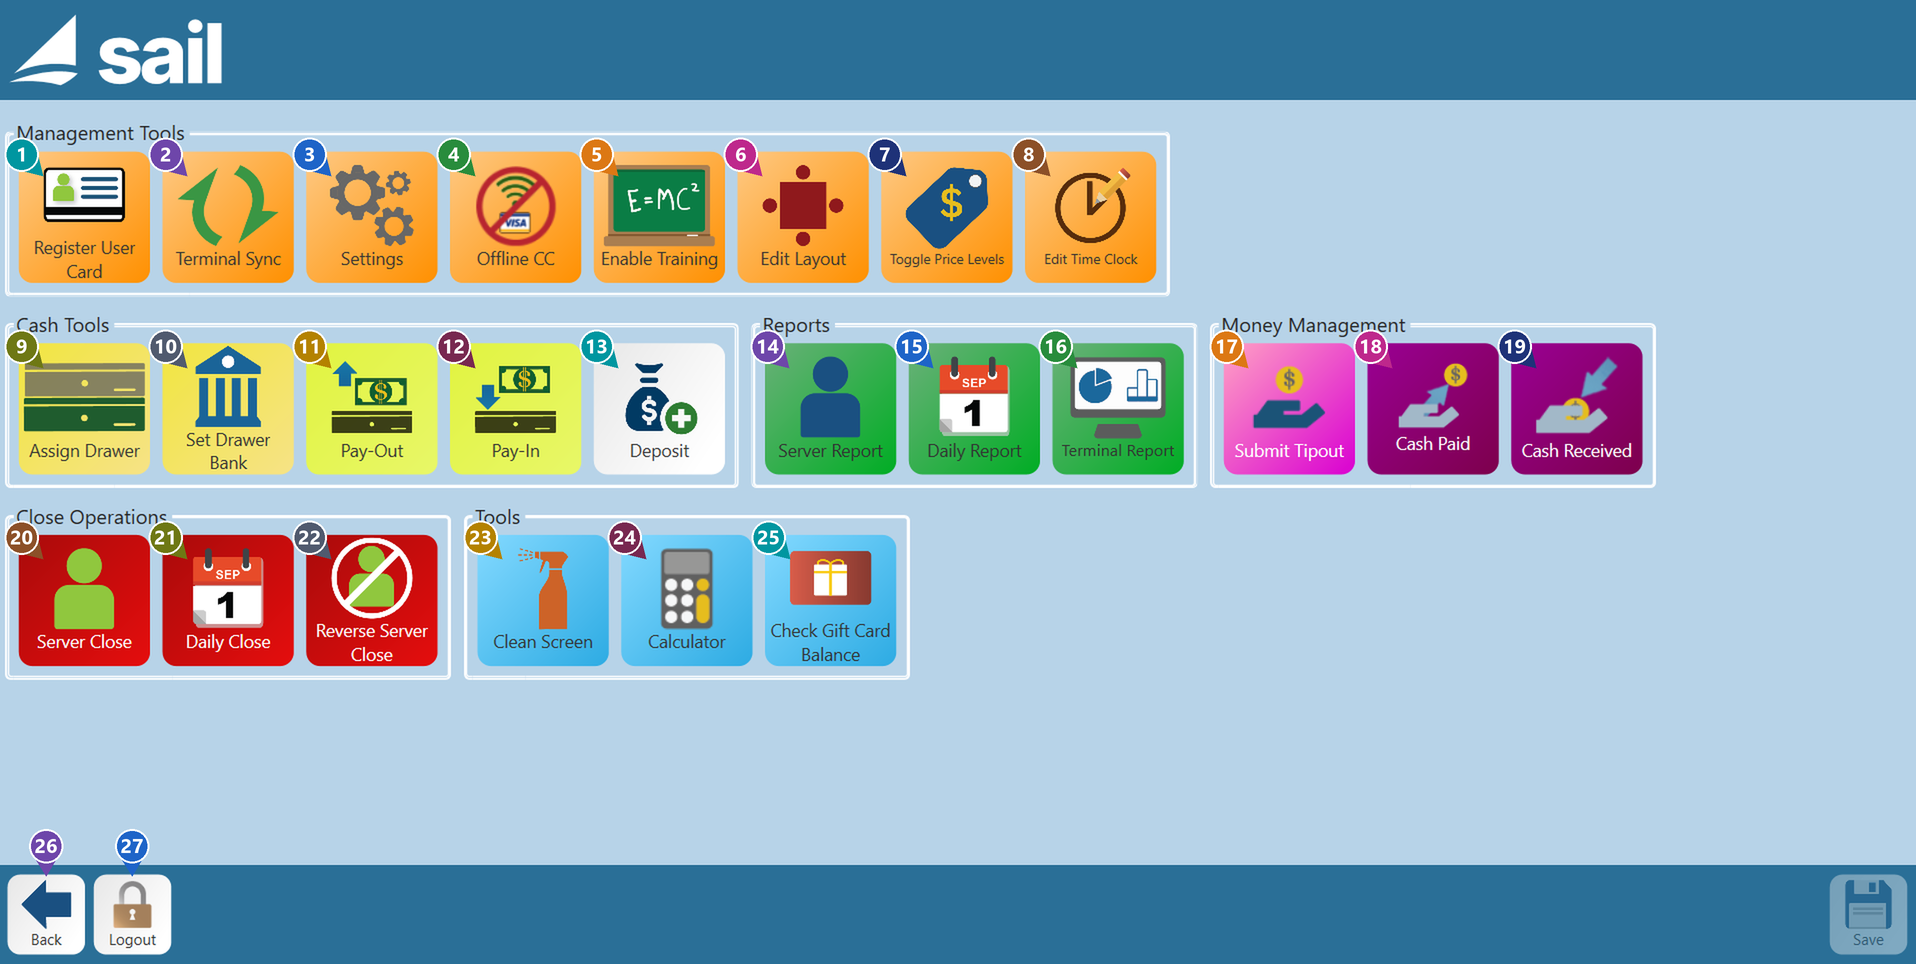
Many of these options are only available to a user with the rights to use the options.
1. Register User Card - This registers a log in card for a user.
2. Terminal Sync - Will pull things from the Backoffice and sync it down to the terminal. It doesn't need to be done very often, just if someone seems to be out of sync with what is in Backoffice. But any Backoffice changes usually sync when you log out and back in. This is only used as a backup if that doesn't work. (This button used to be called Refresh Cache.)
3. Settings - This is where you set peripheral connections for the terminal. If you want a cash drawer, card reader, or a receipt printer connected to the terminal the settings to add them will be found here.
4. Offline CC - Turns on Credit Card Offline Mode, so the terminal can keep taking credit cards during an internet outage. The cards are sent for approval once the connection is back.

5. Enable Training - This will disable printing in the kitchen, payments, and reporting so that you can use the terminal to teach without sending anything into the system.

6. Edit Layout - Set up or re-arrange your rooms: add, rename and delete sections, add, move, size and number the tables, and draw walls, labels and other shapes on the floor plan.

7. Toggle Price Levels - This will allow you to manually activate and deactivate any specials that have the option to be turned on manually.
8. Edit Time Clock - This will let you fix an employee's time clock for any day, from the terminal: change a clock in, clock out or job role, add a forgotten shift, clear a shift and fix breaks.
9. Assign Drawer - Assign a drawer to a bartender so no one else has access to open it. (Expect a manager with rights)
10. Set Drawer Bank - Set the amount of starting money in the drawer bank. This is usually used in conjunction with "Terminal Report".
11. Pay-Out - Takes cash out of the drawer to pay for something, like supplies or a delivery, with a note saying what it was for.
12. Pay-In - Puts cash into the drawer that didn't come from a sale, with a note saying what it was for.
13. Deposit - Records tonight's cash deposit, the cash taken to the bank, so the daily report shows whether it is over or short. Recording deposits is optional.

14. Server Report - This will print the server report for the user logged in. Or if you have rights it will allow you to print a server report for whichever server you choose from the list.

15. Daily Report - Print the daily (current sales) report for your store.
16. Terminal Report - This will print the terminal report. The terminal report uses the set bank the amount entered in "Set Bank" to determine what the starting cash value in the drawer was. This will effect the amount owed by the terminal at the end of the shift/day.

17. Submit Tipout - This will allow you to send a portion of your tips to another employee.
18. Cash Paid - Records cash you hand to another employee during the day, so it shows on both of your reports.
19. Cash Received - Records cash another employee hands to you during the day, so it shows on both of your reports.

20. Server Close - This will close the server out for the day.

21. Daily Close - This will close the business for the day. And batch the credit cards. This can NOT be undone
22. Reverse Server Close - This will allow you to re-open a server after they have been closed out.

23. Clean Screen - Use this to turn off the touch interface for the screen for 30 second to clean the screen without pressing any buttons.
24. Calculator - Opens a calculator.

25. Check Gift Card Balance - Check the total amount of money on a gift card.

26. Back - Returns you to the Launch screen.

27. Log Out - This will log you out of the terminal. Alternatively it can be used to activate manager rights.
No Comments